AUDIO / VIDEO CONTROL PANEL REMOVAL
CAUTION / NOTICE / HINT
- CAUTION:
- ·
Working on 12 V vehicle electrical system.
Risk of short circuits! Risk of fire!
-Detach battery earth lead from battery.
- NOTICE:
- ·
Before performing work on electronic components, disconnect the cable from the negative (-) battery terminal to prevent damage to the electrical system or components.
·When disconnecting the cable, turn the START-STOP button (engine switch) and headlight switch off and loosen the cable nut completely. Perform these operations without twisting or prying on the cable. Then disconnect the cable.
·Clock settings, radio settings, audio system memory, DTCs and other data will be cleared when the cable is disconnected from the negative (-) battery terminal. Write down any necessary data before disconnecting the cable.
- HINT:
- ·
Use the same procedure for LHD and RHD vehicles.
·The procedure listed below is for the LHD vehicles.
PROCEDURE

 1.DISCONNECT CABLE FROM NEGATIVE BATTERY TERMINAL
B48 BATTERY
Click hereGeneral>MAINTENANCE>B48 BATTERY>REMOVAL
B58 BATTERY
Click hereGeneral>MAINTENANCE>B58 BATTERY>REMOVAL
2.REMOVE FRONT CONSOLE ARMREST ASSEMBLY
58822
3.REMOVE CONSOLE SIDE PANEL
58821A
4.REMOVE CONSOLE PANEL AND CONSOLE PANEL RETAINER
55432B
5.REMOVE INSTRUMENT PANEL FINISH LOWER PANEL
55317E
6.REMOVE NO. 1 INSTRUMENT SIDE PANEL
55011A
7.REMOVE NO. 1 INSTRUMENT PANEL GARNISH SUB-ASSEMBLY
86120A
8.REMOVE RADIO RECEIVER SWITCH KNOB
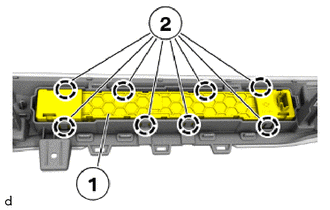
Detach the claws (2) to remove the radio receiver switch knob (1).