ENGINE ASSEMBLY > INSTALLATION |
| 1. INSTALL OIL LEVEL GAGE SUB-ASSEMBLY |
| 2. INSTALL SPARK PLUG |
| 3. INSTALL IGNITION COIL ASSEMBLY |
Install the 6 ignition coils with the 6 bolts.
Connect the 6 ignition coil connectors.
| 4. INSTALL OIL FILLER CAP HOUSING |
Install a new gasket and oil filler cap housing with the 2 nuts.
| 5. INSTALL OIL FILLER CAP SUB-ASSEMBLY |
| 6. INSTALL WATER BY-PASS JOINT RR |
|
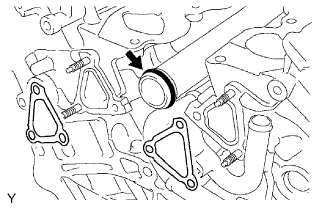
Install a new O-ring onto the water outlet pipe.
Apply soapy water to the O-ring.
Install 2 new gaskets and water by-pass joint rear with the 2 bolts and 4 nuts.
Connect the heater hose.
Connect the engine coolant temperature sensor connector.
| 7. INSTALL CAMSHAFT TIMING OIL CONTROL VALVE ASSEMBLY |
Install the 2 camshaft timing oil control valves with the 2 bolts.
Connect the 2 connectors.
| 8. INSTALL INTAKE MANIFOLD |
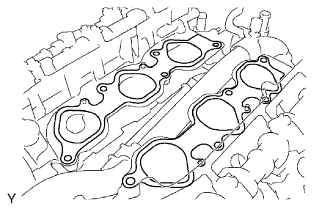 |
Set a new gasket on each cylinder head.
Set the intake manifold on the cylinder heads.
Install and tighten the 10 bolts uniformly in several steps.
Connect the 6 fuel injector connectors.
| 9. INSTALL OIL FILTER BRACKET SUB-ASSEMBLY |
Install a new gasket and oil filler bracket with the 3 bolts and 2 nuts.
| 10. INSTALL WATER INLET |
Install a new gasket onto the water inlet with thermostat.
Install the water inlet with thermostat with the 3 nuts.
| 11. INSTALL V-RIBBED BELT TENSIONER ASSEMBLY |
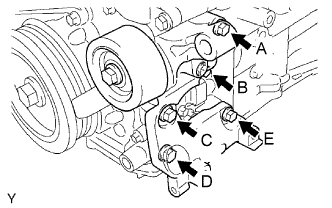 |
| Position | Length |
| A | 70 mm (2.76 in.) |
| B, C, D and E | 33 mm (1.30 in.) |
Use a new bolt in position A.
Finger-tighten the bolts in positions A and E and install the bracket.
Tighten the bolts in positions A and E.
Tighten the bolts in positions B, C and D.
| 12. INSTALL NO.1 IDLER PULLEY SUB-ASSEMBLY |
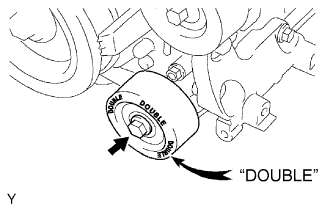 |
Install the idler pulley with the bolt.
| 13. INSTALL NO.2 IDLER PULLEY SUB-ASSEMBLY |
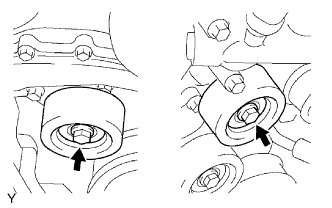 |
Install the 2 idler pulleys with the 2 bolts.
| 14. INSTALL FRONT NO.1 ENGINE MOUNTING BRACKET LH |
Install the engine mounting bracket w/ engine mounting insulator with the 3 bolts.
| 15. INSTALL FRONT NO.1 ENGINE MOUNTING BRACKET RH |
Install the engine mounting bracket w/ engine mounting insulator with the 4 bolts.
| 16. INSTALL EXHAUST MANIFOLD SUB-ASSEMBLY LH |
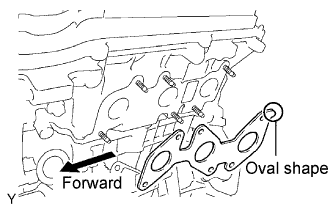 |
Set a new gasket to the LH cylinder head with the oval shape facing forward.
Install the exhaust manifold with the 6 nuts. Tighten the nuts uniformly in several steps.
Connect the air fuel ratio sensor connector.
| 17. INSTALL EXHAUST MANIFOLD SUB-ASSEMBLY RH |
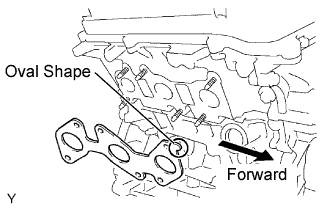 |
Set a new gasket to the RH cylinder head with the oval shape facing forward.
Install the exhaust manifold with the 6 nuts. Tighten the nuts uniformly in several steps.
Connect the air fuel ratio sensor connector.
| 18. INSTALL NO.2 VENTILATION HOSE |
| 19. INSTALL VENTILATION HOSE |
| 20. INSTALL HEATER WATER INLET HOSE |
| 21. INSTALL HEATER WATER OUTLET HOSE |
| 22. INSTALL FLYWHEEL SUB-ASSEMBLY (for Manual Transmission) |
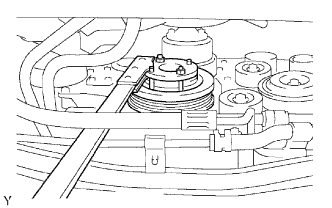 |
Using SST, hold the crankshaft.
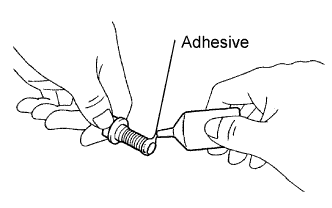 |
Apply adhesive to 2 or 3 threads of the mounting bolt end.
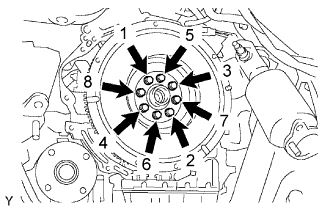 |
Install the flywheel and 2 spacers onto the crankshaft.
Using several steps, uniformly install and tighten the 8 mounting bolts in the sequence shown in the illustration.
| 23. INSTALL DRIVE PLATE & RING GEAR SUB-ASSEMBLY (for Automatic Transmission) |
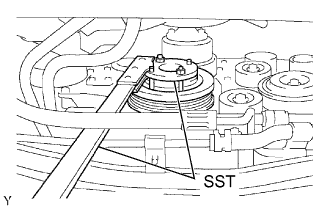 |
Using SST, hold the crankshaft.
|
Apply adhesive to 2 or 3 threads of the mounting bolt end.
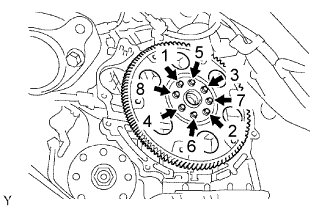 |
Install the drive plate and 2 spacers onto the crankshaft.
Using several steps, uniformly install and tighten the 8 mounting bolts in the sequence shown in the illustration.
| 24. INSTALL ENGINE ASSEMBLY |
Attach the engine sling device and hang the engine with the chain block.
Lower the engine into the engine compartment carefully.
Attach the engine mounting brackets to the frame brackets.
Install the engine mounting brackets onto the frame brackets with the 4 bolts and 4 nuts.
Remove the 4 bolts and 2 engine hangers.
| 25. INSTALL NO.2 ENGINE WIRE |
Install the ground cable to the cylinder block.
| 26. INSTALL ENGINE WIRE |
Connect the 3 connectors to the engine room relay box.
Install the nut, then install the engine wire into the engine room relay block.
Connect the front differential connector (4WD only).
Insert the engine wire into the vehicle room, and install the grommet.
Connect the 2 connectors to the four wheel ECU (4WD only).
Connect the 5 connectors to the ECM.
Install the instrument panel finish panel sub-assembly lower RH.
Install the glove compartment door.
| 27. INSTALL INTAKE AIR SURGE TANK |
Install a new gasket onto the intake air surge tank.
Using the socket hexagon wrench 8, install the intake air surge tank with the 4 bolts.
Install the 2 intake air surge tank nuts.
Install the 2 surge tank stays with the 4 bolts.
Install the oil baffle plate with the bolt.
Install the throttle body bracket with the 2 bolts.
Install the clutch flexible hose bracket with the nut (w/ Manual Transmission).
Install the 3 wire harness clamps and hose clamp.
Connect the throttle body w/ motor connector.
Connect the 2 VSV connectors.
Connect the ventilation hose.
Connect the fuel vapor feed hose.
Connect the 2 water by-pass hoses.
| 28. CONNECT HEATER WATER INLET HOSE |
| 29. CONNECT HEATER WATER OUTLET HOSE |
| 30. CONNECT NO.2 FUEL PIPE SUB-ASSEMBLY |
| 31. CONNECT NO.1 FUEL PIPE SUB-ASSEMBLY |
Push the tube connector into the pipe until the tube connector makes a "click" sound.
Install the fuel pipe clamp.
| 32. INSTALL COOLER COMPRESSOR ASSEMBLY |
Install the cooler compressor assembly with the 4 bolts.
Connect the cooler compressor assembly connector.
Install the suction hose sub-assembly with the bolt.
| 33. INSTALL GENERATOR ASSEMBLY |
Install the generator assembly with the 2 bolts.
Install the wire harness clamp bracket with the 2 bolts.
Connect the wire harness.
Connect the wire harness to terminal B and install the nut.
Connect the connector to the generator assembly.
Install the wire harness stay with the bolt.
| 34. INSTALL VANE PUMP ASSEMBLY |
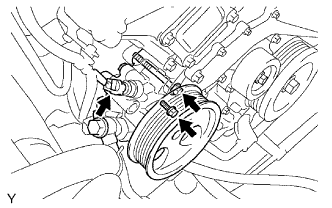 |
Install the vane pump with the 2 bolts.
Connect the power steering pressure switch connector.
Connect the power steering pressure switch connector.
| 35. INSTALL FAN PULLEY |
| 36. INSTALL CLUTCH DISC ASSEMBLY (for Manual Transmission) |
| Transmission | See page |
| RA60 |
Click here
|
| RA60F |
Click here
|
| 37. INSTALL CLUTCH COVER ASSEMBLY (for Manual Transmission) |
| Transmission | See page |
| RA60 |
Click here
|
| RA60F |
Click here
|
| 38. INSTALL TRANSMISSION ASSEMBLY |
| Transmission | Drive Type | See Page |
| Manual Transmission | 2WD |
Click here
|
| Manual Transmission | 4WD |
Click here
|
| Automatic Transmission | 2WD |
Click here
|
| Automatic Transmission | 4WD |
Click here
|
| 39. INSTALL RADIATOR ASSEMBLY |
Install the radiator with the 4 bolts.
Connect the 2 oil cooler hoses (with automatic transmission).
| 40. INSTALL FAN SHROUD |
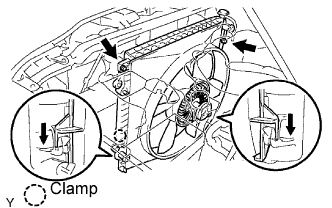 |
Provisionally install the fan shroud together with the fan pulley.
Install the fan and generator V belt .
Install the fan pulley with the 4 nuts.
Install the fan shroud with the 2 bolts.
Install the 2 cooler hoses into the clamp (with automatic transmission).
Connect the hose to the radiator reserve tank.
| 41. INSTALL RADIATOR SUPPORT TO FRAME SEAL LH |
| 42. INSTALL HOOD SUB-ASSEMBLY |
| 43. INSTALL BATTERY |
| 44. ADD ENGINE COOLANT |
Pour coolant into the radiator until it overflows.
| Transmission | Capacity |
| Manual Transmission | 9.7 liters (10.3 Us qts, 8.5 Imp. qts) |
| Automatic Transmission | 9.8 liters (10.4 Us qts, 8.6 Imp. qts) |
Check the coolant level inside the radiator by squeezing the inlet and outlet radiator hoses several times by hand. If the coolant level goes down, add coolant.
Install the radiator cap securely.
Slowly pour coolant into the radiator reservoir until it reaches the FULL line.
Warm up the engine until the cooling fan operates.
Set the air conditioning as follows while warming up the engine.
| Item | Condition |
| Fan Speed | Any setting except OFF |
| Temperature | Toward WARM |
| Air Conditioning Switch | OFF |
Maintain the engine speed at 2,000 to 2,500 rpm and warm up the engine until the cooling fan operates.
Squeeze the inlet and outlet radiator hoses several times by hand while warming up the engine.
Stop the engine and wait until the coolant cools down.
Remove the radiator cap and check the coolant level inside the radiator.
If the coolant level is below the full level, perform the steps from (a) through (h) and repeat the operation until the coolant level remains at the full level.
Check the coolant level inside the radiator reservoir tank again. If it is below the full level, add coolant.
| 45. ADD ENGINE OIL |
Fill with fresh engine oil.
| Drain and refill with oil filter change | 4.5 liters (4.8 US qts, 4.0 lmp. qts) |
| Drain and refill without oil filter change | 4.2 liters (4.4 US qts, 3.7 lmp. qts) |
| Dry fill | 5.6 liters (5.9 US qts, 4.9 lmp. qts) |
| Drain and refill with oil filter change | 5.2 liters (5.5 US qts, 4.6 lmp. qts) |
| Drain and refill without oil filter change | 4.9 liters (5.2 US qts, 4.3 lmp. qts) |
| Dry fill | 6.0 liters (6.3 US qts, 5.3 lmp. qts) |
Reinstall the oil filler cap.
| 46. PERFORM INITIALIZATION |
| 47. CHECK FOR ENGINE COOLANT LEAKAGE |
Fill the radiator with coolant and attach a radiator cap tester.
Pump it to 118 kPa (1.2 kgf/cm2 17.1 psi), then check for leakage.
| 48. CHECK FOR ENGINE OIL LEAKAGE |
| 49. CHECK FOR FUEL LEAKAGE |
| 50. CHECK FOR EXHAUST GAS LEAKAGE |
| 51. INSTALL V-BANK COVER |
Install the V-bank cover with the 2 nuts.
| 52. INSPECT IGNITION TIMING |
Warm up the engine.
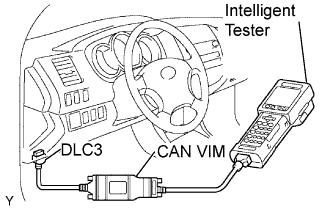 |
When using the intelligent tester.
Connect the intelligent tester to the DLC3.
Select the following menu items: DIAGNOSIS / ENHANCED OBD ll / DATA LIST / IGN ADVANCE.
Inspect the ignition timing during idling.
Check that the ignition timing advances immediately when the engine speed is increased.
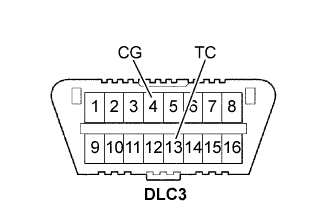 |
When not using intelligent tester.
Using SST, connect the terminals 13 (TC) and 4 (CG) of the DLC3.
Remove the air cleaner.
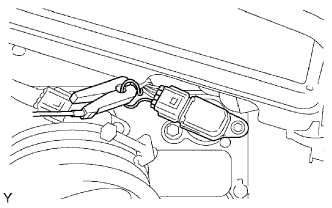 |
Pull out the wire harness as shown in the illustration.
Connect the tester probe of a timing light to the wire of the ignition coil connector for No. 1 cylinder.
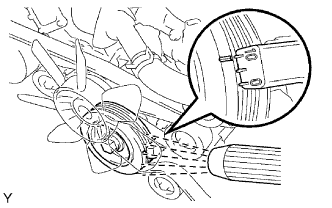 |
Inspect the ignition timing during idling.
Remove the SST from the DLC3.
Inspect the ignition timing during idling.
Install the air cleaner.
| 53. INSPECT ENGINE IDLING SPEED |
Warm up the engine.
|
When using the intelligent tester:
Connect the intelligent tester to the DLC3.
Select the following menu items: DIAGNOSIS / ENHANCED OBD ll / DATA LIST / ENGINE SPD.
Inspect the engine idling speed.
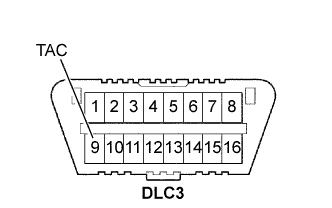 |
When not using the intelligent tester:
Using SST, connect the terminal 8 (TAC) of the DLC3.
Race the engine speed at 2,500 rpm for approximately 90 seconds.
Inspect the engine idling speed.
| 54. INSPECT CO/HC |
Start the engine.
Run the engine at 2,500 rpm for approximately 180 seconds.
Insert the CO/HC meter testing probe at least 40 cm (1.3 ft) into the tailpipe during idling.
Immediately check the CO/HC concentration during idling and/or at 2,500 rpm.
If the CO/HC concentration does not comply with regulations, troubleshoot in the order given below.
Check the heated oxygen sensor operation.
| CO | HC | Problems | Causes |
| Normal | High | Rough idling |
|
| Low | High | Rough idling (Fluctuating HC reading) |
|
| High | High | Rough idling (Black smoke from exhaust) |
|