Home › RESTRAINTS › SUPPLEMENTAL RESTRAINT SYSTEM › OCCUPANT CLASSIFICATION ECU (for Bench Seat Type)

OCCUPANT CLASSIFICATION ECU (for Bench Seat Type) > INSTALLATION

for Preparation Click here


NOTICE:
  1. Never use SRS parts from another vehicle. When replacing the parts, replace them with new ones.
  2. Never reuse an occupant classification ECU involved in a collision when the airbag has deployed.
  3. If the occupant classification ECU has been dropped, or there are any cracks, dents or other defects in the case, bracket or connector, replace it with a new one.
  4. When installing the occupant classification ECU, make sure that the SRS wiring does not interfere with other parts and that it is not pinched between other parts.
  5. After installing, shake the occupant classification ECU to check that there is no looseness.
  6. Remove the front seat cushion cover pad and front seat cushion cover together, in order to avoid occupant classification sensor malfunctions.


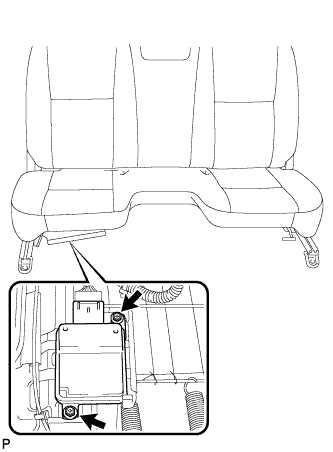
1. INSTALL OCCUPANT CLASSIFICATION ECU


    C123157
  1. Check that the ignition switch is OFF.

  1. Check that the negative battery (-) terminal is disconnected.

    CAUTION:
    After disconnecting the negative battery terminal, wait for at least 90 seconds before starting the operation.

  1. Install the occupant classification ECU with the 2 bolts.

    Torque:
    3.0 N*m{ 31 kgf*cm , 27 in.*lbf }

  1. Connect the connector to the occupant classification ECU.

    NOTICE:
    1. If the occupant classification ECU has been dropped, or there are any cracks, dents or other defects in the case or connector, replace it with a new one.
    2. When installing the occupant classification ECU, make sure that the SRS wiring does not interfere with other parts and that it is not pinched between other parts.
    3. When replacing the occupant classification ECU, replace the bolt with a new one.


2. INSTALL FRONT SEAT ASSEMBLY


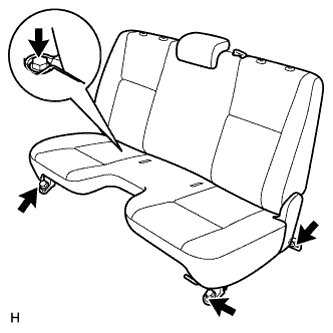
    B121741
  1. Place the front seat in the cabin.

  1. Slide the front seat to the most rearward position.

  1. Tighten the 2 bolts on the front side.

    Torque:
    37 N*m{ 375 kgf*cm , 27 ft.*lbf }

  1. Slide the front seat to the most forward position.

  1. Tighten the 2 bolts on the rear side.
    Torque:
    37 N*m{ 375 kgf*cm , 27 ft.*lbf }


    B121740
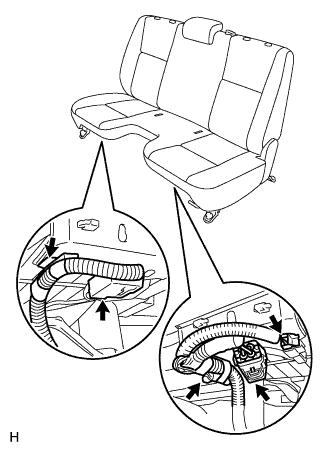
  1. Install the 2 wiring harness clamps.

  1. Connect the 3 connectors.


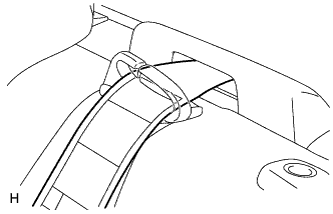
    B121739
  1. Install the belt of the front center seat outer belt into the front center seat outer belt guide.


3. INSTALL FRONT SEAT HEADREST ASSEMBLY


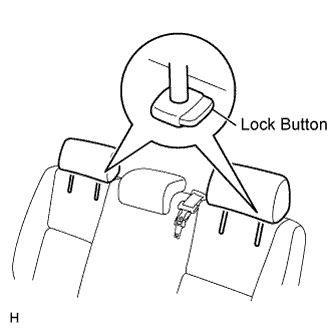
    B121738E01
  1. Push in the 2 lock buttons of the 2 front seat headrest supports and install the 2 front seat headrests.


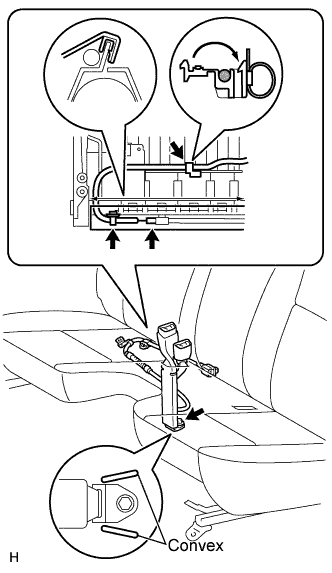
4. INSTALL FRONT SEAT INNER BELT ASSEMBLY LH


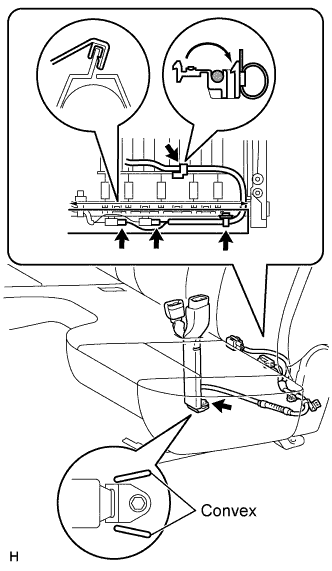
    B121779E01
  1. Slide the front seat to the most forward position.

  1. Install the front seat inner belt with the bolt.

    Torque:
    42 N*m{ 430 kgf*cm , 31 ft.*lbf }

    NOTICE:
    Be careful not to place the front seat inner belt over the convex areas of the floor panel.

  1. Install the 2 wiring harness clamps.

  1. Connect the 2 connectors.

  1. Engage the hook.


5. INSTALL FRONT SEAT INNER BELT ASSEMBLY RH


    B121780E01
  1. Slide the front seat to the most forward position.

  1. Install the front seat inner belt with the bolt.

    Torque:
    42 N*m{ 430 kgf*cm , 31 ft.*lbf }

    NOTICE:
    Be careful not to place the front seat inner belt over the convex areas of the floor panel.

  1. Install the 2 wiring harness clamps.

  1. Connect the connector.

  1. Engage the hook.


6. CONNECT CABLE TO NEGATIVE BATTERY TERMINAL

Torque:
3.9 N*m{ 40 kgf*cm , 35 in.*lbf }


7. INSERT OCCUPANT CLASSIFICATION ECU DATA

NOTICE:
  1. If any DTCs related to the occupant classification ECU are output, troubleshoot those DTCs by referring to the DIAGNOSTIC TROUBLE CODE CHART.
  2. When ECU data saving or loading operations cannot be performed, replace the front seat cushion assembly (with occupant classification ECU and occupant classification sensor).

HINT:
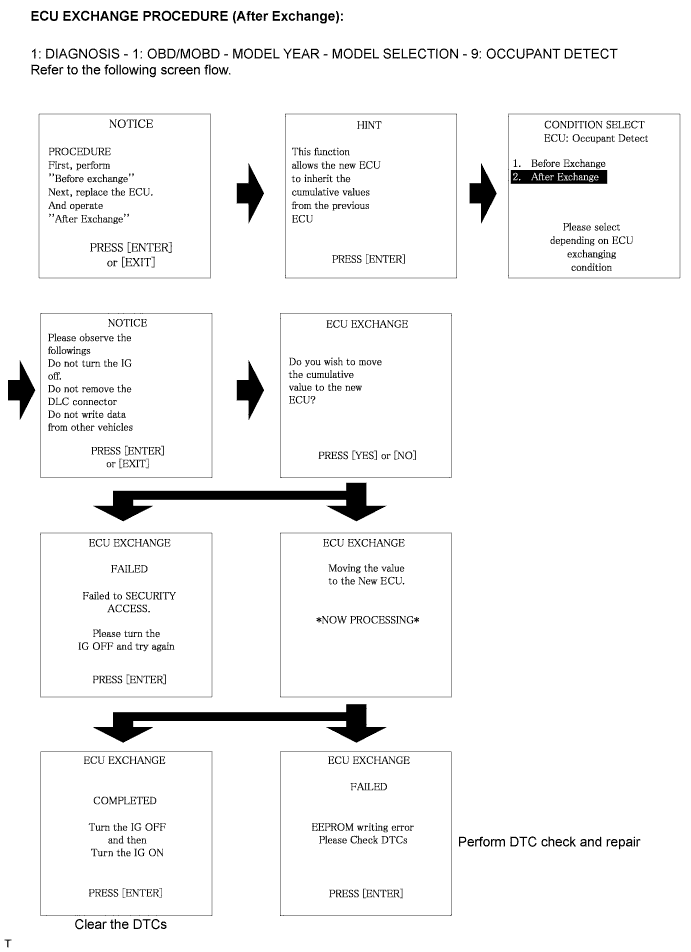
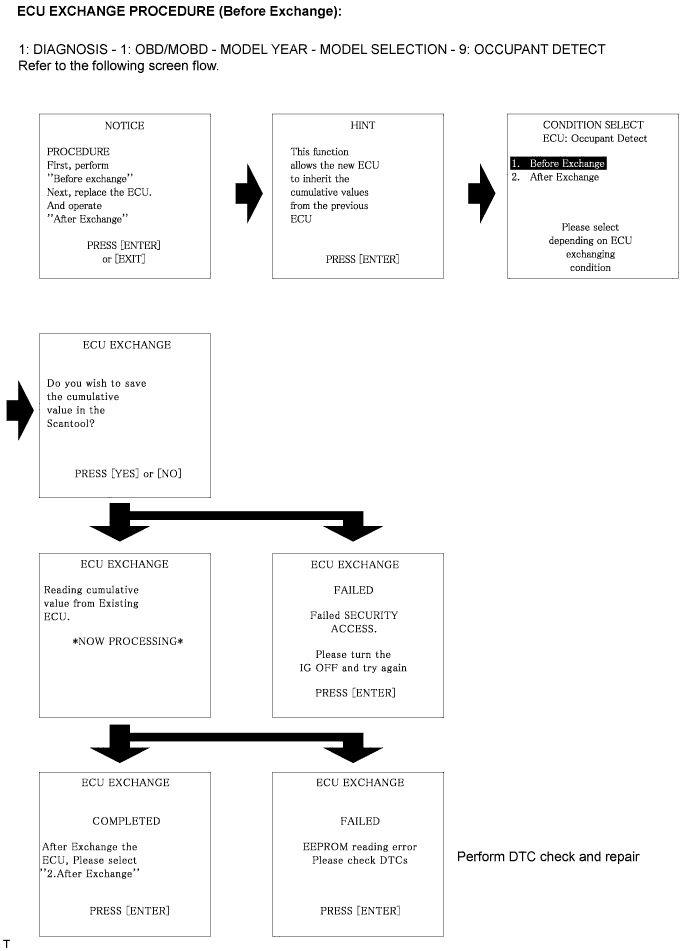
  1. When the occupant classification ECU for a bench seat type is replaced, the previous ECU data must be saved in the intelligent tester and loaded into the new ECU by following the flowchart below.
  2. Until the data from the previous ECU are loaded into the new occupant classification ECU, these data are not erased even when the tester is turned off.
  3. ECU EXCHANGE PROCEDURE (Before Exchange) describes the procedure to save the data in the intelligent tester from the occupant classification ECU which has been installed on the vehicle. ECU EXCHANGE PROCEDURE (After Exchange) describes the procedure to load the data from the previous ECU, stored in the intelligent tester, into the new ECU.

  1. Connect the intelligent tester to the DLC3.

  1. Turn the ignition switch to the ON position.

  1. Store the occupant classification ECU data into the intelligent tester by following the prompts on the tester screen.

    HINT:
    If the ECU data cannot be stored in the intelligent tester, replace the front seat cushion assembly (with occupant classification ECU and occupant classification sensor).

  1. Turn the ignition switch to the LOCK position.

  1. Disconnect the negative (-) terminal cable from the battery, and wait for at least 90 seconds.

  1. Replace the occupant classification ECU (Click here).

  1. Connect the negative (-) terminal cable to the battery.

  1. Turn the ignition switch to the ON position.

  1. Load the data from the previous ECU stored in the tester, into the newly installed ECU by following the prompts on the tester screen.

  1. Turn the ignition switch to the LOCK position.

  1. Turn the ignition switch to the ON position.


  1. Clear the DTCs stored in the memory (Click here).
    HINT:
    If DTC is not cleared at this time, past DTC will remain.

    H101940E01


    H101939E01


8. PERFORM ZERO POINT CALIBRATION AND SENSITIVITY CHECK
(Click here)


9. INSPECT SRS WARNING LIGHT
(Click here)