VALVE CLEARANCE > ADJUSTMENT |
| 1. DISCONNECT CABLE FROM NEGATIVE BATTERY TERMINAL |
| 2. DRAIN ENGINE COOLANT |
|
Remove the service hole cover from the engine under cover.
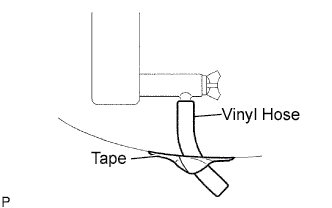
Install a vinyl hose onto the drain on the radiator side.
Fix the vinyl hose with tape.
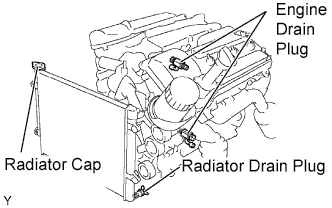 |
Loosen the 3 drain plugs on the engine and radiator, and drain the coolant.
Remove the radiator cap.
Drain the coolant from the reservoir tank.
Tighten the 3 drain plugs.
Remove the vinyl hose from the radiator.
| 3. REMOVE V-BANK COVER |
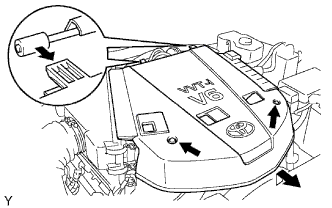 |
Remove the 2 nuts, then remove the V-bank cover.
| 4. REMOVE AIR CLEANER ASSEMBLY |
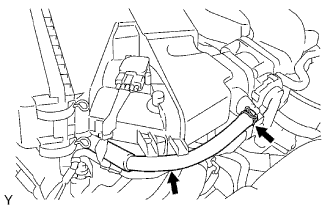 |
Disconnect the ventilation hose No. 2.
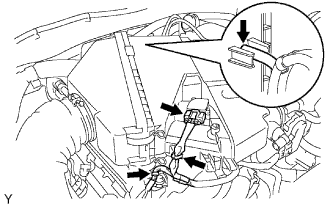 |
Disconnect the vacuum hose.
Disconnect the mass air flow meter connector.
Remove the 2 wire harness clamps.
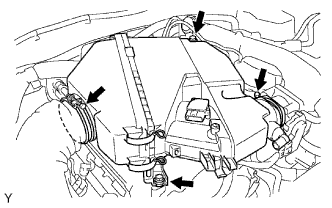 |
Loosen the 2 hose clamps.
Remove the 2 bolts, then remove the air cleaner.
| 5. REMOVE AIR PUMP ASSEMBLY (w/ Secondary Air Injection System) |
| 6. REMOVE NO. 2 AIR CLEANER HOSE (w/ Secondary Air Injection System) |
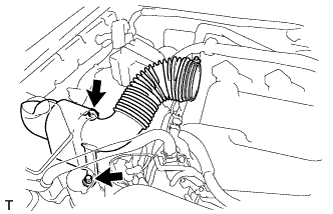 |
Remove the 2 bolts, then remove the No. 2 air cleaner hose.
| 7. REMOVE AIR SWITCHING VALVE ASSEMBLY (w/ Secondary Air Injection System) |
| 8. REMOVE AIR TUBE ASSEMBLY (w/ Secondary Air Injection System) |
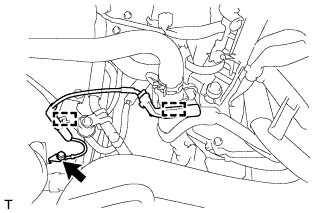 |
Remove the bolt.
Disconnect the 2 wire harness clamps.
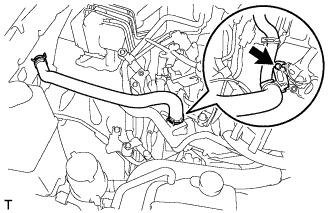 |
Remove the bolt then, remove the air tube assembly.
| 9. REMOVE INTAKE AIR SURGE TANK |
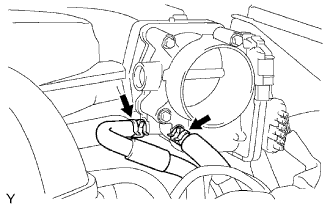 |
Disconnect the 2 water by-pass hoses.
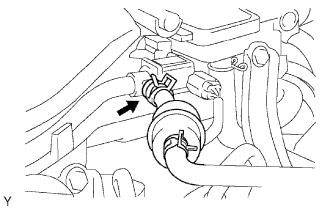 |
Disconnect the fuel vapor feed hose.
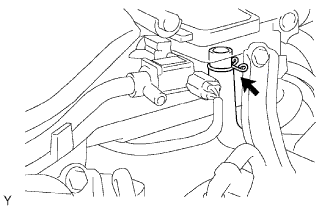 |
Disconnect the ventilation hose.
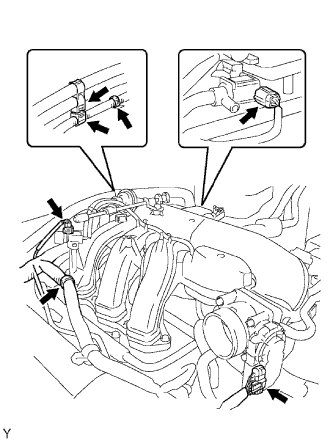 |
Disconnect the 2 VSV connectors.
Disconnect the throttle body with motor connector.
Separate the 3 wire harness clamps and hose clamp.
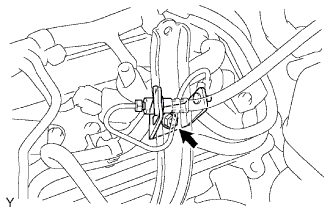 |
Remove the nut, then separate the clutch flexible hose bracket from the surge tank stay (with Manual Transmission).
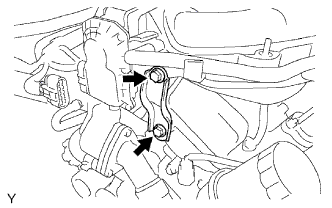 |
Remove the 2 bolts and throttle body bracket.
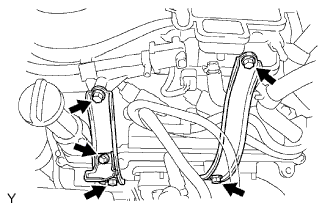 |
Remove the bolt and oil baffle plate.
Remove the 4 bolts and 2 surge tank stays.
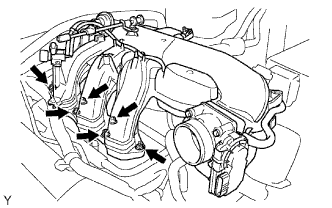 |
Remove the 2 nuts.
Using a socket hexagon wrench 8, remove the 4 bolts, intake air surge tank and gasket.
| 10. REMOVE IGNITION COIL ASSEMBLY |
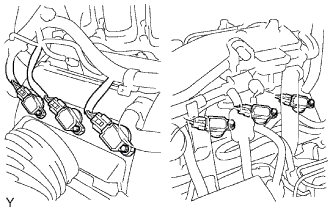 |
Disconnect the 6 connectors.
Remove the 6 bolts, then remove the 6 ignition coils.
| 11. REMOVE CYLINDER HEAD COVER SUB-ASSEMBLY |
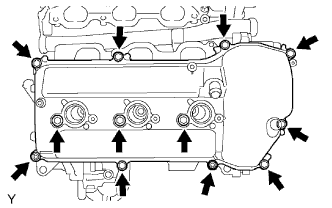 |
Remove the 10 bolts, 3 seal washers, 2 nuts, cylinder head cover and gasket.
| 12. REMOVE CYLINDER HEAD COVER SUB-ASSEMBLY LH |
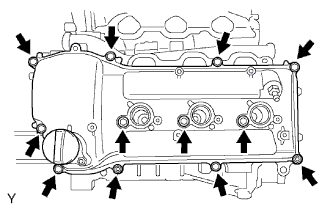 |
Remove the 10 bolts, 3 seal washers, 2 nuts, cylinder head cover and gasket.
| 13. SET NO.1 CYLINDER TO TDC/COMPRESSION |
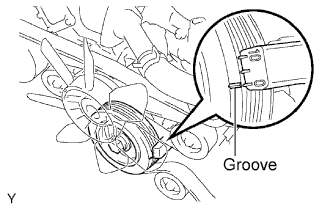 |
Turn the crankshaft pulley until its groove and the timing mark "0" of the timing chain cover are aligned.
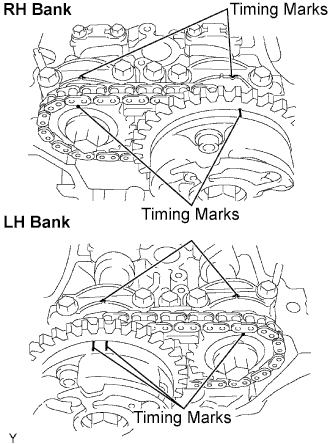 |
Check that the timing marks of the camshaft timing gears are aligned with the timing marks of the bearing cap as shown in the illustration.
If not, turn the crankshaft 1 complete revolution (360°) and align the timing marks above.
| 14. INSPECT VALVE CLEARANCE |
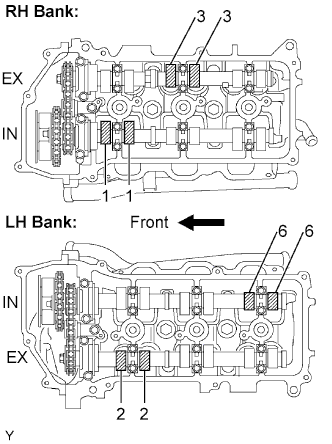 |
Check the valves indicated in the illustration.
Using a feeler gauge, measure the clearance between the valve lifter and camshaft.
Record any out-of-specification valve clearance measurements. They will be used later to determine the required replacement valve lifter.
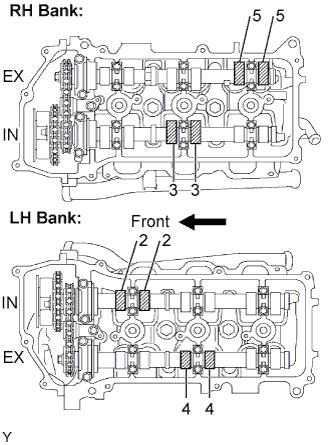 |
Turn the crankshaft 240° clockwise, and check the valves indicated in the illustration.
Using a feeler gauge, measure the clearance between the valve lifter and camshaft.
Record any out-of-specification valve clearance measurements. They will be used later to determine the required replacement valve lifter.
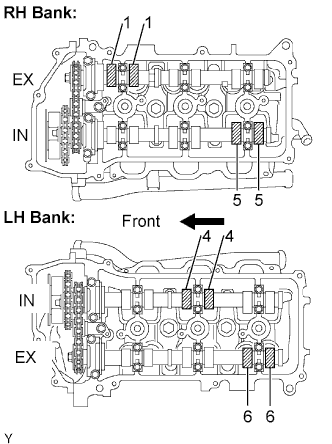 |
Turn the crankshaft 240° clockwise, and check the valves indicated in the illustration.
Using a feeler gauge, measure the clearance between the valve lifter and camshaft.
| 15. ADJUST VALVE CLEARANCE |
|
Set No. 1 cylinder to TDC/compression.
Turn the crankshaft pulley until its groove and the timing mark "0" of the timing chain cover are aligned.
|
Check that the timing marks of the camshaft timing gears are aligned with the timing marks of the bearing cap as shown in the illustration.
If not, turn the crankshaft 1 complete revolution (360°) and align the timing marks as above.
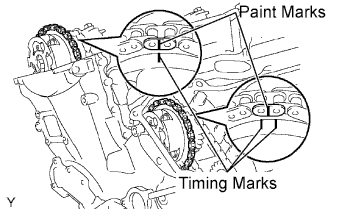 |
Place paint marks on the No. 1 chain links corresponding to the timing marks of the camshaft timing gears.
Remove the chain tensioner assembly No. 1.
Remove the No. 2 camshaft.
Remove the chain tensioner assembly No. 2.
Remove the camshaft.
Remove the No. 4 camshaft sub-assembly.
Remove the chain tensioner assembly No. 3.
Remove the No. 3 camshaft sub-assembly.
Remove the valve lifters.
 |
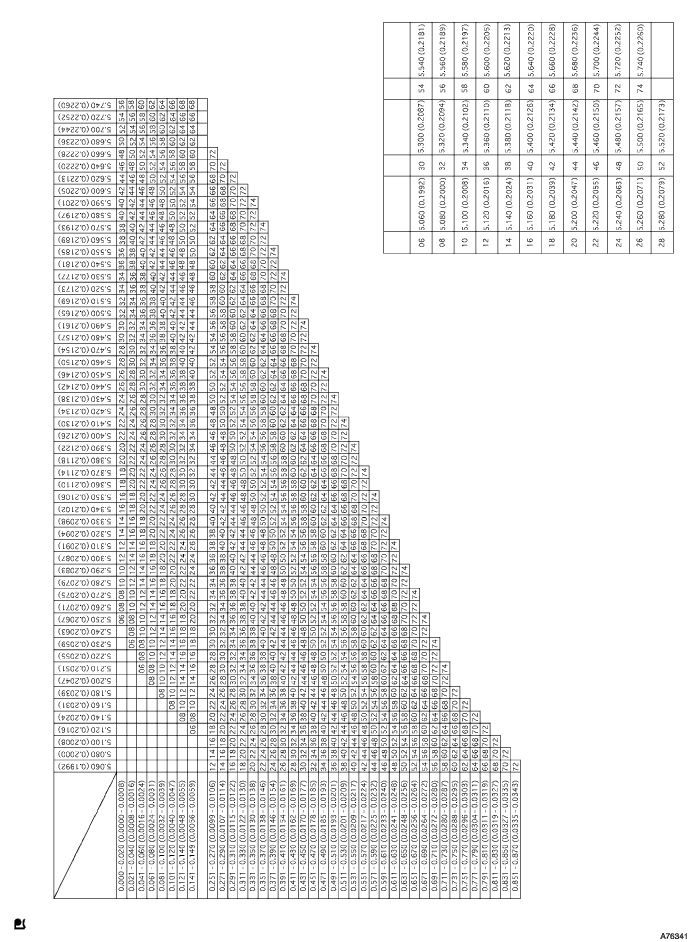
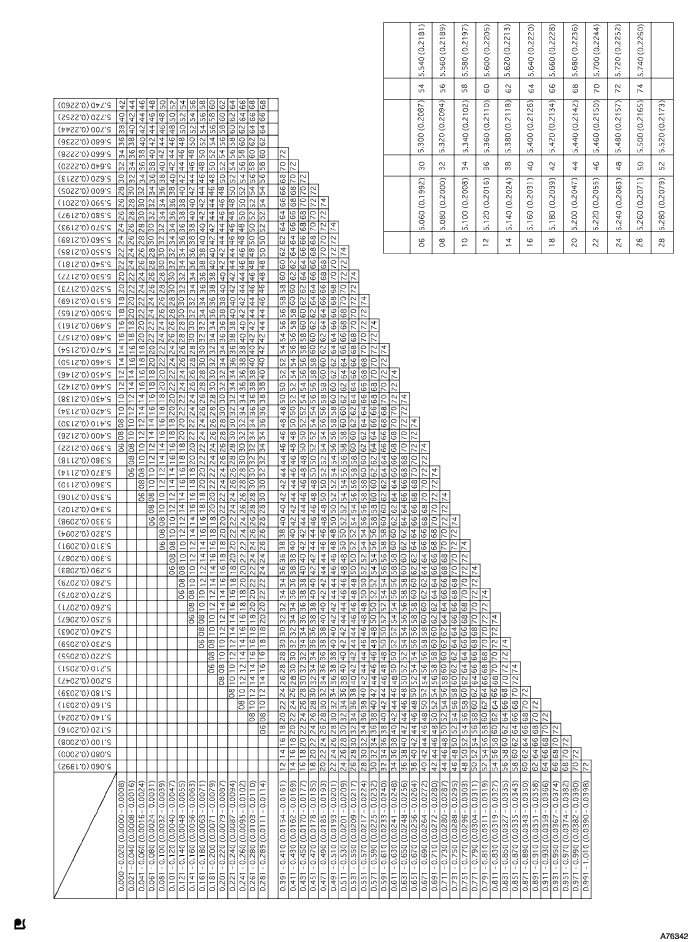
Determine the replacement valve lifter size according to the following formulas and charts:
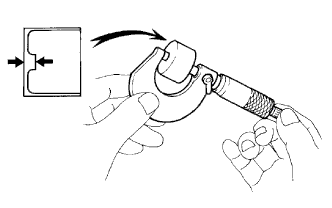
Using a micrometer, measure the thickness of the removed lifter.
Calculate the thickness of a new lifter so that the valve clearance comes within the specified value.
Select a new lifter with a thickness as close as possible to the calculated value.
Install the No. 3 camshaft sub-assembly.
Install the chain tensioner assembly No. 3.
Install the No. 4 camshaft sub-assembly.
Install the camshaft.
Install the chain tensioner assembly No. 2.
Install the No. 2 camshaft.
Install the chain tensioner assembly No. 1.
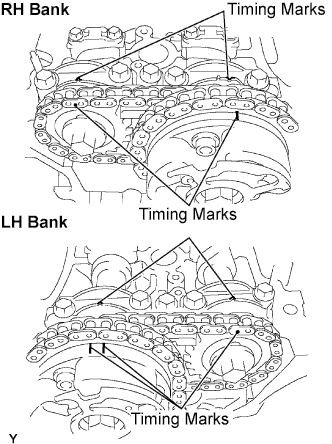 |
Check that the timing marks of the camshaft timing gears are aligned with the timing marks of the bearing cap as shown in the illustration.
| 16. INSTALL CYLINDER HEAD COVER SUB-ASSEMBLY LH |
Remove any old packing (FIPG) material and be careful not to drop any oil on the contact surfaces of the cylinder head, timing chain cover and cylinder head cover.
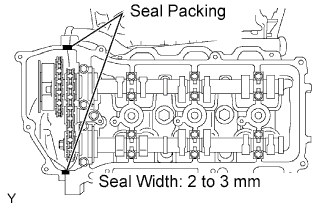 |
Install the cylinder head cover within 3 minutes of applying seal packing. Tighten the cylinder head cover bolts and nuts within 15 minutes of installing the cylinder head cover. Otherwise, the seal packing mush be removed and reapplied.
Install the seal washers onto the bolts.
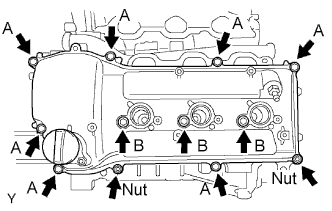 |
Install the cylinder head cover with the 10 bolts and 2 nuts. Tighten the bolts and nuts uniformly in several steps.
| Bolt | Length |
| A | 25 mm (0.98 in.) |
| B | 60 mm (2.36 in.) |
| 17. INSTALL CYLINDER HEAD COVER SUB-ASSEMBLY |
Remove any old packing (FIPG) material and be careful not to drop any oil on the contact surfaces of the cylinder head, timing chain cover and cylinder head cover.
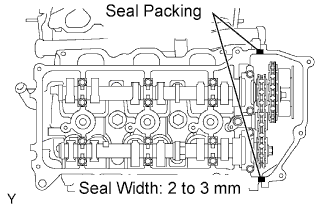 |
Apply a continuous bead of seal packing (diameter 2 to 3 mm (0.08 to 0.12 in.)) to the cylinder head and timing chain cover as shown in the illustration.
Install the seal washers onto the bolts.
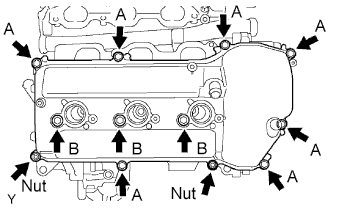 |
Install the cylinder head cover with the 10 bolts and 2 nuts. Tighten the bolts and nuts uniformly in several steps.
| Bolt | Length |
| A | 25 mm (0.98 in.) |
| B | 60 mm (2.36 in.) |
| 18. INSTALL IGNITION COIL ASSEMBLY |
Install the 6 ignition coils with the 6 bolts.
Connect the 6 ignition coil connectors.
| 19. INSTALL INTAKE AIR SURGE TANK |
Install a new gasket onto the intake air surge tank.
Using the socket hexagon wrench 8, install the intake air surge tank with the 4 bolts.
Install the 2 intake air surge tank nuts.
Install the 2 surge tank stays with the 4 bolts.
Install the oil baffle plate with the bolt.
Install the throttle body bracket with the 2 bolts.
Install the clutch flexible hose bracket with the nut (w/ Manual Transmission).
Install the 3 wire harness clamps and hose clamp.
Connect the throttle body w/ motor connector.
Connect the 2 VSV connectors.
Connect the ventilation hose.
Connect the fuel vapor feed hose.
Connect the 2 water by-pass hoses.
| 20. INSTALL AIR TUBE ASSEMBLY (w/ Secondary Air Injection System) |
Install the air tube assembly with the bolt.
Connect the 2 wire harness clamps.
Install the bolt.
| 21. INSTALL AIR SWITCHING VALVE ASSEMBLY (w/ Secondary Air Injection System) |
| 22. INSTALL NO. 2 AIR CLEANER HOSE (w/ Secondary Air Injection System) |
Install the No. 2 air cleaner hose with the 2 bolts.
| 23. INSTALL AIR PUMP ASSEMBLY (w/ Secondary Air Injection System) |
| 24. INSTALL AIR CLEANER ASSEMBLY |
Install the air cleaner with the 2 bolts.
Connect the ventilation hose No. 2.
| 25. ADD ENGINE COOLANT |
Pour coolant into the radiator until it overflows.
| Transmission | Capacity |
| Manual Transmission | 9.7 liters (10.3 Us qts, 8.5 Imp. qts) |
| Automatic Transmission | 9.8 liters (10.4 Us qts, 8.6 Imp. qts) |
Check the coolant level inside the radiator by squeezing the inlet and outlet radiator hoses several times by hand. If the coolant level goes down, add coolant.
Install the radiator cap securely.
Slowly pour coolant into the radiator reservoir until it reaches the FULL line.
Warm up the engine until the cooling fan operates.
Set the air conditioning as follows while warming up the engine.
| Item | Condition |
| Fan Speed | Any setting except OFF |
| Temperature | Toward WARM |
| Air Conditioning Switch | OFF |
Maintain the engine speed at 2,000 to 2,500 rpm and warm up the engine until the cooling fan operates.
Squeeze the inlet and outlet radiator hoses several times by hand while warming up the engine.
Stop the engine and wait until the coolant cools down.
Remove the radiator cap and check the coolant level inside the radiator.
If the coolant level is below the full level, perform the steps from (a) through (h) and repeat the operation until the coolant level remains at the full level.
Check the coolant level inside the radiator reservoir tank again. If it is below the full level, add coolant.
| 26. CONNECT CABLE TO NEGATIVE BATTERY TERMINAL |
| 27. CHECK FOR ENGINE COOLANT LEAKAGE |
Fill the radiator with coolant and attach a radiator cap tester.
Pump it to 118 kPa (1.2 kgf/cm2 17.1 psi), then check for leakage.
| 28. INSTALL V-BANK COVER |
Install the V-bank cover with the 2 nuts.
| 29. INSPECT IGNITION TIMING |
Warm up the engine.
When using the Techstream.
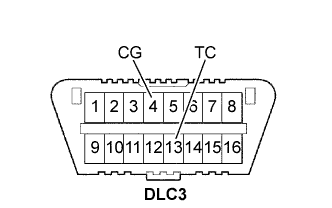
Connect the Techstream to the DLC3.
Enter the following menu items:
Select: Powertrain / Engine and ECT / Data List / IGN Advance.
Inspect the ignition timing during idling.
Check that the ignition timing advances immediately when the engine speed is increased.
 |
When not using Techstream.
Using SST, connect the terminals 13 (TC) and 4 (CG) of the DLC3.
Remove the air cleaner.
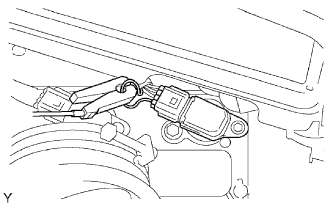 |
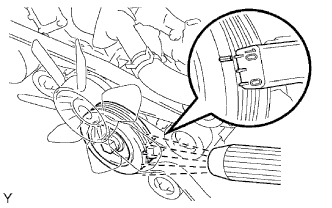
Pull out the wire harness as shown in the illustration.
Connect the tester probe of a timing light to the wire of the ignition coil connector for No. 1 cylinder.
 |
Inspect the ignition timing during idling.
Remove the SST from the DLC3.
Inspect the ignition timing during idling.
Install the air cleaner.