AUTOMATIC TRANSMISSION ASSEMBLY > INSTALLATION |
| 1. INSTALL TORQUE CONVERTER ASSEMBLY |
|
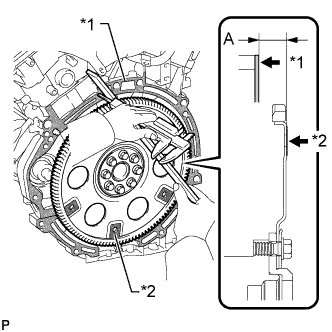
Using a vernier caliper and straightedge, measure dimension "A" between the transmission fitting surface of the engine*1 and the torque converter fitting surface of the drive plate*2. (#)
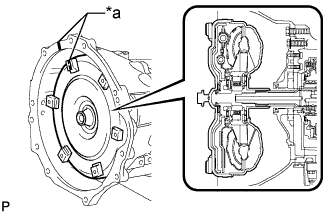 |
Aligning the matchmarks on the transmission case and torque converter clutch, and then mesh the splines of the input shaft and turbine runner.
| *a | Matchmark |
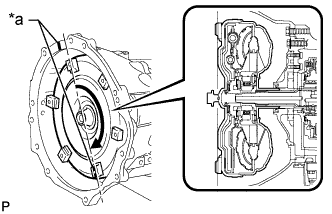 |
Mesh the splines of the stator shaft and stator while turning the torque converter clutch.
| *a | Matchmark |
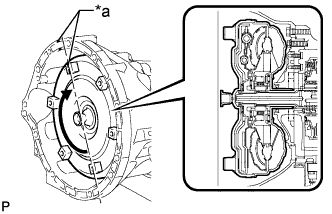 |
Turn the torque converter clutch and align the matchmarks on the torque converter clutch and transmission case to mesh the key of the oil pump drive gear into the slot on the torque converter clutch.
| *a | Matchmark |
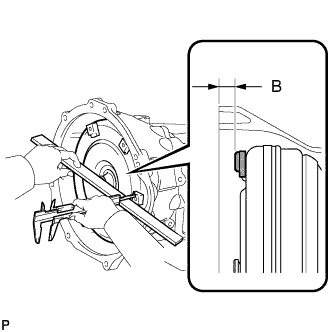 |
Using a vernier caliper and straightedge, measure dimension "B" shown in the illustration and check that B is greater than A measured in the first step.
| 2. INSTALL TRANSMISSION CONTROL CABLE BRACKET |
Install the bracket with the 2 bolts.
| 3. INSTALL WIRE HARNESS CLAMP BRACKET |
Install the front left bank bracket with the bolt.
Install the rear left bank bracket with the bolt.
| 4. INSTALL TRANSMISSION OIL COOLER ASSEMBLY |
Coat 2 new O-rings with ATF, and install them to the transmission oil cooler.
Align the transmission oil cooler with the transmission oil cooler spacer and assemble them with the 3 bolts.
Connect the 2 hoses to the transmission oil cooler spacer with the 2 clips.
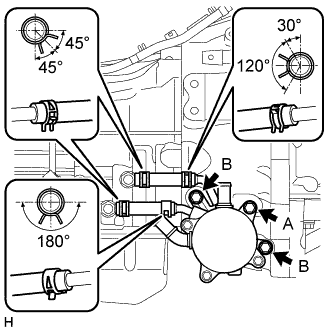 |
Temporarily install the transmission oil cooler with transmission oil cooler spacer with bolt A.
Install the bolt B and tighten it to the specified torque. Then tighten bolt A to the specified torque.
Connect the 2 hoses with the 2 clips.
| 5. INSTALL AUTOMATIC TRANSMISSION ASSEMBLY |
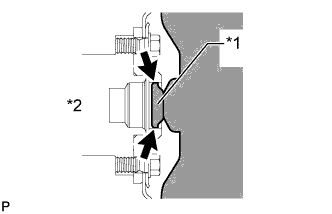 |
Apply clutch spline grease to the surface of the torque converter clutch centerpiece that contacts the crankshaft.
| *1 | Torque Converter Clutch Centerpiece |
| *2 | Crankshaft |
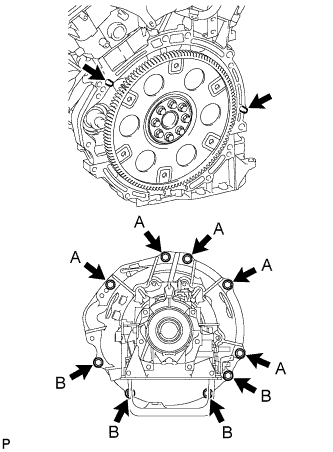 |
Confirm that the 2 knock pins are on the transaxle contact surface of the engine block before transaxle installation.
Install the transmission with the 9 bolts.
| 6. CONNECT NO. 1 WATER BY-PASS PIPE |
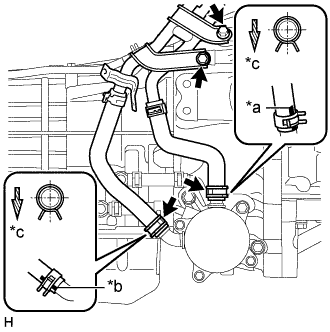 |
Connect the 2 water by-pass hoses with the 2 clips and install the water by-pass pipe with the 2 bolts.
| *a | Yellow Paint Mark |
| *b | White Paint Mark |
| *c | RH Side |
| 7. CONNECT WIRE HARNESS AND CONNECTOR |
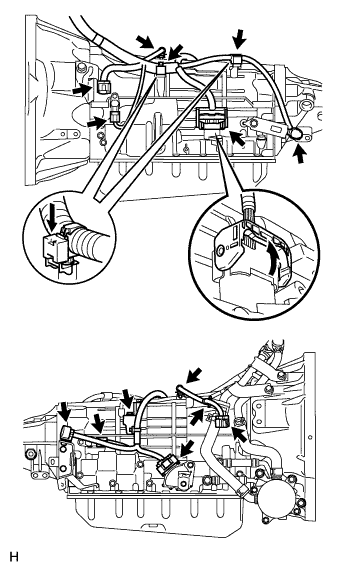 |
Connect the park/neutral start switch connector, transmission wire connector and 2 speed sensor connectors.
Connect the harness clamp with the bolt.
Connect the 4 connector clamps and 4 harness clamps.
Tilt up the automatic transmission.
Connect the ground cable with the bolt.
| 8. INSTALL REAR NO. 1 ENGINE MOUNTING INSULATOR |
Install the rear engine mounting insulator to the transmission with the 4 bolts.
| 9. INSTALL NO. 3 FRAME CROSSMEMBER SUB-ASSEMBLY |
Install the frame crossmember to the rear engine mounting insulator with the 4 bolts.
Install the frame crossmember with the 4 bolts, 4 washers and 4 nuts.
| 10. INSTALL DRIVE PLATE AND TORQUE CONVERTER SETTING BOLT |
Turn the crankshaft to gain access to the 6 bolts and install each bolt while holding the crankshaft pulley setting bolt with a wrench.
Install the flywheel housing side cover.
| 11. INSTALL STARTER ASSEMBLY |
| 12. INSTALL EXHAUST MANIFOLD SUB-ASSEMBLY LH |
| 13. CONNECT TRANSMISSION CONTROL CABLE ASSEMBLY |
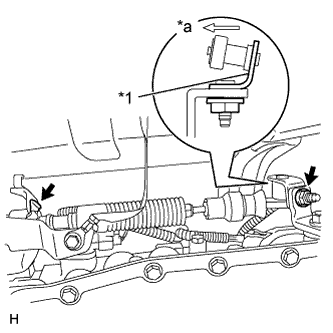 |
Connect the control cable with a new clip and nut.
| *1 | Bracket |
| *a | Inside of Vehicle |
| 14. INSTALL FRONT EXHAUST PIPE ASSEMBLY |
| 15. INSTALL PROPELLER SHAFT ASSEMBLY |
| 16. CONNECT CABLE TO NEGATIVE BATTERY TERMINAL |
| 17. ADD AUTOMATIC TRANSMISSION FLUID |
| 18. ADD ENGINE COOLANT |
Add engine coolant.
Slowly pour coolant into the radiator reservoir until it reaches the FULL line.
Install the reservoir cap.
Install the radiator cap.*1
Start the engine and stop it immediately.*2
Allow approximately 10 seconds to pass. Then remove the radiator cap and check the coolant level. If the coolant level has decreased, add coolant.*3
Repeat steps *1, *2 and *3 until the coolant level does not decrease.
Install the radiator cap.*4
Set the air conditioning as follows.*5
| Item | Condition |
| Fan speed | Any setting except off |
| Temperature | Toward WARM |
| Air conditioning switch | Off |
Start the engine, warm it up until the thermostat opens, and then continue to run the engine for several minutes to circulate the coolant.*6
Stop the engine, wait until the engine coolant cools down to ambient temperature. Then remove the radiator cap and check the coolant level.*7
If the coolant level has decreased, add coolant and warm up the engine until the thermostat opens.*8
If the coolant level has not decreased, check that the coolant level in the radiator reservoir is at the FULL line.
If the coolant level is below the FULL line, repeat steps *4 through *8.
If the coolant level is above the FULL line, drain coolant until the coolant level reaches the FULL line.
| 19. CHECK FOR ENGINE COOLANT LEAK |
Fill the radiator with coolant and attach a radiator cap tester.
Warm up the engine.
Using the radiator cap tester, increase the pressure inside the radiator to 118 kPa (1.2 kgf/cm2, 17 psi), and check that the pressure does not drop.
If the pressure drops, check the hoses, radiator and water pump for leaks. If no external leaks are found, check the heater core, cylinder block and head.
| 20. ADJUST SHIFT LEVER POSITION (for Column Shift Type) |
Move the shift lever to the N position.
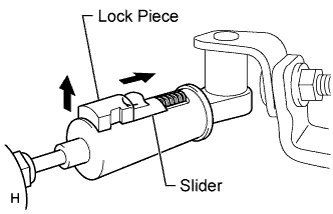 |
Fold back the transmission control cable adjust case cover. Then while sliding the slider toward the cable end side, press the lock piece from the back side to release the lock.
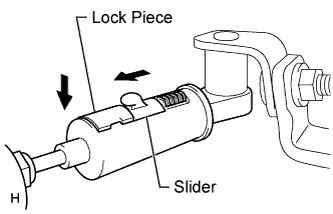 |
Check that the adjust case's spring is applying enough tension to the shift control cable. Then press the lock piece to set the lock.
Return the cover of the adjust case to its original position.
Inspect the operation after the adjustment.
| 21. ADJUST SHIFT LEVER POSITION (for Floor Shift Type) |
Move the shift lever to N.
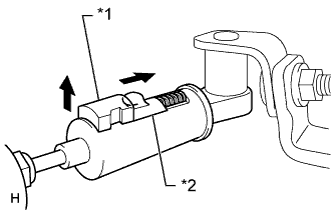 |
Fold back the transmission control cable adjust case cover. Then while sliding the slider toward the cable end side, press the lock piece from the back side to release the lock.
| *1 | Lock Piece |
| *2 | Slider |
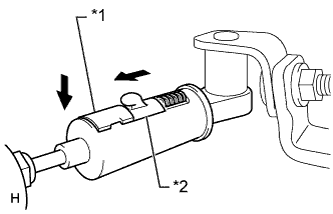 |
Check that the spring of the adjust case is applying enough tension to the shift control cable. Then press the lock piece to set the lock.
| *1 | Lock Piece |
| *2 | Slider |
Return the cover of the adjust case to its original position.
Inspect the operation after the adjustment.
| 22. INSPECT SHIFT LEVER POSITION (for Column Shift Type) |
When moving the shift lever from the N position to other positions, check that the lever can be shifted smoothly and accurately to each position and that the position indicator comes on in accordance with the shift lever position.
If the indicator and shift lever position do not match, carry out the following adjustment procedures.
| 23. INSPECT SHIFT LEVER POSITION (for Floor Shift Type) |
When moving the shift lever from N to other positions, check that the lever can be shifted smoothly and accurately to each position and that the position indicator comes on in accordance with the shift lever position.
If the indicator and shift lever position do not match, carry out the following adjustment procedures.
| 24. CHECK FOR EXHAUST GAS LEAK |
| 25. PERFORM RESET MEMORY |