1UR-FE ENGINE CONTROL HEATED OXYGEN SENSOR INSTALLATION
CAUTION / NOTICE / HINT
- HINT:
-
Perform "Inspection After Repairs" after replacing the heated oxygen sensor (See page Engine / Hybrid System>1UR-FE ENGINE CONTROL>SFI SYSTEM>INITIALIZATION).
PROCEDURE

 89465
1.INSTALL HEATED OXYGEN SENSOR (for Bank 2 Sensor 2)
- HINT:
-
Perform "Inspection After Repairs" after replacing the heated oxygen sensor (See page Engine / Hybrid System>1UR-FE ENGINE CONTROL>SFI SYSTEM>INITIALIZATION).
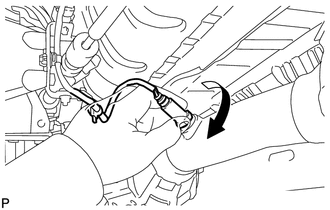
Install the heated oxygen sensor to the front exhaust pipe assembly by hand.
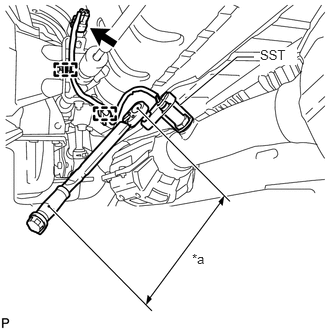
Using SST, tighten the heated oxygen sensor.
- SST
- 09224-00010
- Torque:
- without SST : 44 N*m (449 kgf*cm, 32 ft.*lbf)
- with SST : 40 N*m (408 kgf*cm, 30 ft.*lbf)
| *a | Fulcrum length |
- HINT:
- ·
Use a torque wrench with a fulcrum length of 30 cm (11.8 in.). When using a torque wrench with a fulcrum length that is not 30 cm (11.8 in.), calculate the torque specification for the torque wrench and SST based on the "without SST" torque specification (See page General>INTRODUCTION>REPAIR INSTRUCTION>PRECAUTION).
·Make sure SST and the wrench are connected in a straight line.
Attach the 2 clamps and connect the the heated oxygen sensor connector.
89465
2.INSTALL HEATED OXYGEN SENSOR (for Bank 1 Sensor 2)
- HINT:
-
Perform "Inspection After Repairs" after replacing the heated oxygen sensor (See page Engine / Hybrid System>1UR-FE ENGINE CONTROL>SFI SYSTEM>INITIALIZATION).
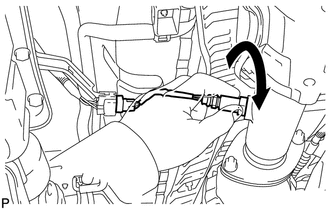
Install the heated oxygen sensor to the front No. 2 exhaust pipe assembly by hand.
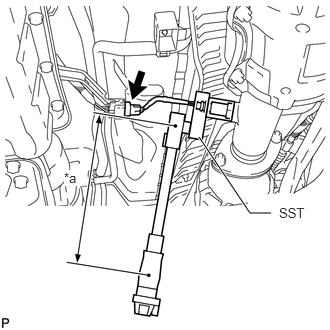
Using SST, tighten the heated oxygen sensor.
| *a | Fulcrum length |
- SST
- 09224-00010
- Torque:
- without SST : 44 N*m (449 kgf*cm, 32 ft.*lbf)
- with SST : 40 N*m (408 kgf*cm, 30 ft.*lbf)
- HINT:
- ·
Use a torque wrench with a fulcrum length of 30 cm (11.8 in.). When using a torque wrench with a fulcrum length that is not 30 cm (11.8 in.), calculate the torque specification for the torque wrench and SST based on the "without SST" torque specification (See page General>INTRODUCTION>REPAIR INSTRUCTION>PRECAUTION).
·Make sure SST and the wrench are connected in a straight line.
Connect the heated oxygen sensor connector.
37117
3.INSTALL PROPELLER SHAFT HEAT INSULATOR
4.INSPECT FOR EXHAUST GAS LEAK