BRAKE CONTROL / DYNAMIC CONTROL SYSTEMS VEHICLE STABILITY CONTROL SYSTEM C1247/47 Stroke Sensor Malfunction
DESCRIPTION
Detects a problem with booster vacuum pressure and enters assist control.
| DTC Code | DTC Detection Condition | Trouble Area |
|---|---|---|
| C1247/47 | When either condition below is met:
1.
When the output becomes 4.7 V or more or 0.2 V or less per 100 msec. 2.
When the output does not return to 2.5 V even when 0.5 sec. or more elapse, in spite of no change in brake operation. |
·
Brake booster ·
Pedal stroke sensor ·
Pedal stroke sensor circuit ·
Skid control ECU |
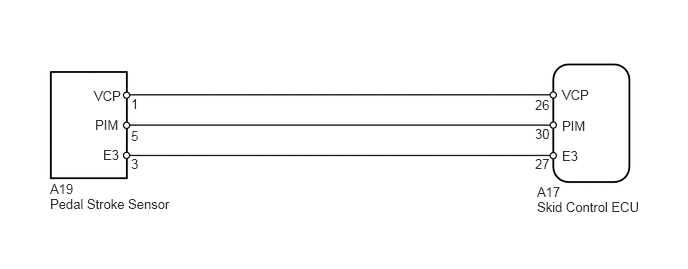
WIRING DIAGRAM
CAUTION / NOTICE / HINT
- NOTICE:
-
When replacing the VSC actuator assembly, perform zero point calibration (See page Brake>BRAKE CONTROL / DYNAMIC CONTROL SYSTEMS>VEHICLE STABILITY CONTROL SYSTEM>CALIBRATION).
PROCEDURE
Connect the Techstream to the DLC3.
Turn the ignition switch to ON.
Run the engine until the engine reaches 3,000 rpm, and return it back to idle.
- HINT:
-
Rev up the engine to ensure a sufficient vacuum.
Select the Data List mode on the Techstream.
| Tester Display | Measurement Item/Range | Normal Condition | Diagnostic Note |
|---|---|---|---|
| Stroke Sensor | Pedal stroke sensor / min.: 0.00 V, max.: 5.00 V | When brake pedal is released: 0.70 to 1.90 V | - |
- HINT:
- ·
The result appears on the Techstream after some delay because a time lag occurs when using the Techstream.
·If a signal from the pedal stroke sensor is sent between sampling, the result does not appear on the Techstream. So be sure to perform the measurement 2 or 3 times.
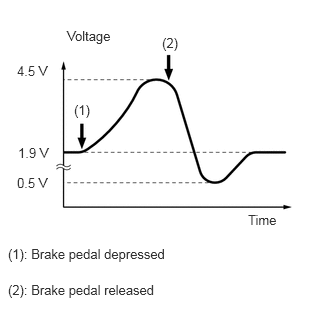
Check that the brake pedal acceleration value of the delta S sensor displayed on the Techstream changes by alternately depressing and releasing the brake pedal.
- OK:
The value changes as shown in the illustration. (The value will return to approximately 1.9 V after the brake pedal is released.)
- HINT:
- ·
The maximum voltage depends on pedal stroke speed but should not exceed 4.7 V or fall below 0.2 V.
·Even if the result is as described above, a malfunction may still exist because there is a high possibility that the malfunction simulation will fail. Therefore, proceed to the troubleshooting procedures below.
NEXT
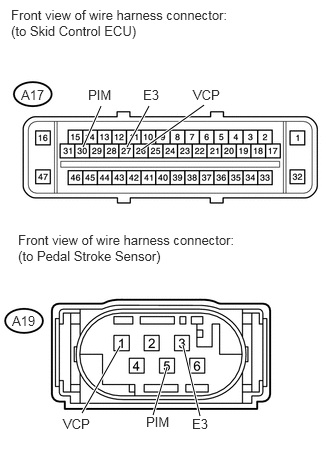
Confirm that the skid control ECU connector and pedal stroke sensor connector are properly connected.
Disconnect the A17 ECU connector.
Disconnect the A19 sensor connector.
Inspect both the connector case and the terminal for deformation and corrosion.
- OK:
No deformation or corrosion.
Measure the resistance according to the value(s) in the table below.
- Standard Resistance:
Tester Connection Condition Specified Condition A17-30 (PIM) - A19-5 (PIM) Always Below 1 Ω A17-30 (PIM) - Body ground Always 10 kΩ or higher A17-27 (E3) - A19-3 (E3) Always Below 1 Ω A17-27 (E3) - Body ground Always 10 kΩ or higher A17-26 (VCP) - A19-1 (VCP) Always Below 1 Ω A17-26 (VCP) - Body ground Always 10 kΩ or higher
OK
NG
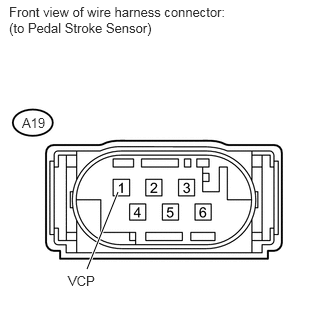
Disconnect the A19 sensor connector.
Measure the voltage according to the value(s) in the table below.
- Standard Voltage:
Tester Connection Switch Condition Specified Condition A19-1 (VCP) - Body ground Ignition switch ON 5.0 V
OK
NG