BRAKE CONTROL / DYNAMIC CONTROL SYSTEMS VEHICLE STABILITY CONTROL SYSTEM VSC OFF Indicator Light does not Come ON
WIRING DIAGRAM
Refer to VSC OFF Indicator Light Remains ON (See page Brake>BRAKE CONTROL / DYNAMIC CONTROL SYSTEMS>VEHICLE STABILITY CONTROL SYSTEM>VSC OFF Indicator Light Remains ON).
CAUTION / NOTICE / HINT
- NOTICE:
-
When replacing the VSC actuator assembly, perform zero point calibration (See page Brake>BRAKE CONTROL / DYNAMIC CONTROL SYSTEMS>VEHICLE STABILITY CONTROL SYSTEM>CALIBRATION).
PROCEDURE
Check if a CAN communication system DTC is output (See page Power Source / Network>CAN COMMUNICATION>CAN COMMUNICATION SYSTEM>HOW TO PROCEED WITH TROUBLESHOOTING).
| Result | Proceed to |
|---|---|
| DTC is not output | A |
| DTC is output | B |
A
B
(See pagePower Source / Network>CAN COMMUNICATION>CAN COMMUNICATION SYSTEM>DIAGNOSTIC TROUBLE CODE CHART)
Check the skid control ECU connector connection condition.
- OK:
The connector is securely connected.
OK
NG
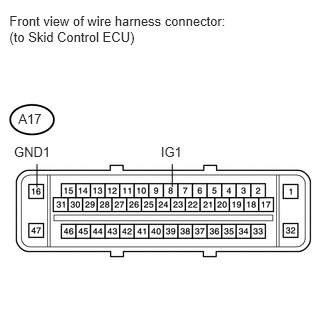
Disconnect the A17 ECU connector.
Measure the voltage and resistance according to the value(s) in the table below.
- Standard Voltage:
Tester Connection Switch Condition Specified Condition A17-8 (IG1) - Body ground Ignition switch ON 11 to 14 V
- Standard Resistance:
Tester Connection Condition Specified Condition A17-16 (GND1) - Body ground Always Below 1 Ω
OK
NG
Connect the Techstream to the DLC3.
Turn the ignition switch to ON.
Turn the Techstream on.
Select the Active Test mode and operate the VSC OFF indicator light using the Techstream.
| Tester Display | Test Part | Control Range | Diagnostic Note |
|---|---|---|---|
| VSC OFF Indicator Light | VSC OFF indicator light | ON / OFF | Observe combination meter |
Check that the VSC OFF indicator light turns on and off in the combination meter when using the Techstream.
- OK:
The VSC OFF indicator light turns on and off in accordance with the Techstream operation.
OK
NG
(See pageVehicle Interior>METER / GAUGE / DISPLAY>METER / GAUGE SYSTEM>HOW TO PROCEED WITH TROUBLESHOOTING)
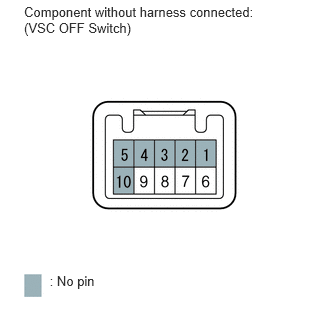
Remove the VSC OFF switch (See page Brake>BRAKE CONTROL / DYNAMIC CONTROL SYSTEMS>VSC OFF SWITCH>REMOVAL).
Measure the resistance according to the value(s) in the table below.
- Standard Resistance:
Tester Connection Switch Condition Specified Condition 6 - 9 Switch is pressed Below 1 Ω Switch is not pressed 10 kΩ or higher
OK
NG
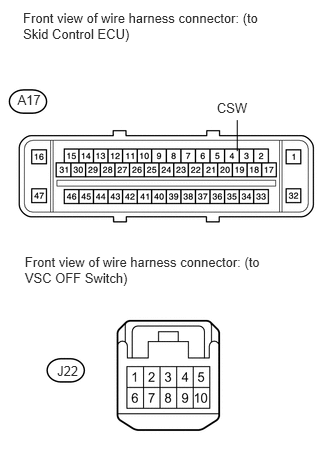
Disconnect the A17 ECU connector.
Disconnect the J22 switch connector.
Measure the resistance according to the value(s) in the table below.
- Standard Resistance:
Tester Connection Condition Specified Condition A17-4 (CSW) - J22-9 Always Below 1 Ω A17-4 (CSW) - Body ground Always 10 kΩ or higher J22-6 - Body ground Always Below 1 Ω
OK
NG