3UR-FBE FUEL FUEL PUMP INSTALLATION
CAUTION / NOTICE / HINT
- HINT:
-
Perform "Inspection After Repairs" after replacing the fuel injector (See page Engine / Hybrid System>3UR-FBE ENGINE CONTROL>SFI SYSTEM>INITIALIZATION).
PROCEDURE

 83320
1.INSTALL FUEL SENDER GAUGE ASSEMBLY
23280
2.INSTALL FUEL PRESSURE REGULATOR ASSEMBLY
77020A
3.INSTALL FUEL SUCTION WITH PUMP AND GAUGE TUBE ASSEMBLY
Apply a light coat of gasoline to a new gasket and install it to the fuel tank.
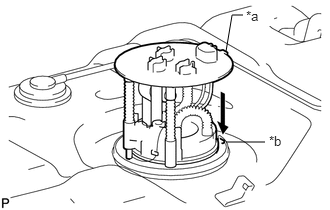
Align the protrusion of the fuel suction with pump and gauge tube assembly with the groove of the fuel tank.
| *a | Protrusion |
| *b | Groove |
Install the fuel suction with pump and gauge tube assembly into the fuel tank.
- NOTICE:
-
Be careful not to bend the arm of the fuel sender gauge.
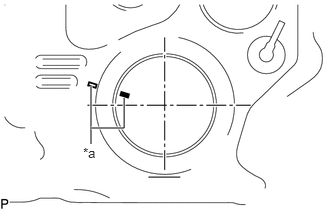
| *a | Co-rotation Prevention Check Mark |
Apply a co-rotation prevention check mark to the fuel suction with pump and gauge tube assembly.
- HINT:
-
Perform this procedure when replacement of the fuel suction with pump and gauge tube assembly is necessary.
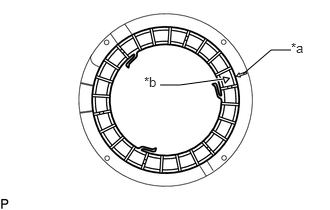
| *a | Rotational Start Point Mark (Fuel Tank Assembly Side) |
| *b | Rotational Start Point Mark (Fuel Pump Gauge Retainer Side) |
Temporarily place the fuel pump gauge retainer by aligning the rotational start point mark of a new fuel pump gauge retainer with the rotational start point mark of the fuel tank assembly while pressing the fuel suction with pump and gauge tube into the fuel tank assembly.
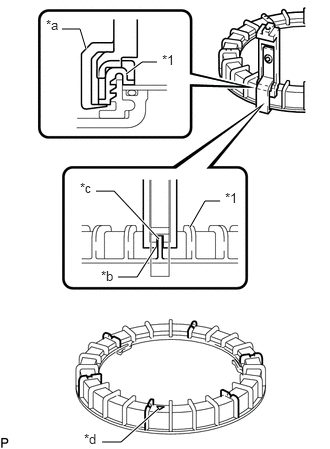
| *1 | Fuel Pump Gauge Retainer |
| *a | SST (claw set) |
| *b | Rib |
| *c | Cutout |
| *d | SST (Claw Set) Incorrect Installation Point (Rotational Start Point Mark of Fuel Pump Gauge Retainer) |
Set 4 SSTs (claw sets) to the fuel pump gauge retainer and temporarily install.
- SST
- 09808-14031 (09808-01080, 09808-01090, 09808-01100)
- NOTICE:
- ·
Align the cutout of SST (claw set) to the rib of the fuel pump gauge retainer.
·Do not place SST on the rotational start point mark of the fuel pump gauge retainer, otherwise SST (claw set) cannot be set correctly.
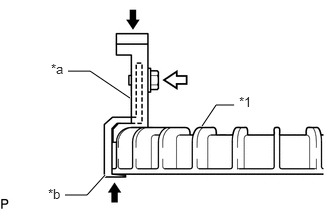
| *1 | Fuel Pump Gauge Retainer |
| *a | SST (Claw Set) |
| *b | Hook |

|
Press |

|
SST (Bolt) |
While firmly pressing the claw of SST into rib of the fuel pump gauge retainer, tighten the bolt.
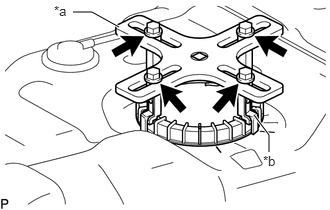
| *a | SST (Plate) |
| *b | SST (Claw Set) |
|
|
SST (Bolt) |
Temporarily install SST (plate) to SST (claw set) with 4 SSTs (bolts).
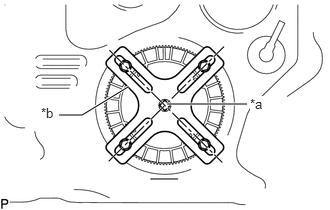
| *a | Center of Fuel Pump Gauge Retainer |
| *b | SST (Plate) |
Adjust the position of SST (plate) so that the setting hole of SST (handle) aligns with the center of the fuel pump gauge retainer.
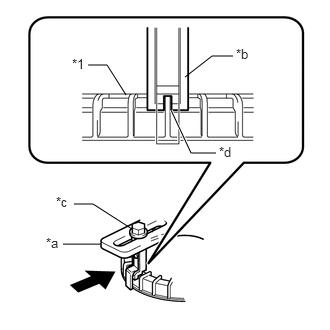
| *1 | Fuel Pump Gauge Retainer |
| *a | SST (Plate) |
| *b | SST (Claw Set) |
| *c | SST (Bolt) |
| *d | Rib |
|
|
Press |
While firmly pressing the SST (claw set) into rib of the fuel pump gauge retainer, tighten SST (bolt).
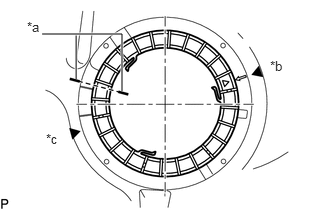
| *a | Co-rotation Prevention Check Mark |
| *b | Tightening Start Position |
| *c | One and Half Rotation Position |
While one person presses the fuel suction with pump and gauge tube assembly into the fuel tank assembly, have another person firmly press the fuel pump gauge retainer into the threads of the fuel tank assembly and tighten approximately one and a half turns.
- NOTICE:
- ·
Do not use any tools other than SST, such as a screwdriver, etc.
·Do not use excessive force when pressing down on SST, as the fuel suction with pump and gauge tube assembly will place excessive force on the pump gauge retainer and be difficult to remove, and parts may be damaged.
·Do not use an impact wrench or turn the SST handle with excessive force, as parts may be damaged.
·Do not rotate the fuel pump gauge retainer when the co-rotation prevention check mark is out of place.
Check the tightening condition of the fuel pump gauge retainer.
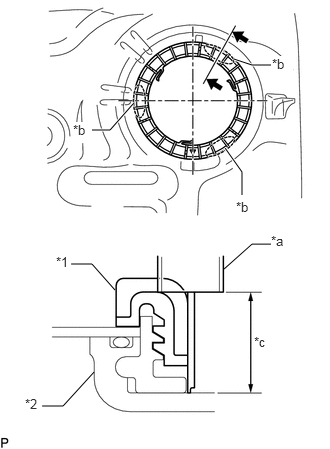
| *1 | Fuel Pump Gauge Retainer |
| *2 | Fuel Tank Assembly |
| *a | Vernier Caliper |
| *b | Measurement Position |
| *c | Measurement Height |
Using a vernier caliper, measure the upper surface dimensions of the fuel tank assembly at the 3 positions as shown in the illustration.
- Standard:
Measurement difference is within 3 mm.
- NOTICE:
-
If the measurement difference is approximately 6 mm, the threads misaligned by 1 threads (6 mm) and the fuel pump gauge retainer must be installed again.
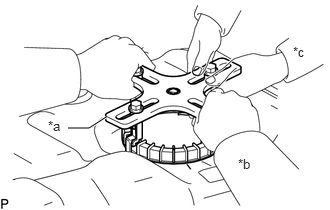
| *a | SST (Plate) |
| *b | Person in Charge of Tightening |
| *c | Person in Charge of Supporting |
While one person presses the fuel tank vent tube assembly into the fuel tank assembly, have another person slowly tighten approximately half turns.
Install SST (handle) to SST (plate).
- SST
- 09808-14031 (09808-01010, 09808-01020)
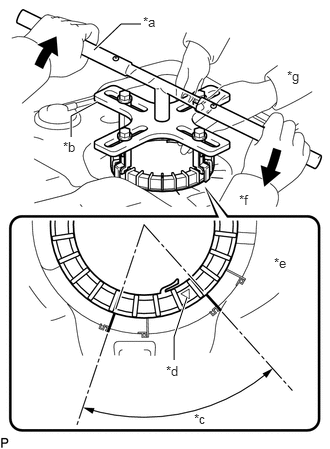
| *a | SST (Handle) |
| *b | SST (Plate) |
| *c | Tightening Complete Position |
| *d | Rotational Start Point Mark of Fuel Pump Gauge Retainer |
| *e | Rotational Start Point Mark of Fuel Tank Assembly |
| *f | Person in Charge of Tightening |
| *g | Person in Charge of Supporting |
|
|
Tighten |
While one person presses the fuel suction with pump and gauge tube assembly onto the fuel tank sub-assembly, have another person use SST (handle) and slowly tighten the fuel pump gauge retainer until it reaches the tightening complete position.
4.INSTALL FUEL PRESSURE SWITCHING VALVE ASSEMBLY
77100
5.INSTALL FUEL TANK ASSEMBLY
Install the fuel tank (See page Engine / Hybrid System>3UR-FBE FUEL>FUEL TANK>INSTALLATION).