BRAKE CONTROL / DYNAMIC CONTROL SYSTEMS ELECTRONICALLY CONTROLLED BRAKE SYSTEM(for HV Model) C050C1F Left Rear Wheel Speed Sensor Circuit Intermittent
DESCRIPTION
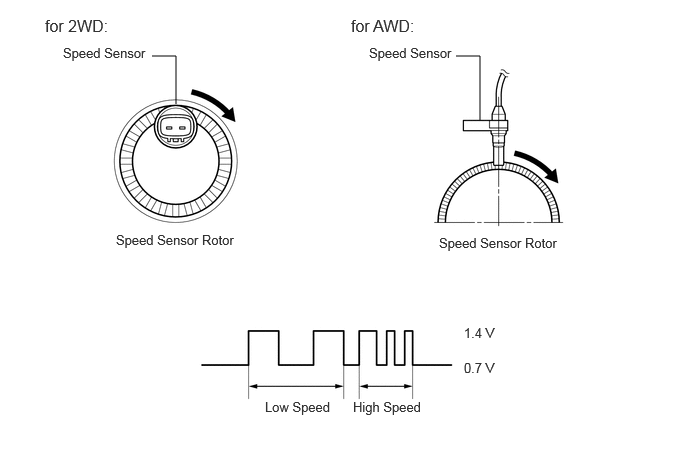
Each speed sensor detects the wheel speed and sends the signals to the skid control ECU (brake booster with master cylinder assembly). These signals are used for ABS control.
- HINT:
-
The output voltage values shown below are for when the vehicle wire harnesses are connected to the skid control ECU (brake booster with master cylinder assembly) and the speed sensors.
| DTC No. | Detection Item | DTC Detection Condition | Trouble Area | DTC Output from | Priority |
|---|---|---|---|---|---|
| C050C1F | Left Rear Wheel Speed Sensor Circuit Intermittent | Any of the following is detected:
·
An open in the sensor signal of a malfunctioning wheel occurs 255 times or more. ·
At a vehicle speed of 20 km/h (12 mph) or more, noise occurs in the sensor signals of a malfunctioning wheel 75 times or more within 5 seconds. ·
At a vehicle speed of 10 km/h (6 mph) or more, noise occurs once per rotor rotation for 15 seconds or more. |
·
Rear speed sensor LH*1 ·
Rear speed sensor LH (rear axle hub and bearing assembly LH)*2 ·
Skid control sensor wire LH (No. 2 parking brake wire assembly) ·
Speed sensor installed improperly ·
Wire harness or connector ·
Rear speed sensor rotor LH (rear axle hub and bearing assembly LH) ·
Skid control ECU (brake booster with master cylinder assembly) |
Brake/EPB | A |
*1: for AWD
*2: for 2WD
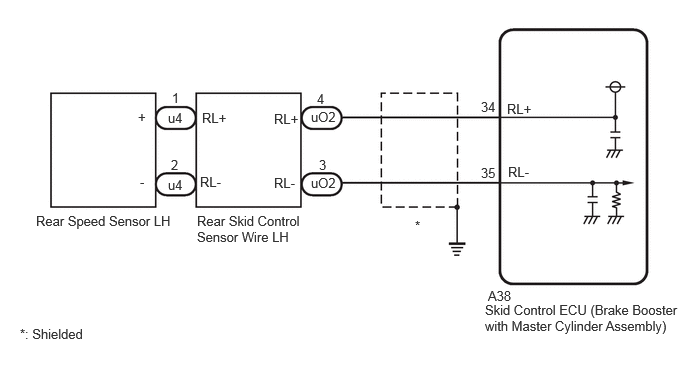
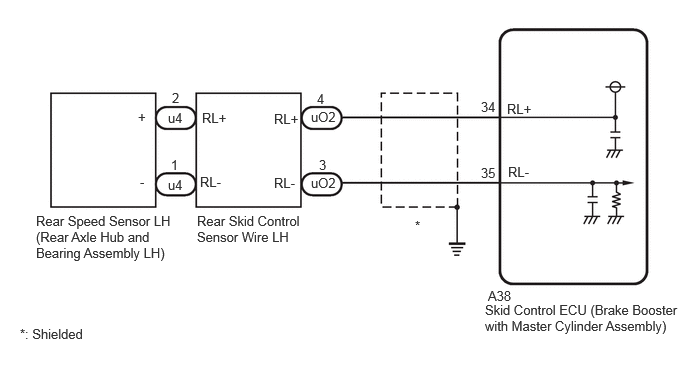
WIRING DIAGRAM
CAUTION / NOTICE / HINT
- NOTICE:
- ·
After replacing the skid control ECU (brake booster with master cylinder assembly), perform "Calibration".
·After replacing or removing and installing a speed sensor, perform Dealer Mode (Signal Check) inspection to confirm that the speed sensors are operating correctly.
·After replacing or removing and installing a speed sensor rotor, perform Dealer Mode (Signal Check) inspection to confirm that the speed sensors are operating correctly.
PROCEDURE
Using the GTS, check for any momentary interruptions in the wire harness and connector corresponding to a DTC.
- Chassis > Brake/EPB > Data List
-
Tester Display Measurement Item Range Normal Condition Diagnostic Note RL Speed Sensor Voltage Open Rear speed sensor LH voltage open detection Normal / Under intermittent Normal: Normal
Under intermittent: Momentary interruption-
- Chassis > Brake/EPB > Data List
-
Tester Display RL Speed Sensor Voltage Open - 50003 435 113
Check for any momentary interruptions in the wire harness and connectors.
- OK:
There are no momentary interruptions.
- NOTICE:
-
Perform the above inspection before removing the sensor and connector.
- Result:
Proceed to OK NG
OK
NG
Select the Data List on the GTS.
- Chassis > Brake/EPB > Data List
-
Tester Display Measurement Item Range Normal Condition Diagnostic Note RL Wheel Speed Rear wheel speed sensor LH reading Min.: 0.0 km/h (0.0 mph)
Max.: 6553.5 km/h (4072 mph)Vehicle stopped: 0.0 km/h (0.0 mph) When driving at constant speed: No large fluctuations
- Chassis > Brake/EPB > Data List
-
Tester Display RL Wheel Speed - 50003 435 16
Check the rear speed sensor LH output value.
- OK:
The output value changes in accordance with the vehicle speed.
- Result:
Proceed to OK NG
OK
NG
Pre-procedure1
None
Procedure1
Clear the DTCs.
- Chassis > Brake/EPB > Clear DTCs
- 50002 435
- Result:
Proceed to NEXT
Post-procedure1
Turn the ignition switch off.
NEXT
Pre-procedure1
Based on the Freeze Frame Data and interview with the customer, attempt to reproduce the conditions when the malfunction occurred.
Procedure1
Operate the GTS to read the DTCs.
- Chassis > Brake/EPB > Trouble Codes
- 50001 435
- Result:
Result Proceed to C050C1F is not output A C050C1F is output B
Post-procedure1
None
A
Click hereGeneral>INTRODUCTION>HOW TO TROUBLESHOOT ECU CONTROLLED SYSTEMS>HOW TO PROCEED WITH TROUBLESHOOTING
B
Check the vehicle specification.
- Result:
Result Proceed to for 2WD A for AWD B
A
B
Pre-procedure1
Turn the ignition switch off.
Procedure1
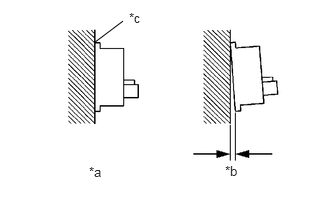
| *a | Correct |
| *b | Incorrect |
| *c | No clearance |
Check the rear speed sensor LH installation.
- OK:
There is no clearance between the rear speed sensor LH and the rear axle hub and bearing assembly LH.
- HINT:
-
The rear speed sensor rotor LH and rear speed sensor LH are incorporated into the rear axle hub and bearing assembly LH.
-
If the rear speed sensor rotor LH needs to be replaced, replace the rear axle hub and bearing assembly LH with rear speed sensor LH.
- Result:
Proceed to OK NG
Post-procedure1
None
OK
NG
Pre-procedure1
Turn the ignition switch off.
Procedure1
Make sure that there is no looseness at the locking part and the connecting part of the connectors.
- OK:
The connector is securely connected.
Pre-procedure2
Disconnect the u4 and uO2 skid control sensor wire LH (No. 2 parking brake wire assembly) connector.
Procedure2
Check both the connector case and the terminals for deformation and corrosion.
- OK:
No deformation or corrosion.
Procedure3
Measure the resistance according to the value(s) in the table below.
- Standard Resistance:
Tester Connection Condition Specified Condition Click Location & Routing(u4,uO2)Location & Routingewd_type=routing;type=c,w;code=u4,uO2
Click Connector(uO2)Body>No. 1 Parking Brake Wire Assembly / No. 2 Parking Brake Wire Assembly>No. 2 Parking Brake Wire Assembly and Floor Wireewd_type=component;type=w;code=uO2;pinno=4,3
u4-2 (+) - uO2-4 (RL+) Always Below 1 Ω u4-2 (+) or uO2-4 (RL+) - Body ground and other terminals Always 10 kΩ or higher u4-1 (-) - uO2-3 (RL-) Always Below 1 Ω u4-1 (-) or uO2-3 (RL-) - Body ground and other terminals Always 10 kΩ or higher
- Result:
Proceed to OK NG
Post-procedure1
None
OK
NG
Procedure1
Make sure that there is no looseness at the locking part and the connecting part of the connectors.
- OK:
The connector is securely connected.
Pre-procedure1
Disconnect the A38 skid control ECU (brake booster with master cylinder assembly) connector.
Procedure2
Check both the connector case and the terminals for deformation and corrosion.
- OK:
No deformation or corrosion.
Procedure3
Measure the resistance according to the value(s) in the table below.
- Standard Resistance:
Tester Connection Condition Specified Condition Click Location & Routing(uO2,A38)Location & Routingewd_type=routing;type=w,c;code=uO2,A38
Click Connector(uO2)Body>No. 1 Parking Brake Wire Assembly / No. 2 Parking Brake Wire Assembly>No. 2 Parking Brake Wire Assembly and Floor Wireewd_type=component;type=w;code=uO2;pinno=4,3
Click Connector(A38)Engine Compartment>Engine Room Main Wire>Brake Booster with Master Cylinder Assemblyewd_type=component;type=c;code=A38;pinno=34,35
uO2-4 (RL+) - A38-34 (RL+) Always Below 1 Ω uO2-4 (RL+) or A38-34 (RL+) - Body ground Always 10 kΩ or higher uO2-3 (RL-) - A38-35 (RL-) Always Below 1 Ω uO2-3 (RL-) or A38-35 (RL-) - Body ground Always 10 kΩ or higher
- Result:
Proceed to OK NG
Post-procedure1
None
OK
NG
Pre-procedure1
Reconnect the A38 skid control ECU (brake booster with master cylinder assembly) connector.
Reconnect the uO2 skid control sensor wire LH (No. 2 parking brake wire assembly) connector.
Procedure1
Make sure that there is no looseness at the locking part and the connecting part of the connectors.
- OK:
The connector is securely connected.
Pre-procedure2
Turn the ignition switch to ON.
Procedure2
Measure the voltage according to the value(s) in the table below.
- Standard Voltage:
Tester Connection Condition Specified Condition Click Location & Routing(u4)Location & Routingewd_type=routing;type=c;code=u4
u4-2 (+) - Body ground Ignition switch ON 8 to 14 V
- HINT:
-
The rear speed sensor LH is incorporated into the rear axle hub and bearing assembly LH.
-
If the rear speed sensor LH needs to be replaced, replace the rear axle hub and bearing assembly LH.
- Result:
Proceed to OK NG
Post-procedure1
None
OK
NG
Pre-procedure1
Turn the ignition switch off.
Procedure1
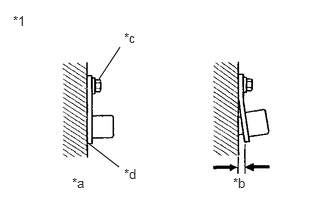
| *1 | Rear Speed Sensor LH |
| *a | OK |
| *b | NG |
| *c | 8.5 N*m (87 kgf*cm, 75 in.*lbf) |
| *d | No Clearance |
Check the rear speed sensor LH installation.
- OK:
There is no clearance between the sensor and the rear axle carrier.
The installation bolt is tightened properly.
- Torque:
8.5 N*m (87 kgf*cm, 75 in.*lbf)
- Result:
Proceed to OK NG
Post-procedure1
None
OK
NG
Pre-procedure1
Remove the rear speed sensor LH and the component with the rear speed sensor rotor LH.
- HINT:
-
for Rear Speed Sensor LH: Click hereBrake>BRAKE CONTROL / DYNAMIC CONTROL SYSTEMS>REAR SPEED SENSOR (for AWD)>REMOVAL
-
for Rear Speed Sensor Rotor LH: Click hereDrivetrain>AXLE AND DIFFERENTIAL>REAR AXLE HUB (for AWD)>REMOVAL
Procedure1
Check the rear speed sensor tip LH and rear speed sensor rotor LH.
- OK:
The rear speed sensor tip LH and rear speed sensor rotor LH are free of scratches, oil, and foreign matter.
- NOTICE:
- ·
If there is oil or foreign matter on the rear speed sensor LH, clean the rear speed sensor LH and then check the rear speed sensor rotor LH.
·If the rear speed sensor LH is damaged, replace the rear speed sensor LH with a new one.
·Check the rear speed sensor LH signal after cleaning or replacement.
- Result:
Proceed to OK NG
Post-procedure1
None
OK
NG
Pre-procedure1
Turn the ignition switch off.
Procedure1
Make sure that there is no looseness at the locking part and the connecting part of the connectors.
- OK:
The connector is securely connected.
Pre-procedure2
Disconnect the u4 and uO2 skid control sensor wire LH (No. 2 parking brake wire assembly) connector.
Procedure2
Check both the connector case and the terminals for deformation and corrosion.
- OK:
No deformation or corrosion.
Procedure3
Measure the resistance according to the value(s) in the table below.
- Standard Resistance:
Tester Connection Condition Specified Condition Click Location & Routing(u4,uO2)Location & Routingewd_type=routing;type=c,w;code=u4,uO2
Click Connector(uO2)Body>No. 1 Parking Brake Wire Assembly / No. 2 Parking Brake Wire Assembly>No. 2 Parking Brake Wire Assembly and Floor Wireewd_type=component;type=w;code=uO2;pinno=4,3
u4-2 (+) - uO2-4 (RL+) Always Below 1 Ω u4-2 (+) or uO2-4 (RL+) - Body ground and other terminals Always 10 kΩ or higher u4-1 (-) - uO2-3 (RL-) Always Below 1 Ω u4-1 (-) or uO2-3 (RL-) - Body ground and other terminals Always 10 kΩ or higher
- Result:
Proceed to OK NG
Post-procedure1
None
OK
NG
Procedure1
Make sure that there is no looseness at the locking part and the connecting part of the connectors.
- OK:
The connector is securely connected.
Pre-procedure1
Disconnect the A38 skid control ECU (brake booster with master cylinder assembly) connector.
Procedure2
Check both the connector case and the terminals for deformation and corrosion.
- OK:
No deformation or corrosion.
Procedure3
Measure the resistance according to the value(s) in the table below.
- Standard Resistance:
Tester Connection Condition Specified Condition Click Location & Routing(uO2,A38)Location & Routingewd_type=routing;type=w,c;code=uO2,A38
Click Connector(uO2)Body>No. 1 Parking Brake Wire Assembly / No. 2 Parking Brake Wire Assembly>No. 2 Parking Brake Wire Assembly and Floor Wireewd_type=component;type=w;code=uO2;pinno=4,3
Click Connector(A38)Engine Compartment>Engine Room Main Wire>Brake Booster with Master Cylinder Assemblyewd_type=component;type=c;code=A38;pinno=34,35
uO2-4 (RL+) - A38-34 (RL+) Always Below 1 Ω uO2-4 (RL+) or A38-34 (RL+) - Body ground Always 10 kΩ or higher uO2-3 (RL-) - A38-35 (RL-) Always Below 1 Ω uO2-3 (RL-) or A38-35 (RL-) - Body ground Always 10 kΩ or higher
- Result:
Proceed to OK NG
Post-procedure1
None
OK
NG
Pre-procedure1
Reconnect the A38 skid control ECU (brake booster with master cylinder assembly) connector.
Reconnect the uO2 skid control sensor wire LH (No. 2 parking brake wire assembly) connector.
Procedure1
Make sure that there is no looseness at the locking part and the connecting part of the connectors.
- OK:
The connector is securely connected.
Pre-procedure2
Turn the ignition switch to ON.
Procedure2
Measure the voltage according to the value(s) in the table below.
- Standard Voltage:
Tester Connection Condition Specified Condition Click Location & Routing(u4)Location & Routingewd_type=routing;type=c;code=u4
u4-1 (+) - Body ground Ignition switch ON 8 to 14 V
- Result:
Proceed to OK NG
Post-procedure1
None
OK
NG