NETWORKING LIN COMMUNICATION SYSTEM B120687 P/W Master SW System Missing Message B124987 Double Locking System Missing Message B232187 D-Door P/W System Missing Message B232287 P-Door P/W System Missing Message B232387 RR-Door P/W System Missing Message B232487 RL-Door P/W System Missing Message
DESCRIPTION
This DTC is stored when LIN communication between the main body ECU (multiplex network body ECU) and multiplex network master switch assembly, power window regulator motor assembly (driver door), power window regulator motor assembly (front passenger door), power window regulator motor assembly (rear door RH), power window regulator motor assembly (rear door LH) or double lock door control relay assembly*1 stops for 10 seconds or more.
*1: w/ Double Locking System
| DTC No. | Detection Item | DTC Detection Condition | Trouble Area | DTC Output from | Priority |
|---|---|---|---|---|---|
| B120687 | P/W Master SW System Missing Message | No communication between multiplex network master switch assembly and main body ECU (multiplex network body ECU) for 10 seconds or more. | ·
Main body ECU (multiplex network body ECU) ·
Power distribution box assembly ·
Multiplex network master switch assembly ·
Wire harness or connector |
Main Body | A |
| B124987 | Double Locking System Missing Message | No communication between double lock door control relay assembly and main body ECU (multiplex network body ECU) for 10 seconds or more.*1 | ·
Main body ECU (multiplex network body ECU) ·
Power distribution box assembly ·
Double lock door control relay assembly ·
Wire harness or connector |
Main Body | A |
| B232187 | D-Door P/W System Missing Message | No communication between front power window regulator motor assembly (driver door) and main body ECU (multiplex network body ECU) for 10 seconds or more. | ·
Main body ECU (multiplex network body ECU) ·
Power distribution box assembly ·
Multiplex network master switch assembly ·
Front power window regulator motor assembly (driver door) ·
Wire harness or connector |
Main Body | A |
| B232287 | P-Door P/W System Missing Message | No communication between front power window regulator motor assembly (front passenger door) and main body ECU (multiplex network body ECU) for 10 seconds or more. | ·
Main body ECU (multiplex network body ECU) ·
Power distribution box assembly ·
Front power window regulator motor assembly (front passenger door) ·
Wire harness or connector |
Main Body | A |
| B232387 | RR-Door P/W System Missing Message | No communication between rear power window regulator motor assembly (rear RH door) and main body ECU (multiplex network body ECU) for 10 seconds or more. | ·
Main body ECU (multiplex network body ECU) ·
Power distribution box assembly ·
Rear power window regulator motor assembly (rear RH door) ·
Wire harness or connector |
Main Body | A |
| B232487 | RL-Door P/W System Missing Message | No communication between rear power window regulator motor assembly (rear LH door) and main body ECU (multiplex network body ECU) for 10 seconds or more. | ·
Main body ECU (multiplex network body ECU) ·
Power distribution box assembly ·
Rear power window regulator motor assembly (rear LH door) ·
Wire harness or connector |
Main Body | A |
*1: w/ Double Locking System
WIRING DIAGRAM
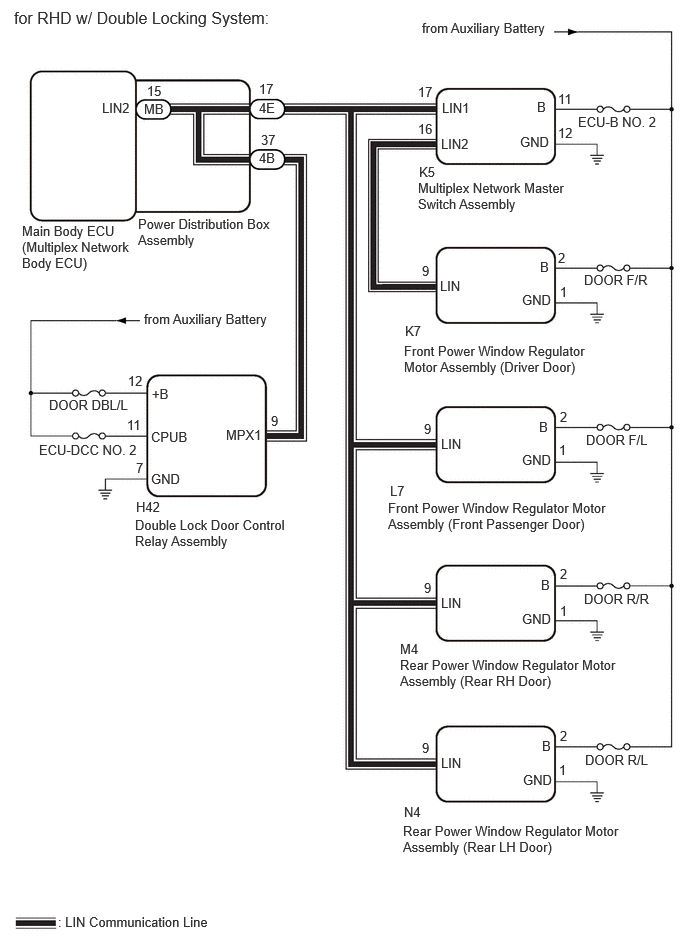
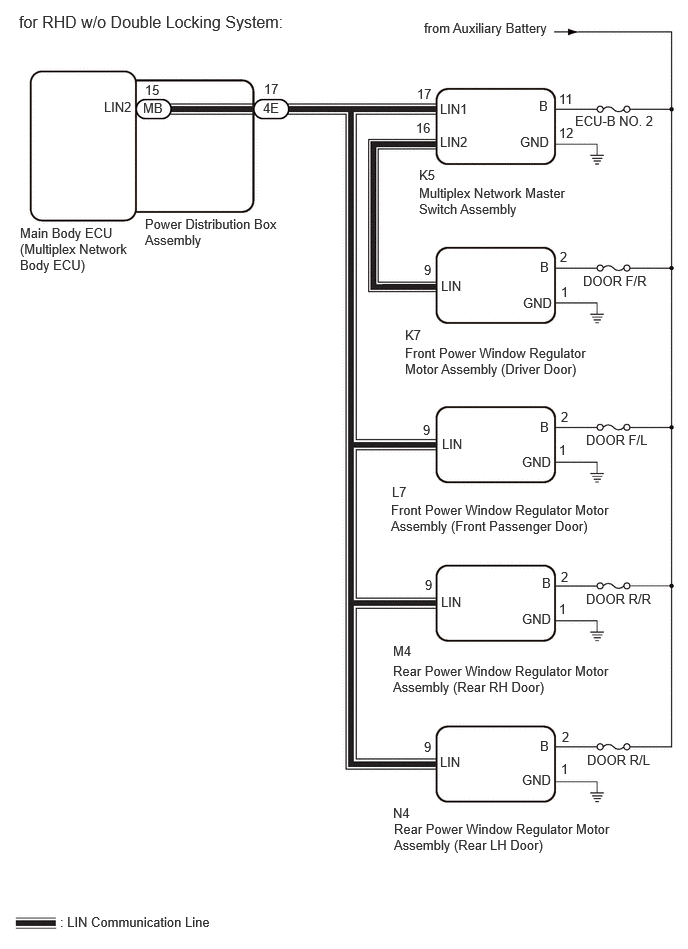
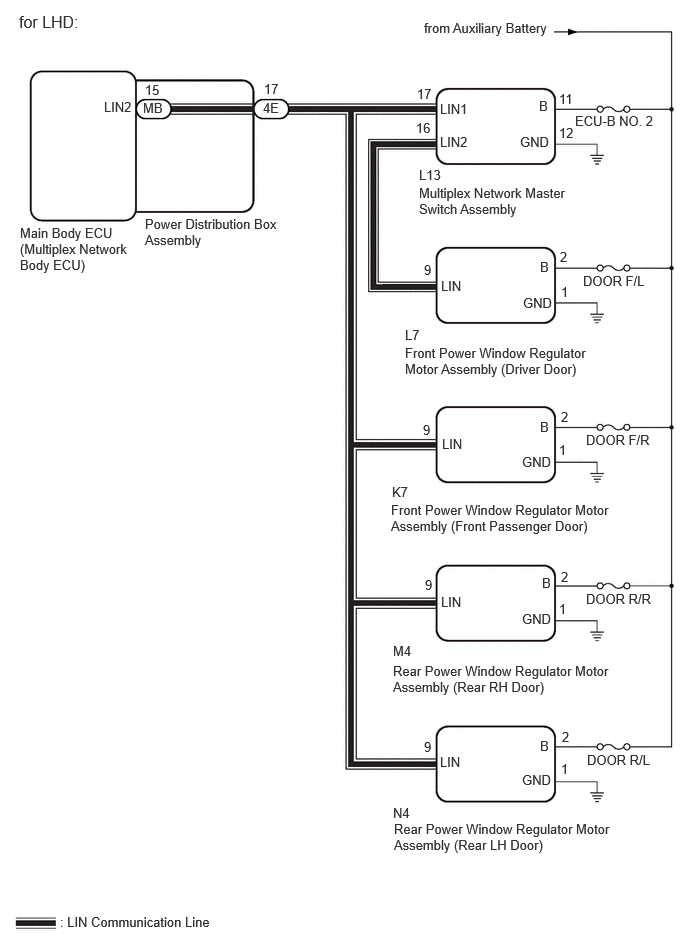
CAUTION / NOTICE / HINT
- NOTICE:
- ·
Inspect the fuses for circuits related to this system before performing the following procedure.
·When a power window regulator motor assembly is replaced or removed and reinstalled, it is necessary to perform initialization.
Click hereVehicle Exterior>WINDOW / GLASS>POWER WINDOW CONTROL SYSTEM>INITIALIZATION
·Before replacing the main body ECU (multiplex network body ECU), refer to Service Bulletin.
PROCEDURE
Clear the DTCs.
- Body Electrical > Main Body > Clear DTCs
- 50002 449
- Result:
Proceed to NEXT
NEXT
Check vehicle type.
- Result:
Result Proceed to for RHD w/ Double Locking System A for RHD w/o Double Locking System B for LHD C
A
B
C
Check for DTCs.
- Body Electrical > Main Body > Trouble Codes
- 50001 449
- Result:
Result Proceed to B232588 is output A B120687, B124987, B232187, B232287, B232387 and B232487 are output B B120687, B232187, B232287, B232387 and B232487 are output C B120687 and B232187 are output D Only B120687 is output E Only B124987 is output F Only B232187 is output G Only B232287 is output H Only B232387 is output I Only B232487 is output J DTCs are not output K
A
B
C
D
E
F
G
H
I
J
K
Click hereGeneral>INTRODUCTION>HOW TO TROUBLESHOOT ECU CONTROLLED SYSTEMS>HOW TO PROCEED WITH TROUBLESHOOTING
Pre-procedure1
Remove the power distribution box assembly.
Remove the main body ECU (multiplex network body ECU) from the power distribution box assembly.
Procedure1
Measure the resistance according to the value(s) in the table below.
- HINT:
-
This inspection is to check the LIN communication line in the power distribution box assembly that connects the wire harness to the built-in main body ECU (multiplex network body ECU).
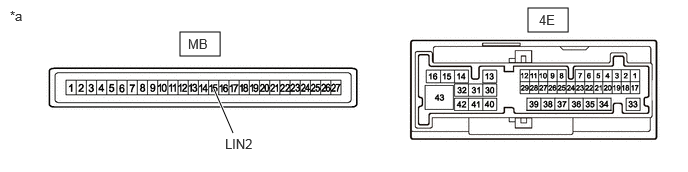
| *a | Component without harness connected
(Power Distribution Box Assembly) |
- | - |
- Standard Resistance:
Tester Connection Condition Specified Condition 4E-17 - MB-15 (LIN2) Always Below 1 Ω
- Result:
Proceed to OK NG
Post-procedure1
None
OK
NG
Pre-procedure1
Disconnect the 4E power distribution box assembly connector.
Disconnect the K5 multiplex network master switch assembly connector.
Procedure1
Measure the resistance according to the value(s) in the table below.
- NOTICE:
-
Make sure that each ECU is in sleep mode before performing the inspection. To enter sleep mode, turn the ignition switch from ON to off and wait for 180 seconds or more without operating any switches.
- Standard Resistance:
Tester Connection Condition Specified Condition Click Location & Routing(K5)Location & Routingewd_type=routing;type=c;code=K5
Click Connector(K5)Body>Front Door Wire RH / Television Camera Wire>Multiplex Network Master Switch Assemblyewd_type=component;type=c;code=K5;pinno=17
4E-17 - K5-17 (LIN1) Always Below 1 Ω
- Result:
Proceed to OK NG
Post-procedure1
None
OK
NG
Pre-procedure1
Remove the power distribution box assembly.
Remove the main body ECU (multiplex network body ECU) from the power distribution box assembly.
Procedure1
Measure the resistance according to the value(s) in the table below.
- HINT:
-
This inspection is to check the LIN communication line in the power distribution box assembly that connects the wire harness to the built-in main body ECU (multiplex network body ECU).
| *a | Component without harness connected
(Power Distribution Box Assembly) |
- | - |
- Standard Resistance:
Tester Connection Condition Specified Condition 4E-17 - MB-15 (LIN2) Always Below 1 Ω
- Result:
Proceed to OK NG
Post-procedure1
None
OK
NG
Pre-procedure1
Disconnect the 4E power distribution box assembly connector.
Disconnect the K5 multiplex network master switch assembly connector.
Procedure1
Measure the resistance according to the value(s) in the table below.
- NOTICE:
-
Make sure that each ECU is in sleep mode before performing the inspection. To enter sleep mode, turn the ignition switch from ON to off and wait for 180 seconds or more without operating any switches.
- Standard Resistance:
Tester Connection Switch Condition Specified Condition Click Location & Routing(K5)Location & Routingewd_type=routing;type=c;code=K5
Click Connector(K5)Body>Front Door Wire RH / Television Camera Wire>Multiplex Network Master Switch Assemblyewd_type=component;type=c;code=K5;pinno=17
4E-17 - K5-17 (LIN1) Ignition switch off Below 1 Ω
- Result:
Proceed to OK NG
Post-procedure1
None
OK
NG
Pre-procedure1
Disconnect the K5 multiplex network master switch assembly connector.
Procedure1
Measure the voltage and resistance according to the value(s) in the table below.
- Standard Voltage:
Tester Connection Switch Condition Specified Condition Click Location & Routing(K5)Location & Routingewd_type=routing;type=c;code=K5
Click Connector(K5)Body>Front Door Wire RH / Television Camera Wire>Multiplex Network Master Switch Assemblyewd_type=component;type=c;code=K5;pinno=11,12
K5-11 (B) - K5-12 (GND) Ignition switch off 11 to 14 V
- Standard Resistance:
Tester Connection Condition Specified Condition Click Location & Routing(K5)Location & Routingewd_type=routing;type=c;code=K5
Click Connector(K5)Body>Front Door Wire RH / Television Camera Wire>Multiplex Network Master Switch Assemblyewd_type=component;type=c;code=K5;pinno=12
K5-12 (GND) - Body ground Always Below 1 Ω
- Result:
Proceed to OK NG
Post-procedure1
None
OK
NG
Pre-procedure1
Remove the power distribution box assembly.
Remove the main body ECU (multiplex network body ECU) from the power distribution box assembly.
Procedure1
Measure the resistance according to the value(s) in the table below.
- HINT:
-
This inspection is to check the LIN communication line in the power distribution box assembly that connects the wire harness to the built-in main body ECU (multiplex network body ECU).
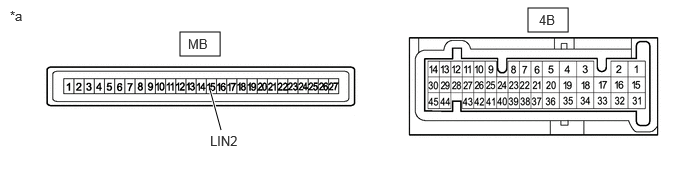
| *a | Component without harness connected
(Power Distribution Box Assembly) |
- | - |
- Standard Resistance:
Tester Connection Condition Specified Condition 4B-37 - MB-15 (LIN2) Always Below 1 Ω
- Result:
Proceed to OK NG
Post-procedure1
None
OK
NG
Pre-procedure1
Disconnect the 4B power distribution box assembly connector.
Disconnect the H42 double lock door control relay assembly connector.
Procedure1
Measure the resistance according to the value(s) in the table below.
- NOTICE:
-
Make sure that each ECU is in sleep mode before performing the inspection. To enter sleep mode, turn the ignition switch from ON to off and wait for 180 seconds or more without operating any switches.
- Standard Resistance:
Tester Connection Switch Condition Specified Condition Click Location & Routing(H42)Location & Routingewd_type=routing;type=c;code=H42
Click Connector(H42)Instrument Panel>Instrument Panel Wire / Speaker Wire>Double Lock Door Control Relay Assemblyewd_type=component;type=c;code=H42;pinno=9
4B-37 - H42-9 (MPX1) Ignition switch off Below 1 Ω
- Result:
Proceed to OK NG
Post-procedure1
None
OK
NG
Pre-procedure1
Disconnect the H42 double lock door control relay assembly connector.
Procedure1
Measure the resistance according to the value(s) in the table below.
- Standard Voltage:
Tester Connection Switch Condition Specified Condition Click Location & Routing(H42)Location & Routingewd_type=routing;type=c;code=H42
Click Connector(H42)Instrument Panel>Instrument Panel Wire / Speaker Wire>Double Lock Door Control Relay Assemblyewd_type=component;type=c;code=H42;pinno=12,7,11
H42-12 (+B) - H42-7 (GND) Ignition switch off 11 to 14 V H42-11 (CPUB) - H42-7 (GND) Ignition switch off 11 to 14 V
- Standard Resistance:
Tester Connection Condition Specified Condition Click Location & Routing(H42)Location & Routingewd_type=routing;type=c;code=H42
Click Connector(H42)Instrument Panel>Instrument Panel Wire / Speaker Wire>Double Lock Door Control Relay Assemblyewd_type=component;type=c;code=H42;pinno=7
H42-7 (GND) - Body ground Always Below 1 Ω
- Result:
Proceed to OK NG
Post-procedure1
None
OK
NG
Pre-procedure1
Disconnect the 4E power distribution box assembly connector.
Disconnect the K7 front power window regulator motor assembly (driver door) connector.
Procedure1
Measure the resistance according to the value(s) in the table below.
- Standard Resistance:
Tester Connection Condition Specified Condition Click Location & Routing(K7)Location & Routingewd_type=routing;type=c;code=K7
Click Connector(K7)Body>Front Door Wire RH / Television Camera Wire>Front Power Window Regulator Motor Assembly RHewd_type=component;type=c;code=K7;pinno=9
4E-17 - K7-9 (LIN) Always Below 1 Ω
- Result:
Proceed to OK NG
Post-procedure1
None
OK
NG
Pre-procedure1
Disconnect the K5 multiplex network master switch assembly connector.
Disconnect the K7 front power window regulator motor assembly (driver door) connector.
Procedure1
Measure the resistance according to the value(s) in the table below.
- NOTICE:
-
Make sure that each ECU is in sleep mode before performing the inspection. To enter sleep mode, turn the ignition switch from ON to off and wait for 180 seconds or more without operating any switches.
- Standard Resistance:
Tester Connection Condition Specified Condition Click Location & Routing(K5,K7)Location & Routingewd_type=routing;type=c,c;code=K5,K7
Click Connector(K5)Body>Front Door Wire RH / Television Camera Wire>Multiplex Network Master Switch Assemblyewd_type=component;type=c;code=K5;pinno=16
Click Connector(K7)Body>Front Door Wire RH / Television Camera Wire>Front Power Window Regulator Motor Assembly RHewd_type=component;type=c;code=K7;pinno=9
K5-16 - K7-9 (LIN) Always Below 1 Ω
- Result:
Proceed to OK NG
Post-procedure1
None
OK
NG
Pre-procedure1
Disconnect the K7 front power window regulator motor assembly (driver door) connector.
Procedure1
Measure the voltage and resistance according to the value(s) in the table below.
- Standard Voltage:
Tester Connection Switch Condition Specified Condition Click Location & Routing(K7)Location & Routingewd_type=routing;type=c;code=K7
Click Connector(K7)Body>Front Door Wire RH / Television Camera Wire>Front Power Window Regulator Motor Assembly RHewd_type=component;type=c;code=K7;pinno=2,1
K7-2 (B) - K7-1 (GND) Ignition switch off 11 to 14 V
- Standard Resistance:
Tester Connection Condition Specified Condition Click Location & Routing(K7)Location & Routingewd_type=routing;type=c;code=K7
Click Connector(K7)Body>Front Door Wire RH / Television Camera Wire>Front Power Window Regulator Motor Assembly RHewd_type=component;type=c;code=K7;pinno=1
K7-1 (GND) - Body ground Always Below 1 Ω
- Result:
Proceed to OK NG
Post-procedure1
None
OK
NG
Pre-procedure1
Disconnect the 4E power distribution box assembly connector.
Disconnect the L7 front power window regulator motor assembly (front passenger door) connector.
Procedure1
Measure the resistance according to the value(s) in the table below.
- NOTICE:
-
Make sure that each ECU is in sleep mode before performing the inspection. To enter sleep mode, turn the ignition switch from ON to off and wait for 180 seconds or more without operating any switches.
- Standard Resistance:
Tester Connection Switch Condition Specified Condition Click Location & Routing(L7)Location & Routingewd_type=routing;type=c;code=L7
Click Connector(L7)Body>Front Door Wire LH / Television Camera Wire>Front Power Window Regulator Motor Assembly LHewd_type=component;type=c;code=L7;pinno=9
4E-17 - L7-9 (LIN) Ignition switch off Below 1 Ω
- Result:
Proceed to OK NG
Post-procedure1
None
OK
NG
Pre-procedure1
Disconnect the L7 front power window regulator motor assembly (front passenger door) connector.
Procedure1
Measure the voltage and resistance according to the value(s) in the table below.
- Standard Voltage:
Tester Connection Switch Condition Specified Condition Click Location & Routing(L7)Location & Routingewd_type=routing;type=c;code=L7
Click Connector(L7)Body>Front Door Wire LH / Television Camera Wire>Front Power Window Regulator Motor Assembly LHewd_type=component;type=c;code=L7;pinno=2,1
L7-2 (B) - L7-1 (GND) Ignition switch off 11 to 14 V
- Standard Resistance:
Tester Connection Condition Specified Condition Click Location & Routing(L7)Location & Routingewd_type=routing;type=c;code=L7
Click Connector(L7)Body>Front Door Wire LH / Television Camera Wire>Front Power Window Regulator Motor Assembly LHewd_type=component;type=c;code=L7;pinno=1
L7-1 (GND) - Body ground Always Below 1 Ω
- Result:
Proceed to OK NG
Post-procedure1
None
OK
NG
Pre-procedure1
Disconnect the 4E power distribution box assembly connector.
Disconnect the M4 rear power window regulator motor assembly (rear RH door) connector.
Procedure1
Measure the resistance according to the value(s) in the table below.
- NOTICE:
-
Make sure that each ECU is in sleep mode before performing the inspection. To enter sleep mode, turn the ignition switch from ON to off and wait for 180 seconds or more without operating any switches.
- Standard Resistance:
Tester Connection Switch Condition Specified Condition Click Location & Routing(M4)Location & Routingewd_type=routing;type=c;code=M4
Click Connector(M4)Body>No. 1 Rear Door Wire>Rear Power Window Regulator Motor Assembly RHewd_type=component;type=c;code=M4;pinno=9
4E-17 - M4-9 (LIN) Ignition switch off Below 1 Ω
- Result:
Proceed to OK NG
Post-procedure1
None
OK
NG
Pre-procedure1
Disconnect the M4 rear power window regulator motor assembly (rear RH door) connector.
Procedure1
Measure the voltage and resistance according to the value(s) in the table below.
- Standard Voltage:
Tester Connection Switch Condition Specified Condition Click Location & Routing(M4)Location & Routingewd_type=routing;type=c;code=M4
Click Connector(M4)Body>No. 1 Rear Door Wire>Rear Power Window Regulator Motor Assembly RHewd_type=component;type=c;code=M4;pinno=2,1
M4-2 (B) - M4-1 (GND) Ignition switch off 11 to 14 V
- Standard Resistance:
Tester Connection Condition Specified Condition Click Location & Routing(M4)Location & Routingewd_type=routing;type=c;code=M4
Click Connector(M4)Body>No. 1 Rear Door Wire>Rear Power Window Regulator Motor Assembly RHewd_type=component;type=c;code=M4;pinno=1
M4-1 (GND) - Body ground Always Below 1 Ω
- Result:
Proceed to OK NG
Post-procedure1
None
OK
NG
Pre-procedure1
Disconnect the 4E power distribution box assembly connector.
Disconnect the N4 rear power window regulator motor assembly (rear LH door) connector.
Procedure1
Measure the resistance according to the value(s) in the table below.
- NOTICE:
-
Make sure that each ECU is in sleep mode before performing the inspection. To enter sleep mode, turn the ignition switch from ON to off and wait for 180 seconds or more without operating any switches.
- Standard Resistance:
Tester Connection Switch Condition Specified Condition Click Location & Routing(N4)Location & Routingewd_type=routing;type=c;code=N4
Click Connector(N4)Body>No. 2 Rear Door Wire>Rear Power Window Regulator Motor Assembly LHewd_type=component;type=c;code=N4;pinno=9
4E-17 - N4-9 (LIN) Ignition switch off Below 1 Ω
- Result:
Proceed to OK NG
Post-procedure1
None
OK
NG
Pre-procedure1
Disconnect the N4 rear power window regulator motor assembly (rear LH door) connector.
Procedure1
Measure the voltage and resistance according to the value(s) in the table below.
- Standard Voltage:
Tester Connection Switch Condition Specified Condition Click Location & Routing(N4)Location & Routingewd_type=routing;type=c;code=N4
Click Connector(N4)Body>No. 2 Rear Door Wire>Rear Power Window Regulator Motor Assembly LHewd_type=component;type=c;code=N4;pinno=2,1
N4-2 (B) - N4-1 (GND) Ignition switch off 11 to 14 V
- Standard Resistance:
Tester Connection Condition Specified Condition Click Location & Routing(N4)Location & Routingewd_type=routing;type=c;code=N4
Click Connector(N4)Body>No. 2 Rear Door Wire>Rear Power Window Regulator Motor Assembly LHewd_type=component;type=c;code=N4;pinno=1
N4-1 (GND) - Body ground Always Below 1 Ω
- Result:
Proceed to OK NG
Post-procedure1
None
OK
NG
Check for DTCs.
- Body Electrical > Main Body > Trouble Codes
- 50001 449
- Result:
Result Proceed to B232588 is output A B120687, B232187, B232287, B232387 and B232487 are output B B120687 and B232187 are output C Only B120687 is output D Only B232187 is output E Only B232287 is output F Only B232387 is output G Only B232487 is output H DTCs are not output I
A
B
C
D
E
F
G
H
I
Click hereGeneral>INTRODUCTION>HOW TO TROUBLESHOOT ECU CONTROLLED SYSTEMS>HOW TO PROCEED WITH TROUBLESHOOTING
Pre-procedure1
Disconnect the 4E power distribution box assembly connector.
Disconnect the K5 multiplex network master switch assembly connector.
Procedure1
Measure the resistance according to the value(s) in the table below.
- NOTICE:
-
Make sure that each ECU is in sleep mode before performing the inspection. To enter sleep mode, turn the ignition switch from ON to off and wait for 180 seconds or more without operating any switches.
- Standard Resistance:
Tester Connection Condition Specified Condition Click Location & Routing(K5)Location & Routingewd_type=routing;type=c;code=K5
Click Connector(K5)Body>Front Door Wire RH / Television Camera Wire>Multiplex Network Master Switch Assemblyewd_type=component;type=c;code=K5;pinno=17
4E-17 - K5-17 (LIN1) Always Below 1 Ω
- Result:
Proceed to OK NG
Post-procedure1
None
OK
NG
Pre-procedure1
Remove the power distribution box assembly.
Remove the main body ECU (multiplex network body ECU) from the power distribution box assembly.
Procedure1
Measure the resistance according to the value(s) in the table below.
- HINT:
-
This inspection is to check the LIN communication line in the power distribution box assembly that connects the wire harness to the built-in main body ECU (multiplex network body ECU).
| *a | Component without harness connected
(Power Distribution Box Assembly) |
- | - |
- Standard Resistance:
Tester Connection Condition Specified Condition 4E-17 - MB-15 (LIN2) Always Below 1 Ω
- Result:
Proceed to OK NG
Post-procedure1
None
OK
NG
Pre-procedure1
Disconnect the 4E power distribution box assembly connector.
Disconnect the K5 multiplex network master switch assembly connector.
Procedure1
Measure the resistance according to the value(s) in the table below.
- NOTICE:
-
Make sure that each ECU is in sleep mode before performing the inspection. To enter sleep mode, turn the ignition switch from ON to off and wait for 180 seconds or more without operating any switches.
- Standard Resistance:
Tester Connection Switch Condition Specified Condition Click Location & Routing(K5)Location & Routingewd_type=routing;type=c;code=K5
Click Connector(K5)Body>Front Door Wire RH / Television Camera Wire>Multiplex Network Master Switch Assemblyewd_type=component;type=c;code=K5;pinno=17
4E-17 - K5-17 (LIN1) Ignition switch off Below 1 Ω
- Result:
Proceed to OK NG
Post-procedure1
None
OK
NG
Pre-procedure1
Disconnect the K5 multiplex network master switch assembly connector.
Procedure1
Measure the voltage and resistance according to the value(s) in the table below.
- Standard Voltage:
Tester Connection Switch Condition Specified Condition Click Location & Routing(K5)Location & Routingewd_type=routing;type=c;code=K5
Click Connector(K5)Body>Front Door Wire RH / Television Camera Wire>Multiplex Network Master Switch Assemblyewd_type=component;type=c;code=K5;pinno=11,12
K5-11 (B) - K5-12 (GND) Ignition switch off 11 to 14 V
- Standard Resistance:
Tester Connection Condition Specified Condition Click Location & Routing(K5)Location & Routingewd_type=routing;type=c;code=K5
Click Connector(K5)Body>Front Door Wire RH / Television Camera Wire>Multiplex Network Master Switch Assemblyewd_type=component;type=c;code=K5;pinno=12
K5-12 (GND) - Body ground Always Below 1 Ω
- Result:
Proceed to OK NG
Post-procedure1
None
OK
NG
Pre-procedure1
Disconnect the 4E power distribution box assembly connector.
Disconnect the K7 front power window regulator motor assembly (driver door) connector.
Procedure1
Measure the resistance according to the value(s) in the table below.
- Standard Resistance:
Tester Connection Condition Specified Condition Click Location & Routing(K7)Location & Routingewd_type=routing;type=c;code=K7
Click Connector(K7)Body>Front Door Wire RH / Television Camera Wire>Front Power Window Regulator Motor Assembly RHewd_type=component;type=c;code=K7;pinno=9
4E-17 - K7-9 (LIN) Always Below 1 Ω
- Result:
Proceed to OK NG
Post-procedure1
None
OK
NG
Pre-procedure1
Disconnect the K5 multiplex network master switch assembly connector.
Disconnect the K7 front power window regulator motor assembly (driver door) connector.
Procedure1
Measure the resistance according to the value(s) in the table below.
- NOTICE:
-
Make sure that each ECU is in sleep mode before performing the inspection. To enter sleep mode, turn the ignition switch from ON to off and wait for 180 seconds or more without operating any switches.
- Standard Resistance:
Tester Connection Condition Specified Condition Click Location & Routing(K5,K7)Location & Routingewd_type=routing;type=c,c;code=K5,K7
Click Connector(K5)Body>Front Door Wire RH / Television Camera Wire>Multiplex Network Master Switch Assemblyewd_type=component;type=c;code=K5;pinno=16
Click Connector(K7)Body>Front Door Wire RH / Television Camera Wire>Front Power Window Regulator Motor Assembly RHewd_type=component;type=c;code=K7;pinno=9
K5-16 - K7-9 (LIN) Always Below 1 Ω
- Result:
Proceed to OK NG
Post-procedure1
None
OK
NG
Pre-procedure1
Disconnect the K7 front power window regulator motor assembly (driver door) connector.
Procedure1
Measure the voltage and resistance according to the value(s) in the table below.
- Standard Voltage:
Tester Connection Switch Condition Specified Condition Click Location & Routing(K7)Location & Routingewd_type=routing;type=c;code=K7
Click Connector(K7)Body>Front Door Wire RH / Television Camera Wire>Front Power Window Regulator Motor Assembly RHewd_type=component;type=c;code=K7;pinno=2,1
K7-2 (B) - K7-1 (GND) Ignition switch off 11 to 14 V
- Standard Resistance:
Tester Connection Condition Specified Condition Click Location & Routing(K7)Location & Routingewd_type=routing;type=c;code=K7
Click Connector(K7)Body>Front Door Wire RH / Television Camera Wire>Front Power Window Regulator Motor Assembly RHewd_type=component;type=c;code=K7;pinno=1
K7-1 (GND) - Body ground Always Below 1 Ω
- Result:
Proceed to OK NG
Post-procedure1
None
OK
NG
Pre-procedure1
Disconnect the 4E power distribution box assembly connector.
Disconnect the L7 front power window regulator motor assembly (front passenger door) connector.
Procedure1
Measure the resistance according to the value(s) in the table below.
- NOTICE:
-
Make sure that each ECU is in sleep mode before performing the inspection. To enter sleep mode, turn the ignition switch from ON to off and wait for 180 seconds or more without operating any switches.
- Standard Resistance:
Tester Connection Switch Condition Specified Condition Click Location & Routing(L7)Location & Routingewd_type=routing;type=c;code=L7
Click Connector(L7)Body>Front Door Wire LH / Television Camera Wire>Front Power Window Regulator Motor Assembly LHewd_type=component;type=c;code=L7;pinno=9
4E-17 - L7-9 (LIN) Ignition switch off Below 1 Ω
- Result:
Proceed to OK NG
Post-procedure1
None
OK
NG
Pre-procedure1
Disconnect the L7 front power window regulator motor assembly (front passenger door) connector.
Procedure1
Measure the voltage and resistance according to the value(s) in the table below.
- Standard Voltage:
Tester Connection Switch Condition Specified Condition Click Location & Routing(L7)Location & Routingewd_type=routing;type=c;code=L7
Click Connector(L7)Body>Front Door Wire LH / Television Camera Wire>Front Power Window Regulator Motor Assembly LHewd_type=component;type=c;code=L7;pinno=2,1
L7-2 (B) - L7-1 (GND) Ignition switch off 11 to 14 V
- Standard Resistance:
Tester Connection Condition Specified Condition Click Location & Routing(L7)Location & Routingewd_type=routing;type=c;code=L7
Click Connector(L7)Body>Front Door Wire LH / Television Camera Wire>Front Power Window Regulator Motor Assembly LHewd_type=component;type=c;code=L7;pinno=1
L7-1 (GND) - Body ground Always Below 1 Ω
- Result:
Proceed to OK NG
Post-procedure1
None
OK
NG
Pre-procedure1
Disconnect the 4E power distribution box assembly connector.
Disconnect the M4 rear power window regulator motor assembly (rear RH door) connector.
Procedure1
Measure the resistance according to the value(s) in the table below.
- NOTICE:
-
Make sure that each ECU is in sleep mode before performing the inspection. To enter sleep mode, turn the ignition switch from ON to off and wait for 180 seconds or more without operating any switches.
- Standard Resistance:
Tester Connection Switch Condition Specified Condition Click Location & Routing(M4)Location & Routingewd_type=routing;type=c;code=M4
Click Connector(M4)Body>No. 1 Rear Door Wire>Rear Power Window Regulator Motor Assembly RHewd_type=component;type=c;code=M4;pinno=9
4E-17 - M4-9 (LIN) Ignition switch off Below 1 Ω
- Result:
Proceed to OK NG
Post-procedure1
None
OK
NG
Pre-procedure1
Disconnect the M4 rear power window regulator motor assembly (rear RH door) connector.
Procedure1
Measure the voltage and resistance according to the value(s) in the table below.
- Standard Voltage:
Tester Connection Switch Condition Specified Condition Click Location & Routing(M4)Location & Routingewd_type=routing;type=c;code=M4
Click Connector(M4)Body>No. 1 Rear Door Wire>Rear Power Window Regulator Motor Assembly RHewd_type=component;type=c;code=M4;pinno=2,1
M4-2 (B) - M4-1 (GND) Ignition switch off 11 to 14 V
- Standard Resistance:
Tester Connection Condition Specified Condition Click Location & Routing(M4)Location & Routingewd_type=routing;type=c;code=M4
Click Connector(M4)Body>No. 1 Rear Door Wire>Rear Power Window Regulator Motor Assembly RHewd_type=component;type=c;code=M4;pinno=1
M4-1 (GND) - Body ground Always Below 1 Ω
- Result:
Proceed to OK NG
Post-procedure1
None
OK
NG
Pre-procedure1
Disconnect the 4E power distribution box assembly connector.
Disconnect the N4 rear power window regulator motor assembly (rear LH door) connector.
Procedure1
Measure the resistance according to the value(s) in the table below.
- NOTICE:
-
Make sure that each ECU is in sleep mode before performing the inspection. To enter sleep mode, turn the ignition switch from ON to off and wait for 180 seconds or more without operating any switches.
- Standard Resistance:
Tester Connection Switch Condition Specified Condition Click Location & Routing(N4)Location & Routingewd_type=routing;type=c;code=N4
Click Connector(N4)Body>No. 2 Rear Door Wire>Rear Power Window Regulator Motor Assembly LHewd_type=component;type=c;code=N4;pinno=9
4E-17 - N4-9 (LIN) Ignition switch off Below 1 Ω
- Result:
Proceed to OK NG
Post-procedure1
None
OK
NG
Pre-procedure1
Disconnect the N4 rear power window regulator motor assembly (rear LH door) connector.
Procedure1
Measure the voltage and resistance according to the value(s) in the table below.
- Standard Voltage:
Tester Connection Switch Condition Specified Condition Click Location & Routing(N4)Location & Routingewd_type=routing;type=c;code=N4
Click Connector(N4)Body>No. 2 Rear Door Wire>Rear Power Window Regulator Motor Assembly LHewd_type=component;type=c;code=N4;pinno=2,1
N4-2 (B) - N4-1 (GND) Ignition switch off 11 to 14 V
- Standard Resistance:
Tester Connection Condition Specified Condition Click Location & Routing(N4)Location & Routingewd_type=routing;type=c;code=N4
Click Connector(N4)Body>No. 2 Rear Door Wire>Rear Power Window Regulator Motor Assembly LHewd_type=component;type=c;code=N4;pinno=1
N4-1 (GND) - Body ground Always Below 1 Ω
- Result:
Proceed to OK NG
Post-procedure1
None
OK
NG
Check for DTCs.
- Body Electrical > Main Body > Trouble Codes
- 50001 449
- Result:
Result Proceed to B232588 is output A B120687, B232187, B232287, B232387 and B232487 are output B B120687 and B232187 are output C Only B120687 is output D Only B232187 is output E Only B232287 is output F Only B232387 is output G Only B232487 is output H DTCs are not output I
A
B
C
D
E
F
G
H
I
Click hereGeneral>INTRODUCTION>HOW TO TROUBLESHOOT ECU CONTROLLED SYSTEMS>HOW TO PROCEED WITH TROUBLESHOOTING
Pre-procedure1
Disconnect the 4E power distribution box assembly connector.
Disconnect the L13 multiplex network master switch assembly connector.
Procedure1
Measure the resistance according to the value(s) in the table below.
- NOTICE:
-
Make sure that each ECU is in sleep mode before performing the inspection. To enter sleep mode, turn the ignition switch from ON to off and wait for 180 seconds or more without operating any switches.
- Standard Resistance:
Tester Connection Condition Specified Condition Click Location & Routing(L13)Location & Routingewd_type=routing;type=c;code=L13
Click Connector(L13)Body>Front Door Wire LH / Television Camera Wire>Multiplex Network Master Switch Assemblyewd_type=component;type=c;code=L13;pinno=17
4E-17 - L13-17 (LIN1) Always Below 1 Ω
- Result:
Proceed to OK NG
Post-procedure1
None
OK
NG
Pre-procedure1
Remove the power distribution box assembly.
Remove the main body ECU (multiplex network body ECU) from the power distribution box assembly.
Procedure1
Measure the resistance according to the value(s) in the table below.
- HINT:
-
This inspection is to check the LIN communication line in the power distribution box assembly that connects the wire harness to the built-in main body ECU (multiplex network body ECU).
| *a | Component without harness connected
(Power Distribution Box Assembly) |
- | - |
- Standard Resistance:
Tester Connection Condition Specified Condition 4E-17 - MB-15 (LIN2) Always Below 1 Ω
- Result:
Proceed to OK NG
Post-procedure1
None
OK
NG
Pre-procedure1
Disconnect the 4E power distribution box assembly connector.
Disconnect the L13 multiplex network master switch assembly connector.
Procedure1
Measure the resistance according to the value(s) in the table below.
- NOTICE:
-
Make sure that each ECU is in sleep mode before performing the inspection. To enter sleep mode, turn the ignition switch from ON to off and wait for 180 seconds or more without operating any switches.
- Standard Resistance:
Tester Connection Switch Condition Specified Condition Click Location & Routing(L13)Location & Routingewd_type=routing;type=c;code=L13
Click Connector(L13)Body>Front Door Wire LH / Television Camera Wire>Multiplex Network Master Switch Assemblyewd_type=component;type=c;code=L13;pinno=17
4E-17 - L13-17 (LIN1) Ignition switch off Below 1 Ω
- Result:
Proceed to OK NG
Post-procedure1
None
OK
NG
Pre-procedure1
Disconnect the L13 multiplex network master switch assembly connector.
Procedure1
Measure the voltage and resistance according to the value(s) in the table below.
- Standard Voltage:
Tester Connection Switch Condition Specified Condition Click Location & Routing(L13)Location & Routingewd_type=routing;type=c;code=L13
Click Connector(L13)Body>Front Door Wire LH / Television Camera Wire>Multiplex Network Master Switch Assemblyewd_type=component;type=c;code=L13;pinno=11,12
L13-11 (B) - L13-12 (GND) Ignition switch off 11 to 14 V
- Standard Resistance:
Tester Connection Condition Specified Condition Click Location & Routing(L13)Location & Routingewd_type=routing;type=c;code=L13
Click Connector(L13)Body>Front Door Wire LH / Television Camera Wire>Multiplex Network Master Switch Assemblyewd_type=component;type=c;code=L13;pinno=12
L13-12 (GND) - Body ground Always Below 1 Ω
- Result:
Proceed to OK NG
Post-procedure1
None
OK
NG
Pre-procedure1
Disconnect the 4E power distribution box assembly connector.
Disconnect the L7 front power window regulator motor assembly (driver door) connector.
Procedure1
Measure the resistance according to the value(s) in the table below.
- Standard Resistance:
Tester Connection Condition Specified Condition Click Location & Routing(L7)Location & Routingewd_type=routing;type=c;code=L7
Click Connector(L7)Body>Front Door Wire LH / Television Camera Wire>Front Power Window Regulator Motor Assembly LHewd_type=component;type=c;code=L7;pinno=9
4E-17 - L7-9 (LIN) Always Below 1 Ω
- Result:
Proceed to OK NG
Post-procedure1
None
OK
NG
Pre-procedure1
Disconnect the L13 multiplex network master switch assembly connector.
Disconnect the L7 front power window regulator motor assembly (driver door) connector.
Procedure1
Measure the resistance according to the value(s) in the table below.
- NOTICE:
-
Make sure that each ECU is in sleep mode before performing the inspection. To enter sleep mode, turn the ignition switch from ON to off and wait for 180 seconds or more without operating any switches.
- Standard Resistance:
Tester Connection Condition Specified Condition Click Location & Routing(L13,L7)Location & Routingewd_type=routing;type=c,c;code=L13,L7
Click Connector(L13)Body>Front Door Wire LH / Television Camera Wire>Multiplex Network Master Switch Assemblyewd_type=component;type=c;code=L13;pinno=16
Click Connector(L7)Body>Front Door Wire LH / Television Camera Wire>Front Power Window Regulator Motor Assembly LHewd_type=component;type=c;code=L7;pinno=9
L13-16 - L7-9 (LIN) Always Below 1 Ω
- Result:
Proceed to OK NG
Post-procedure1
None
OK
NG
Pre-procedure1
Disconnect the L7 front power window regulator motor assembly (driver door) connector.
Procedure1
Measure the voltage and resistance according to the value(s) in the table below.
- Standard Voltage:
Tester Connection Switch Condition Specified Condition Click Location & Routing(L7)Location & Routingewd_type=routing;type=c;code=L7
Click Connector(L7)Body>Front Door Wire LH / Television Camera Wire>Front Power Window Regulator Motor Assembly LHewd_type=component;type=c;code=L7;pinno=2,1
L7-2 (B) - L7-1 (GND) Ignition switch off 11 to 14 V
- Standard Resistance:
Tester Connection Condition Specified Condition Click Location & Routing(L7)Location & Routingewd_type=routing;type=c;code=L7
Click Connector(L7)Body>Front Door Wire LH / Television Camera Wire>Front Power Window Regulator Motor Assembly LHewd_type=component;type=c;code=L7;pinno=1
L7-1 (GND) - Body ground Always Below 1 Ω
- Result:
Proceed to OK NG
Post-procedure1
None
OK
NG
Pre-procedure1
Disconnect the 4E power distribution box assembly connector.
Disconnect the K7 front power window regulator motor assembly (front passenger door) connector.
Procedure1
Measure the resistance according to the value(s) in the table below.
- NOTICE:
-
Make sure that each ECU is in sleep mode before performing the inspection. To enter sleep mode, turn the ignition switch from ON to off and wait for 180 seconds or more without operating any switches.
- Standard Resistance:
Tester Connection Switch Condition Specified Condition Click Location & Routing(K7)Location & Routingewd_type=routing;type=c;code=K7
Click Connector(K7)Body>Front Door Wire RH / Television Camera Wire>Front Power Window Regulator Motor Assembly RHewd_type=component;type=c;code=K7;pinno=9
4E-17 - K7-9 (LIN) Ignition switch off Below 1 Ω
- Result:
Proceed to OK NG
Post-procedure1
None
OK
NG
Pre-procedure1
Disconnect the K7 front power window regulator motor assembly (front passenger door) connector.
Procedure1
Measure the voltage and resistance according to the value(s) in the table below.
- Standard Voltage:
Tester Connection Switch Condition Specified Condition Click Location & Routing(K7)Location & Routingewd_type=routing;type=c;code=K7
Click Connector(K7)Body>Front Door Wire RH / Television Camera Wire>Front Power Window Regulator Motor Assembly RHewd_type=component;type=c;code=K7;pinno=2,1
K7-2 (B) - K7-1 (GND) Ignition switch off 11 to 14 V
- Standard Resistance:
Tester Connection Condition Specified Condition Click Location & Routing(K7)Location & Routingewd_type=routing;type=c;code=K7
Click Connector(K7)Body>Front Door Wire RH / Television Camera Wire>Front Power Window Regulator Motor Assembly RHewd_type=component;type=c;code=K7;pinno=1
K7-1 (GND) - Body ground Always Below 1 Ω
- Result:
Proceed to OK NG
Post-procedure1
None
OK
NG
Pre-procedure1
Disconnect the 4E power distribution box assembly connector.
Disconnect the M4 rear power window regulator motor assembly (rear RH door) connector.
Procedure1
Measure the resistance according to the value(s) in the table below.
- NOTICE:
-
Make sure that each ECU is in sleep mode before performing the inspection. To enter sleep mode, turn the ignition switch from ON to off and wait for 180 seconds or more without operating any switches.
- Standard Resistance:
Tester Connection Switch Condition Specified Condition Click Location & Routing(M4)Location & Routingewd_type=routing;type=c;code=M4
Click Connector(M4)Body>No. 1 Rear Door Wire>Rear Power Window Regulator Motor Assembly RHewd_type=component;type=c;code=M4;pinno=9
4E-17 - M4-9 (LIN) Ignition switch off Below 1 Ω
- Result:
Proceed to OK NG
Post-procedure1
None
OK
NG
Pre-procedure1
Disconnect the M4 rear power window regulator motor assembly (rear RH door) connector.
Procedure1
Measure the voltage and resistance according to the value(s) in the table below.
- Standard Voltage:
Tester Connection Switch Condition Specified Condition Click Location & Routing(M4)Location & Routingewd_type=routing;type=c;code=M4
Click Connector(M4)Body>No. 1 Rear Door Wire>Rear Power Window Regulator Motor Assembly RHewd_type=component;type=c;code=M4;pinno=2,1
M4-2 (B) - M4-1 (GND) Ignition switch off 11 to 14 V
- Standard Resistance:
Tester Connection Condition Specified Condition Click Location & Routing(M4)Location & Routingewd_type=routing;type=c;code=M4
Click Connector(M4)Body>No. 1 Rear Door Wire>Rear Power Window Regulator Motor Assembly RHewd_type=component;type=c;code=M4;pinno=1
M4-1 (GND) - Body ground Always Below 1 Ω
- Result:
Proceed to OK NG
Post-procedure1
None
OK
NG
Pre-procedure1
Disconnect the 4E power distribution box assembly connector.
Disconnect the N4 rear power window regulator motor assembly (rear LH door) connector.
Procedure1
Measure the resistance according to the value(s) in the table below.
- NOTICE:
-
Make sure that each ECU is in sleep mode before performing the inspection. To enter sleep mode, turn the ignition switch from ON to off and wait for 180 seconds or more without operating any switches.
- Standard Resistance:
Tester Connection Switch Condition Specified Condition Click Location & Routing(N4)Location & Routingewd_type=routing;type=c;code=N4
Click Connector(N4)Body>No. 2 Rear Door Wire>Rear Power Window Regulator Motor Assembly LHewd_type=component;type=c;code=N4;pinno=9
4E-17 - N4-9 (LIN) Ignition switch off Below 1 Ω
- Result:
Proceed to OK NG
Post-procedure1
None
OK
NG
Pre-procedure1
Disconnect the N4 rear power window regulator motor assembly (rear LH door) connector.
Procedure1
Measure the voltage and resistance according to the value(s) in the table below.
- Standard Voltage:
Tester Connection Switch Condition Specified Condition Click Location & Routing(N4)Location & Routingewd_type=routing;type=c;code=N4
Click Connector(N4)Body>No. 2 Rear Door Wire>Rear Power Window Regulator Motor Assembly LHewd_type=component;type=c;code=N4;pinno=2,1
N4-2 (B) - N4-1 (GND) Ignition switch off 11 to 14 V
- Standard Resistance:
Tester Connection Condition Specified Condition Click Location & Routing(N4)Location & Routingewd_type=routing;type=c;code=N4
Click Connector(N4)Body>No. 2 Rear Door Wire>Rear Power Window Regulator Motor Assembly LHewd_type=component;type=c;code=N4;pinno=1
N4-1 (GND) - Body ground Always Below 1 Ω
- Result:
Proceed to OK NG
Post-procedure1
None
OK
NG