AXLE AND DIFFERENTIAL REAR AXLE HUB(for AWD) REMOVAL
CAUTION / NOTICE / HINT
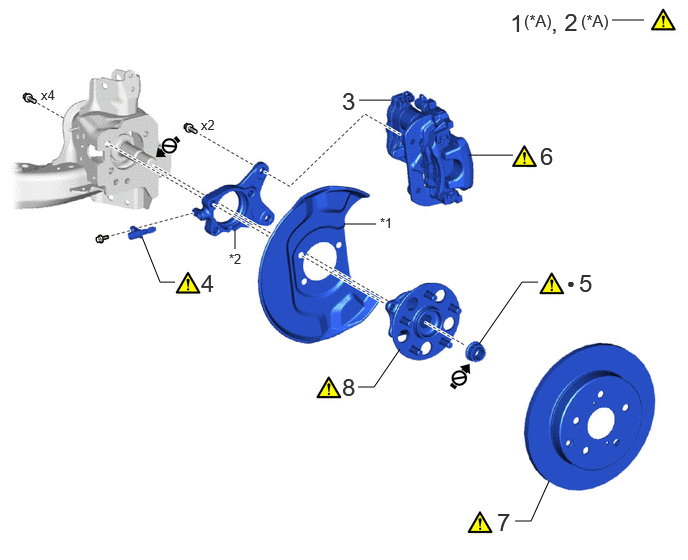
| Procedure | Part Name Code | 
|

|

|
|
|---|---|---|---|---|---|
| 1 | PRECAUTION | - | ( ) |
- | - |
| 2 | DISABLE BRAKE CONTROL | - | ()
|
- | - |
| 3 | PARKING BRAKE ACTUATOR ASSEMBLY | 46310B | - | - | - |
| 4 | REAR SKID CONTROL SENSOR | 89544E | ()
|
- | - |
| 5 | REAR AXLE SHAFT NUT | 42312B | ()
|
- | - |
| 6 | REAR DISC BRAKE CALIPER ASSEMBLY | - | ()
|
- | - |
| 7 | REAR DISC | 42431 | ()
|
- | - |
| 8 | REAR AXLE HUB AND BEARING ASSEMBLY | 42450B | ()
|
- | - |
| *A | for TMC Made | - | - |
| *1 | REAR BRAKE DUST COVER | *2 | REAR AXLE BEARING RETAINER |
| ● | Non-reusable part | - | - |
CAUTION / NOTICE / HINT
The necessary procedures (adjustment, calibration, initialization, or registration) that must be performed after parts are removed and installed, or replaced during the rear axle hub and bearing assembly removal/installation are shown below.
| Replacement Part or Procedure | Necessary Procedures | Effect/Inoperative Function When Necessary Procedures are not Performed | Link |
|---|---|---|---|
| Auxiliary battery terminal is disconnected/reconnected | Memorize steering angle neutral point | Parking assist monitor system | ()
|
| Panoramic view monitor system (w/o Advanced Park) | ()
|
- HINT:
- for TMC Made
- When the cable is disconnected/reconnected to the auxiliary battery terminal, systems temporarily stop operating. However, each system has a function that completes learning the first time the system is used.·
Learning completes when vehicle is driven
Effect/Inoperative Function When Necessary Procedures are not Performed Necessary Procedures Link Lane tracing assist system Drive the vehicle straight ahead at 35 km/h (22 mph) or more for 5 seconds or more. ( )
Pre-collision system Parking support brake system
·Learning completes when vehicle is operated normally
Effect/Inoperative Function When Necessary Procedures are not Performed Necessary Procedures Link Power door lock control system
·Back door opener
Perform door unlock operation with door control switch or electrical key transmitter sub-assembly switch. ( )
Power back door system Fully close the back door by hand.
- HINT:
-
Initialization is not necessary if the above procedures are performed while the back door is closed.
( )
Air conditioning system After the ignition switch is turned to ON, the servo motor standard position is recognized. -
- HINT:
- ·
Use the same procedure for the RH side and LH side.
·The following procedure is for the LH side.
PROCEDURE

 1. PRECAUTION (for TMC Made)
|
|
|
2. DISABLE BRAKE CONTROL (for TMC Made)
|
|
Click here()
|
46310B
3.REMOVE PARKING BRAKE ACTUATOR ASSEMBLY
89544E
4.REMOVE REAR SKID CONTROL SENSOR
|
|
Click here()
|
42312B
5.REMOVE REAR AXLE SHAFT NUT
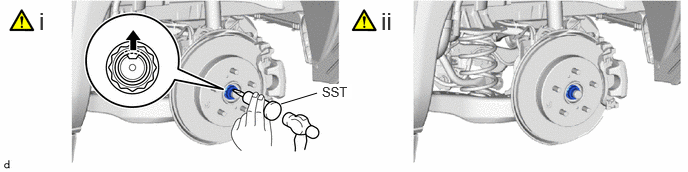
Using SST and a hammer, release the staked part of the rear axle shaft nut.
- SST
- 09930-00010
- NOTICE:
-
Loosen the staked part of the rear axle shaft nut completely, otherwise the threads of the rear drive shaft assembly may be damaged.
Using a 30 mm deep socket wrench, remove the rear axle shaft nut while applying the brakes.
6.SEPARATE REAR DISC BRAKE CALIPER ASSEMBLY
|
|
Click here()
|
42431
7.REMOVE REAR DISC
|
|
Click here()
|
42450B
8.REMOVE REAR AXLE HUB AND BEARING ASSEMBLY
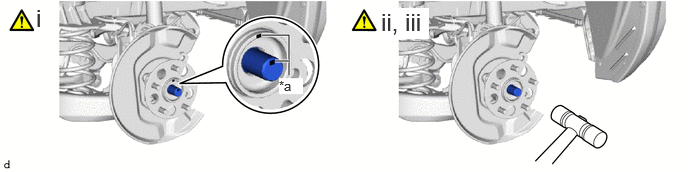
| *a | Matchmark | - | - |
Put matchmarks on the rear drive shaft assembly and the rear axle hub and bearing assembly.
Using a plastic hammer, separate the rear drive shaft assembly from the rear axle hub and bearing assembly.
- NOTICE:
-
Do not damage the rear drive shaft outboard joint boot.
If it is difficult to separate the rear drive shaft assembly from the rear axle hub and bearing assembly, tap the end of the rear drive shaft assembly using a brass bar and a hammer.
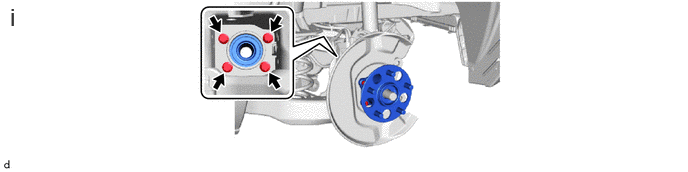
Remove the 4 bolts, rear axle hub and bearing assembly, rear axle bearing retainer and rear brake dust cover from the rear axle carrier sub-assembly.