BRAKE CONTROL / DYNAMIC CONTROL SYSTEMS ELECTRONICALLY CONTROLLED BRAKE SYSTEM(for HV Model TMMF Made) C051212 Right Rear Wheel Speed Sensor Circuit Short to Battery
DESCRIPTION
Each speed sensor detects wheel speed and sends signals to the skid control ECU (brake actuator assembly). These signals are used by the ABS control.
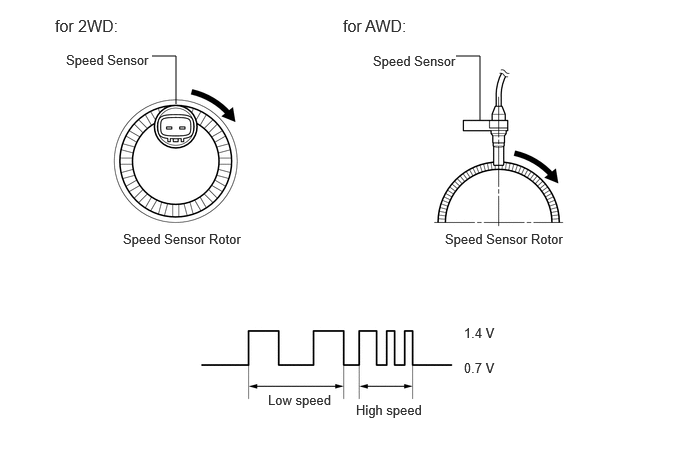
The speed sensor detects the magnetic fields of the speed sensor rotor as it rotates and outputs a pulse signal.
The frequency of the pulse varies in accordance with the rotational speed of the speed sensor rotor and the system uses this to determine the wheel speed.
- HINT:
-
The following example shows a pulse signal that is output when the wire harness connectors are connected to the speed sensors and skid control ECU (brake actuator assembly).
| DTC No. | Detection Item | DTC Detection Condition | Trouble Area | DTC Output from | Priority |
|---|---|---|---|---|---|
| C051212 | Right Rear Wheel Speed Sensor Circuit Short to Battery | A short to +B in the speed sensor signal circuit is detected for 0.12 seconds or more. | ·
Rear speed sensor LH (rear axle hub and bearing assembly RH)*1 ·
Rear speed sensor RH*2 ·
Wire harness or connector ·
Skid control sensor wire RH (No. 1 parking brake wire assembly) ·
Skid control ECU (brake actuator assembly) |
Brake/EPB | A |
*1: for 2WD
*2: for AWD
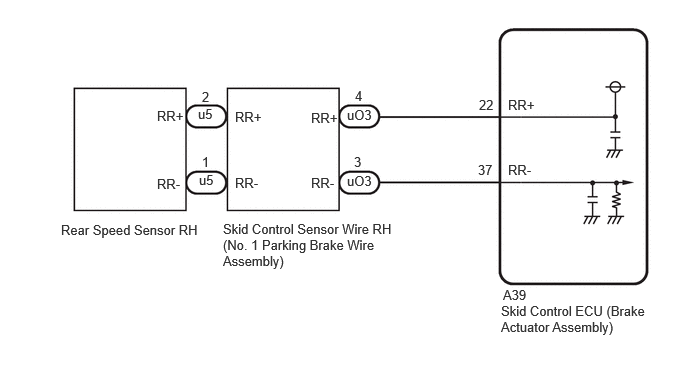
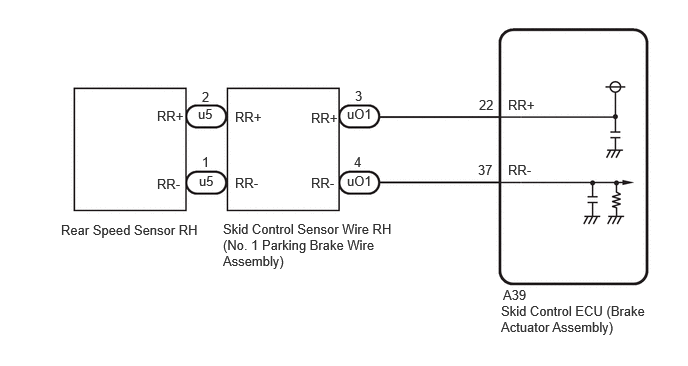
WIRING DIAGRAM
for 2WD
for AWD
CAUTION / NOTICE / HINT
- NOTICE:
- ·
After replacing the skid control ECU (brake actuator assembly), perform acceleration sensor zero point calibration and store system information memorization.
·After replacing or removing and installing a speed sensor, perform Dealer Mode (Signal Check) inspection to confirm that the speed sensors are operating correctly.
PROCEDURE
Check the vehicle specification.
- Result:
Result Proceed to for 2WD A for AWD B
A
B
Procedure1
Make sure that there is no looseness at the locking part and the connecting part of the connectors.
- OK:
The connector is securely connected.
Pre-procedure1
Disconnect the u5 rear speed sensor RH (rear axle hub and bearing assembly RH) connector.
Procedure2
Check both the connector case and the terminals for deformation and corrosion.
- OK:
No deformation or corrosion.
Pre-procedure2
Turn the ignition switch to ON.
Procedure3
Measure the voltage according to the value(s) in the table below.
- Standard Voltage:
Tester Connection Condition Specified Condition Click Location & Routing(u5)Location & Routingewd_type=routing;type=c;code=u5
Click Connector(u5)Body>No. 1 Parking Brake Wire Assembly / No. 2 Parking Brake Wire Assembly>Rear Speed Sensor RHewd_type=component;type=c;code=u5;pinno=2,1
u5-2 (RR+) - u5-1 (RR-) Ignition switch ON 11 to 14 V
- Result:
Proceed to OK NG
Post-procedure1
None
OK
NG
Procedure1
Make sure that there is no looseness at the locking part and the connecting part of the connectors.
- OK:
The connector is securely connected.
Pre-procedure1
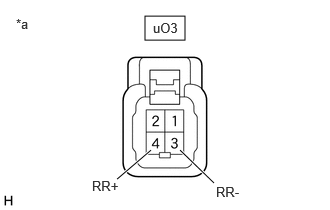
| *a | Front view of wire harness connector
(to Skid Control Sensor Wire RH (No. 1 Parking Brake Wire Assembly)) |
Disconnect the uO3 skid control sensor wire RH (No. 1 parking brake wire assembly) connector.
Procedure2
Check both the connector case and the terminals for deformation and corrosion.
- OK:
No deformation or corrosion.
Pre-procedure2
Turn the ignition switch to ON.
Procedure3
Measure the voltage according to the value(s) in the table below.
- Standard Voltage:
Tester Connection Condition Specified Condition Click Location & Routing(uO3)Location & Routingewd_type=routing;type=w;code=uO3
Click Connector(uO3)Body>No. 1 Parking Brake Wire Assembly / No. 2 Parking Brake Wire Assembly>No. 1 Parking Brake Wire Assembly and Floor Wireewd_type=component;type=w;code=uO3;pinno=4,3
uO3-4 (RR+) - uO3-3 (RR-) Ignition switch ON 11 to 14 V
- Result:
Proceed to OK NG
Post-procedure1
None
OK
NG
Procedure1
Make sure that there is no looseness at the locking part and the connecting part of the connectors.
- OK:
The connector is securely connected.
Pre-procedure1
Disconnect the A39 skid control ECU (brake actuator assembly) connector.
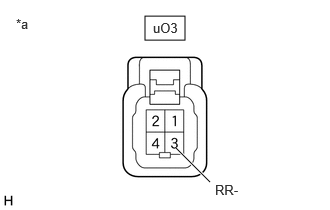
| *a | Front view of wire harness connector
(to Skid Control Sensor Wire RH (No. 1 Parking Brake Wire Assembly)) |
Disconnect the uO3 skid control sensor wire RH (No. 1 parking brake wire assembly) connector.
Procedure2
Check both the connector case and the terminals for deformation and corrosion.
- OK:
No deformation or corrosion.
Procedure3
Measure the voltage according to the value(s) in the table below.
- Standard Voltage:
Tester Connection Condition Specified Condition Click Location & Routing(uO3)Location & Routingewd_type=routing;type=w;code=uO3
Click Connector(uO3)Body>No. 1 Parking Brake Wire Assembly / No. 2 Parking Brake Wire Assembly>No. 1 Parking Brake Wire Assembly and Floor Wireewd_type=component;type=w;code=uO3;pinno=3
uO3-3 (RR-) - Body ground Always Below 1.5 V
- Result:
Proceed to OK NG
Post-procedure1
None
OK
NG
Procedure1
Make sure that there is no looseness at the locking part and the connecting part of the connectors.
- OK:
The connector is securely connected.
Pre-procedure1
Disconnect the A39 skid control ECU (brake actuator assembly) connector.
Disconnect the uO3 skid control sensor wire RH (No. 1 parking brake wire assembly) connector.
Procedure2
Check both the connector case and the terminals for deformation and corrosion.
- OK:
No deformation or corrosion.
Procedure3
Measure the resistance according to the value(s) in the table below.
- Standard Resistance:
Tester Connection Condition Specified Condition Click Location & Routing(uO3,A39)Location & Routingewd_type=routing;type=w,c;code=uO3,A39
Click Connector(uO3)Body>No. 1 Parking Brake Wire Assembly / No. 2 Parking Brake Wire Assembly>No. 1 Parking Brake Wire Assembly and Floor Wireewd_type=component;type=w;code=uO3;pinno=4,3
Click Connector(A39)Engine Compartment>Engine Room Main Wire>Brake Actuator Assemblyewd_type=component;type=c;code=A39;pinno=22,37
uO3-4 (RR+) or A39-22 (RR+) - uO3-3 (RR-) or A39-37 (RR-) Always 10 kΩ or higher
- Result:
Proceed to OK NG
Post-procedure1
None
OK
for RHD: Click hereBrake>BRAKE CONTROL / DYNAMIC CONTROL SYSTEMS>BRAKE ACTUATOR (for HV Model TMMF Made RHD)>REMOVAL
for LHD: Click hereBrake>BRAKE CONTROL / DYNAMIC CONTROL SYSTEMS>BRAKE ACTUATOR (for LHD)>REMOVAL
NG
Procedure1
Make sure that there is no looseness at the locking part and the connecting part of the connectors.
- OK:
The connector is securely connected.
Pre-procedure1
Disconnect the u5 rear speed sensor RH connector.
Procedure2
Check both the connector case and the terminals for deformation and corrosion.
- OK:
No deformation or corrosion.
Pre-procedure2
Turn the ignition switch to ON.
Procedure3
Measure the voltage according to the value(s) in the table below.
- Standard Voltage:
Tester Connection Condition Specified Condition Click Location & Routing(u5)Location & Routingewd_type=routing;type=c;code=u5
Click Connector(u5)Body>No. 1 Parking Brake Wire Assembly / No. 2 Parking Brake Wire Assembly>Rear Speed Sensor RHewd_type=component;type=c;code=u5;pinno=2,1
u5-2 (RR+) - u5-1 (RR-) Ignition switch ON 11 to 14 V
- Result:
Proceed to OK NG
Post-procedure1
None
OK
NG
Procedure1
Make sure that there is no looseness at the locking part and the connecting part of the connectors.
- OK:
The connector is securely connected.
Pre-procedure1
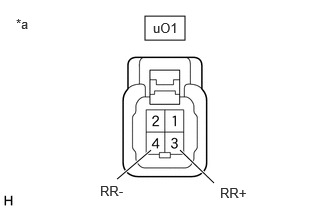
| *a | Front view of wire harness connector
(to Skid Control Sensor Wire RH (No. 1 Parking Brake Wire Assembly)) |
Disconnect the uO1 skid control sensor wire RH (No. 1 parking brake wire assembly) connector.
Procedure2
Check both the connector case and the terminals for deformation and corrosion.
- OK:
No deformation or corrosion.
Pre-procedure2
Turn the ignition switch to ON.
Procedure3
Measure the voltage according to the value(s) in the table below.
- Standard Voltage:
Tester Connection Condition Specified Condition Click Location & Routing(uO1)Location & Routingewd_type=routing;type=w;code=uO1
Click Connector(uO1)Body>No. 1 Parking Brake Wire Assembly / No. 2 Parking Brake Wire Assembly>No. 1 Parking Brake Wire Assembly and Floor Wireewd_type=component;type=w;code=uO1;pinno=3,4
uO1-3 (RR+) - uO1-4 (RR-) Ignition switch ON 11 to 14 V
- Result:
Proceed to OK NG
Post-procedure1
None
OK
NG
Procedure1
Make sure that there is no looseness at the locking part and the connecting part of the connectors.
- OK:
The connector is securely connected.
Pre-procedure1
Disconnect the A39 skid control ECU (brake actuator assembly) connector.
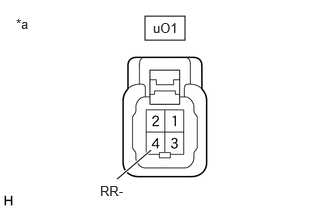
| *a | Front view of wire harness connector
(to Skid Control Sensor Wire RH (No. 1 Parking Brake Wire Assembly)) |
Disconnect the uO1 skid control sensor wire RH (No. 1 parking brake wire assembly) connector.
Procedure2
Check both the connector case and the terminals for deformation and corrosion.
- OK:
No deformation or corrosion.
Procedure3
Measure the voltage according to the value(s) in the table below.
- Standard Voltage:
Tester Connection Condition Specified Condition Click Location & Routing(uO1)Location & Routingewd_type=routing;type=w;code=uO1
Click Connector(uO1)Body>No. 1 Parking Brake Wire Assembly / No. 2 Parking Brake Wire Assembly>No. 1 Parking Brake Wire Assembly and Floor Wireewd_type=component;type=w;code=uO1;pinno=4
uO1-4 (RR-) - Body ground Always Below 1.5 V
- Result:
Proceed to OK NG
Post-procedure1
None
OK
NG
Procedure1
Make sure that there is no looseness at the locking part and the connecting part of the connectors.
- OK:
The connector is securely connected.
Pre-procedure1
Disconnect the A39 skid control ECU (brake actuator assembly) connector.
Disconnect the uO1 skid control sensor wire RH (No. 1 parking brake wire assembly) connector.
Procedure2
Check both the connector case and the terminals for deformation and corrosion.
- OK:
No deformation or corrosion.
Procedure3
Measure the resistance according to the value(s) in the table below.
- Standard Resistance:
Tester Connection Condition Specified Condition Click Location & Routing(uO1,A39)Location & Routingewd_type=routing;type=w,c;code=uO1,A39
Click Connector(uO1)Body>No. 1 Parking Brake Wire Assembly / No. 2 Parking Brake Wire Assembly>No. 1 Parking Brake Wire Assembly and Floor Wireewd_type=component;type=w;code=uO1;pinno=3,4
Click Connector(A39)Engine Compartment>Engine Room Main Wire>Brake Actuator Assemblyewd_type=component;type=c;code=A39;pinno=22,37
uO1-3 (RR+) or A39-22 (RR+) - uO1-4 (RR-) or A39-37 (RR-) Always 10 kΩ or higher
- Result:
Proceed to OK NG
Post-procedure1
None
OK
for RHD: Click hereBrake>BRAKE CONTROL / DYNAMIC CONTROL SYSTEMS>BRAKE ACTUATOR (for HV Model TMMF Made RHD)>REMOVAL
for LHD: Click hereBrake>BRAKE CONTROL / DYNAMIC CONTROL SYSTEMS>BRAKE ACTUATOR (for LHD)>REMOVAL
NG