BRAKE CONTROL / DYNAMIC CONTROL SYSTEMS ELECTRONICALLY CONTROLLED BRAKE SYSTEM(for HV Model TMMF Made) C14E614 Left Rear Wheel Speed Sensor Supply Voltage Circuit Short to Ground or Open
DESCRIPTION
Refer to DTC C050C12.
| DTC No. | Detection Item | DTC Detection Condition | Trouble Area | DTC Output from | Priority |
|---|---|---|---|---|---|
| C14E614 | Left Rear Wheel Speed Sensor Supply Voltage Circuit Short to Ground or Open | An open or short in the speed sensor power supply circuit is detected for 0.12 seconds or more. | ·
Rear speed sensor LH (rear axle hub and bearing assembly LH)*1 ·
Rear speed sensor LH*2 ·
Wire harness or connector ·
Skid control sensor wire LH (No. 2 parking brake wire assembly) ·
Skid control ECU (brake actuator assembly) |
Brake/EPB | A |
*1: for 2WD
*2: for AWD
WIRING DIAGRAM
Refer to DTC C050C12.
CAUTION / NOTICE / HINT
- NOTICE:
- ·
After replacing the skid control ECU (brake actuator assembly), perform acceleration sensor zero point calibration and store system information memorization.
·After replacing or removing and installing a speed sensor, perform Dealer Mode (Signal Check) inspection to confirm that the speed sensors are operating correctly.
PROCEDURE
Check the vehicle specification.
- Result:
Result Proceed to for 2WD A for AWD B
A
B
Procedure1
Make sure that there is no looseness at the locking part and the connecting part of the connectors.
- OK:
The connector is securely connected.
Pre-procedure1
Disconnect the u6 rear speed sensor LH (rear axle hub and bearing assembly LH) connector.
Procedure2
Check both the connector case and the terminals for deformation and corrosion.
- OK:
No deformation or corrosion.
Pre-procedure2
Turn the ignition switch to ON.
Procedure3
Measure the voltage according to the value(s) in the table below.
- Standard Voltage:
Tester Connection Condition Specified Condition Click Location & Routing(u6)Location & Routingewd_type=routing;type=c;code=u6
Click Connector(u6)Body>No. 1 Parking Brake Wire Assembly / No. 2 Parking Brake Wire Assembly>Rear Speed Sensor LHewd_type=component;type=c;code=u6;pinno=2,1
u6-2 (RL+) - u6-1 (RL-) Ignition switch ON 11 to 14 V
- Result:
Proceed to OK NG
Post-procedure1
None
OK
NG
Procedure1
Make sure that there is no looseness at the locking part and the connecting part of the connectors.
- OK:
The connector is securely connected.
Pre-procedure1
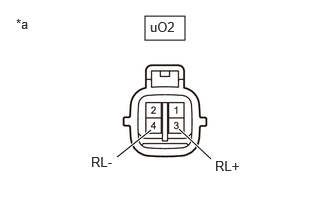
| *a | Front view of wire harness connector
(to Skid Control Sensor Wire LH (No. 2 Parking Brake Wire Assembly)) |
Disconnect the uO2 skid control sensor wire LH (No. 2 parking brake wire assembly) connector.
Procedure2
Check both the connector case and the terminals for deformation and corrosion.
- OK:
No deformation or corrosion.
Pre-procedure2
Turn the ignition switch to ON.
Procedure3
Measure the voltage according to the value(s) in the table below.
- Standard Voltage:
Tester Connection Condition Specified Condition Click Location & Routing(uO2)Location & Routingewd_type=routing;type=w;code=uO2
Click Connector(uO2)Body>No. 1 Parking Brake Wire Assembly / No. 2 Parking Brake Wire Assembly>No. 2 Parking Brake Wire Assembly and Floor Wireewd_type=component;type=w;code=uO2;pinno=3,4
uO2-3 (RL+) - uO2-4 (RL-) Ignition switch ON 11 to 14 V
- Result:
Proceed to OK NG
Post-procedure1
None
OK
NG
Procedure1
Make sure that there is no looseness at the locking part and the connecting part of the connectors.
- OK:
The connector is securely connected.
Pre-procedure1
Disconnect the A39 skid control ECU (brake actuator assembly) connector.
Disconnect the uO2 skid control sensor wire LH (No. 2 parking brake wire assembly) connector.
Procedure2
Check both the connector case and the terminals for deformation and corrosion.
- OK:
No deformation or corrosion.
Procedure3
Measure the resistance according to the value(s) in the table below.
- Standard Resistance:
Tester Connection Condition Specified Condition Click Location & Routing(uO2,A39)Location & Routingewd_type=routing;type=w,c;code=uO2,A39
Click Connector(uO2)Body>No. 1 Parking Brake Wire Assembly / No. 2 Parking Brake Wire Assembly>No. 2 Parking Brake Wire Assembly and Floor Wireewd_type=component;type=w;code=uO2;pinno=3
Click Connector(A39)Engine Compartment>Engine Room Main Wire>Brake Actuator Assemblyewd_type=component;type=c;code=A39;pinno=39
uO2-3 (RL+) or A39-39 (RL+) - Body ground Always 10 kΩ or higher
- Result:
Proceed to OK NG
Post-procedure1
None
OK
for RHD: Click hereBrake>BRAKE CONTROL / DYNAMIC CONTROL SYSTEMS>BRAKE ACTUATOR (for HV Model TMMF Made RHD)>REMOVAL
for LHD: Click hereBrake>BRAKE CONTROL / DYNAMIC CONTROL SYSTEMS>BRAKE ACTUATOR (for LHD)>REMOVAL
NG
Procedure1
Make sure that there is no looseness at the locking part and the connecting part of the connectors.
- OK:
The connector is securely connected.
Pre-procedure1
Disconnect the u6 rear speed sensor LH connector.
Procedure2
Check both the connector case and the terminals for deformation and corrosion.
- OK:
No deformation or corrosion.
Pre-procedure2
Turn the ignition switch to ON.
Procedure3
Measure the voltage according to the value(s) in the table below.
- Standard Voltage:
Tester Connection Condition Specified Condition Click Location & Routing(u6)Location & Routingewd_type=routing;type=c;code=u6
Click Connector(u6)Body>No. 1 Parking Brake Wire Assembly / No. 2 Parking Brake Wire Assembly>Rear Speed Sensor LHewd_type=component;type=c;code=u6;pinno=2,1
u6-2 (RL+) - u6-1 (RL-) Ignition switch ON 11 to 14 V
- Result:
Proceed to OK NG
Post-procedure1
None
OK
NG
Procedure1
Make sure that there is no looseness at the locking part and the connecting part of the connectors.
- OK:
The connector is securely connected.
Pre-procedure1
| *a | Front view of wire harness connector
(to Skid Control Sensor Wire LH (No. 2 Parking Brake Wire Assembly)) |
Disconnect the uO2 skid control sensor wire LH (No. 2 parking brake wire assembly) connector.
Procedure2
Check both the connector case and the terminals for deformation and corrosion.
- OK:
No deformation or corrosion.
Pre-procedure2
Turn the ignition switch to ON.
Procedure3
Measure the voltage according to the value(s) in the table below.
- Standard Voltage:
Tester Connection Condition Specified Condition Click Location & Routing(uO2)Location & Routingewd_type=routing;type=w;code=uO2
Click Connector(uO2)Body>No. 1 Parking Brake Wire Assembly / No. 2 Parking Brake Wire Assembly>No. 2 Parking Brake Wire Assembly and Floor Wireewd_type=component;type=w;code=uO2;pinno=3,4
uO2-3 (RL+) - uO2-4 (RL-) Ignition switch ON 11 to 14 V
- Result:
Proceed to OK NG
Post-procedure1
None
OK
NG
Procedure1
Make sure that there is no looseness at the locking part and the connecting part of the connectors.
- OK:
The connector is securely connected.
Pre-procedure1
Disconnect the A39 skid control ECU (brake actuator assembly) connector.
Disconnect the uO2 skid control sensor wire LH (No. 2 parking brake wire assembly) connector.
Procedure2
Check both the connector case and the terminals for deformation and corrosion.
- OK:
No deformation or corrosion.
Procedure3
Measure the resistance according to the value(s) in the table below.
- Standard Resistance:
Tester Connection Condition Specified Condition Click Location & Routing(uO2,A39)Location & Routingewd_type=routing;type=w,c;code=uO2,A39
Click Connector(uO2)Body>No. 1 Parking Brake Wire Assembly / No. 2 Parking Brake Wire Assembly>No. 2 Parking Brake Wire Assembly and Floor Wireewd_type=component;type=w;code=uO2;pinno=3
Click Connector(A39)Engine Compartment>Engine Room Main Wire>Brake Actuator Assemblyewd_type=component;type=c;code=A39;pinno=39
uO2-3 (RL+) or A39-39 (RL+) - Body ground Always 10 kΩ or higher
- Result:
Proceed to OK NG
Post-procedure1
None
OK
for RHD: Click hereBrake>BRAKE CONTROL / DYNAMIC CONTROL SYSTEMS>BRAKE ACTUATOR (for HV Model TMMF Made RHD)>REMOVAL
for LHD: Click hereBrake>BRAKE CONTROL / DYNAMIC CONTROL SYSTEMS>BRAKE ACTUATOR (for LHD)>REMOVAL
NG