DOOR LOCK POWER DOOR LOCK CONTROL SYSTEM Only Back Door cannot be Opened
DESCRIPTION
The main body ECU (multiplex network body ECU) receives signals from the back door opener switch assembly. Then, the main body ECU (multiplex network body ECU) activates the back door lock motor.
WIRING DIAGRAM
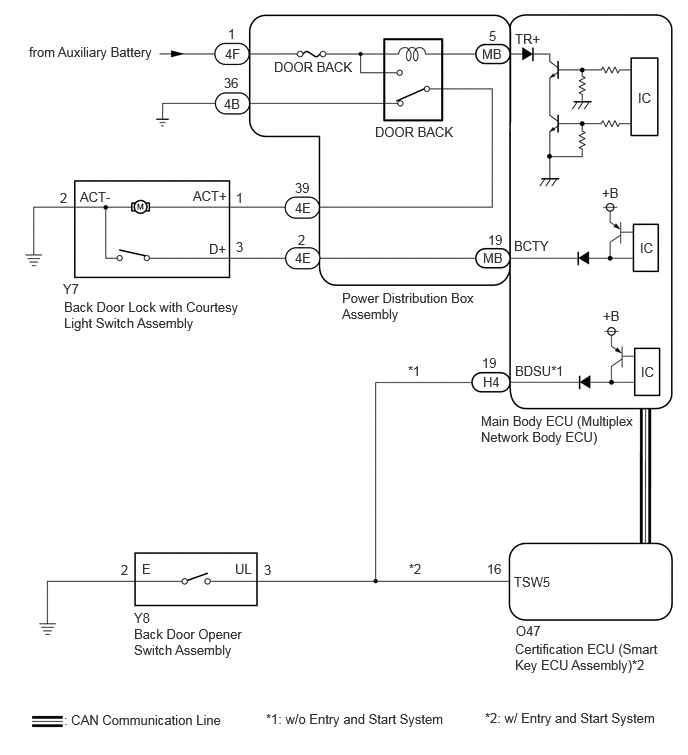
CAUTION / NOTICE / HINT
- NOTICE:
- ·
When using the GTS with the vehicle ignition switch off, connect the GTS to the DLC3 and turn a courtesy light switch on and off at intervals of 1.5 seconds or less until communication between the GTS and the vehicle begins. Then select Model Code "KEY REGIST" under manual mode and enter the following menus: Body Electrical / Entry&Start(CAN). While using the GTS, periodically turn a courtesy light switch on and off at intervals of 1.5 seconds or less to maintain communication between the GTS and the vehicle.
·Inspect the fuses for circuits related to this system before performing the following procedure.
·If the main body ECU (multiplex network body ECU) is replaced, refer to the Service Bulletin.*
*: w/ Entry and Start System
·The power door lock control system uses the CAN communication system. Inspect the communication function by following How to Proceed with Troubleshooting. Troubleshoot the power door lock control system after confirming that the communication systems are functioning properly.
Click hereVehicle Interior>DOOR LOCK>POWER DOOR LOCK CONTROL SYSTEM>HOW TO PROCEED WITH TROUBLESHOOTING
PROCEDURE
Perform the Active Test according to the display on the GTS.
- Body Electrical > Main Body > Active Test
-
Tester Display Measurement Item Control Range Diagnostic Note Trunk Lid / Back Door Open Back door lock motor OFF/ON -
- Body Electrical > Main Body > Active Test
-
Tester Display Trunk Lid / Back Door Open - 50004 449 15
- OK:
The back door lock assembly with courtesy light switch unlatches when ON is selected.
- Result:
Result Proceed to OK (w/ Entry and Start System) A OK (w/o Entry and Start System) B NG C
A
for HV Model: Click hereVehicle Interior>THEFT DETERRENT / KEYLESS ENTRY>ENTRY AND START SYSTEM (for Entry Function, HV Model)>HOW TO PROCEED WITH TROUBLESHOOTING
for Gasoline Model: Click hereVehicle Interior>THEFT DETERRENT / KEYLESS ENTRY>ENTRY AND START SYSTEM (for Entry Function, Gasoline Model)>HOW TO PROCEED WITH TROUBLESHOOTING
B
C
OK
NG
Disconnect the Y8 back door opener switch assembly connector.
Disconnect the H4 main body ECU (multiplex network body ECU) connector.
Measure the resistance according to the value(s) in the table below.
- Standard Resistance:
Tester Connection Condition Specified Condition Click Location & Routing(Y8,H4)Location & Routingewd_type=routing;type=c,c;code=Y8,H4
Click Connector(Y8)Body>No. 2 Back Door Wire>Back Door Opener Switch Assemblyewd_type=component;type=c;code=Y8;pinno=3,2
Click Connector(H4)Instrument Panel>Instrument Panel Wire / Speaker Wire>Main Body ECUewd_type=component;type=c;code=H4;pinno=19
Y8-3 (UL) - H4-19 (BDSU) Always Below 1 Ω Y8-2 (E) - Body ground Always Below 1 Ω Y8-3 (UL) or H4-19 (BDSU) - Other terminals and body ground Always 10 kΩ or higher
- Result:
Proceed to OK NG
OK
for LHD: Click herePower Source / Network>POWER DISTRIBUTION>MAIN BODY ECU (for LHD)>REMOVAL
for RHD: Click herePower Source / Network>POWER DISTRIBUTION>MAIN BODY ECU (for RHD)>REMOVAL
NG
OK
NG
Disconnect the Y7 back door lock with courtesy light switch assembly connector.
Disconnect the 4E power distribution box assembly connector.
Measure the resistance according to the value(s) in the table below.
- Standard Resistance:
Tester Connection Condition Specified Condition Click Location & Routing(Y7)Location & Routingewd_type=routing;type=c;code=Y7
Click Connector(Y7)Body>No. 2 Back Door Wire>Back Door Lock with Courtesy Light Switch Assemblyewd_type=component;type=c;code=Y7;pinno=1,3,2
Y7-1 (ACT+) - 4E-39 Always Below 1 Ω Y7-3 (D+) - 4E-2 Always Below 1 Ω Y7-2 (ACT-) - Body ground Always Below 1 Ω Y7-1 (ACT+) or 4E-39 - Body ground Always 10 kΩ or higher Y7-3 (D+) or 4E-4 - Body ground Always 10 kΩ or higher
- Result:
Proceed to OK NG
OK
NG
Remove the power distribution box assembly.
for LHD: Click herePower Source / Network>POWER DISTRIBUTION>MAIN BODY ECU (for LHD)>REMOVAL
for RHD: Click herePower Source / Network>POWER DISTRIBUTION>MAIN BODY ECU (for RHD)>REMOVAL
Remove the main body ECU (multiplex network body ECU) from the power distribution box assembly.
Measure the resistance according to the value(s) in the table below.
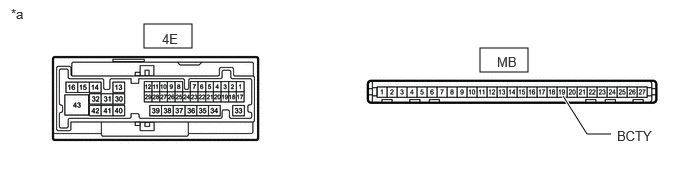
| *a | Component without harness connected
(Power Distribution Box Assembly) |
- | - |
- Standard Resistance:
Tester Connection Condition Specified Condition MB-19 (BCTY) - 4E-2 Always Below 1 Ω
- Result:
Proceed to OK NG
OK
NG
for LHD: Click herePower Source / Network>POWER DISTRIBUTION>MAIN BODY ECU (for LHD)>REMOVAL
for RHD: Click herePower Source / Network>POWER DISTRIBUTION>MAIN BODY ECU (for RHD)>REMOVAL
Disconnect the power distribution box assembly connectors.
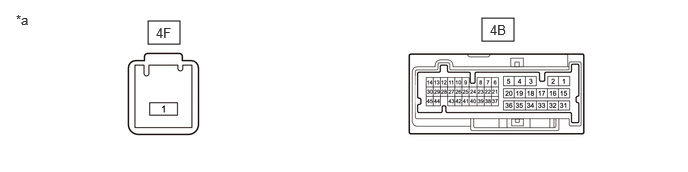
| *a | Component without harness connected
(Power Distribution Box Assembly) |
- | - |
Measure the voltage according to the value(s) in the table below.
- Standard Voltage:
Tester Connection Switch Condition Specified Condition 4F-1 - Body ground Ignition switch off 11 to 14 V
Measure the resistance according to the value(s) in the table below.
- Standard Resistance:
Tester Connection Condition Specified Condition 4B-36 - Body ground Always Below 1 Ω
- Result:
Proceed to OK NG
OK
NG
Remove the power distribution box assembly.
for LHD: Click herePower Source / Network>POWER DISTRIBUTION>MAIN BODY ECU (for LHD)>REMOVAL
for RHD: Click herePower Source / Network>POWER DISTRIBUTION>MAIN BODY ECU (for RHD)>REMOVAL
Remove the main body ECU (multiplex network body ECU) from the power distribution box assembly.
Measure the resistance according to the value(s) in the table below.
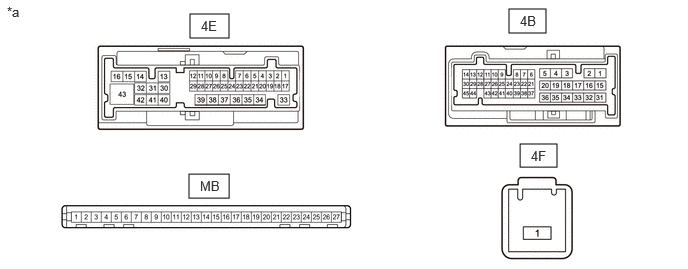
| *a | Front view of wire harness connector
(to Power Distribution Box Assembly) |
- | - |
- Standard Resistance:
Tester Connection Condition Specified Condition 4B-36 - 4E-39 Auxiliary battery voltage applied between 4F-1 and MB-5(TR+) 10 kΩ or higher 4B-36 - 4E-39 Auxiliary battery voltage not applied between 4F-1 and MB-5(TR+) Below 1 Ω
Measure the voltage according to the value(s) in the table below.
- Standard Voltage:
Tester Connection Condition Specified Condition 4E-39 - Auxiliary battery negative (-) terminal Auxiliary battery voltage applied between 4F-1 and MB-5(TR+) 11 to 14 V
- Result:
Proceed to OK NG
OK
for LHD: Click herePower Source / Network>POWER DISTRIBUTION>MAIN BODY ECU (for LHD)>REMOVAL
for RHD: Click herePower Source / Network>POWER DISTRIBUTION>MAIN BODY ECU (for RHD)>REMOVAL
NG
for LHD: Click herePower Source / Network>POWER DISTRIBUTION>MAIN BODY ECU (for LHD)>REMOVAL
for RHD: Click herePower Source / Network>POWER DISTRIBUTION>MAIN BODY ECU (for RHD)>REMOVAL