LIGHTING (INT) LIGHTING SYSTEM Instrument Panel Illumination does not Turn On
DESCRIPTION
The power distribution box assembly controls the instrument panel illuminations.
WIRING DIAGRAM
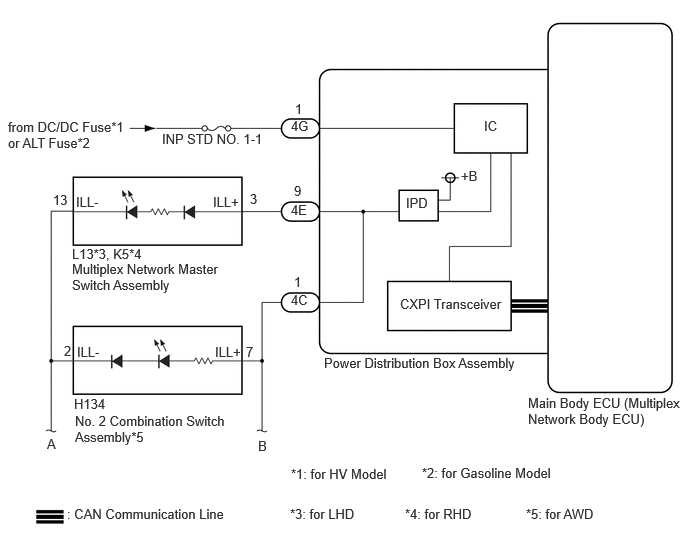
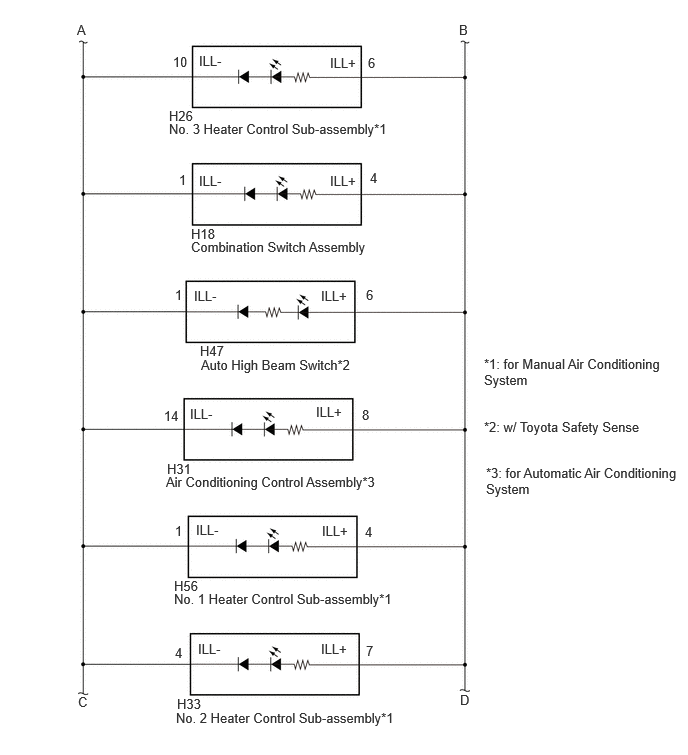
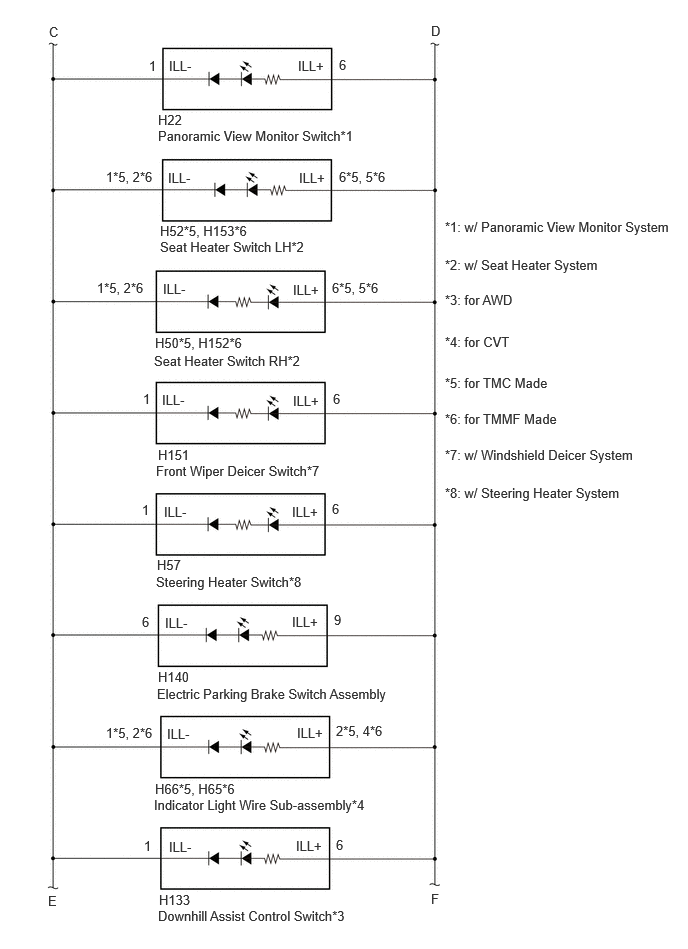
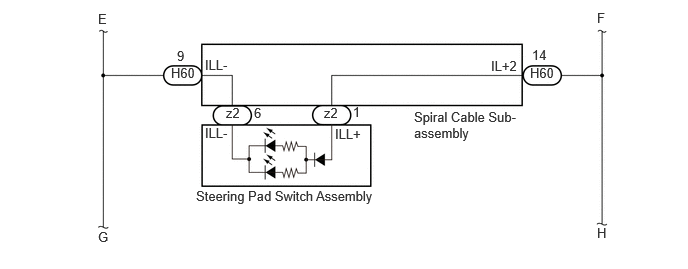
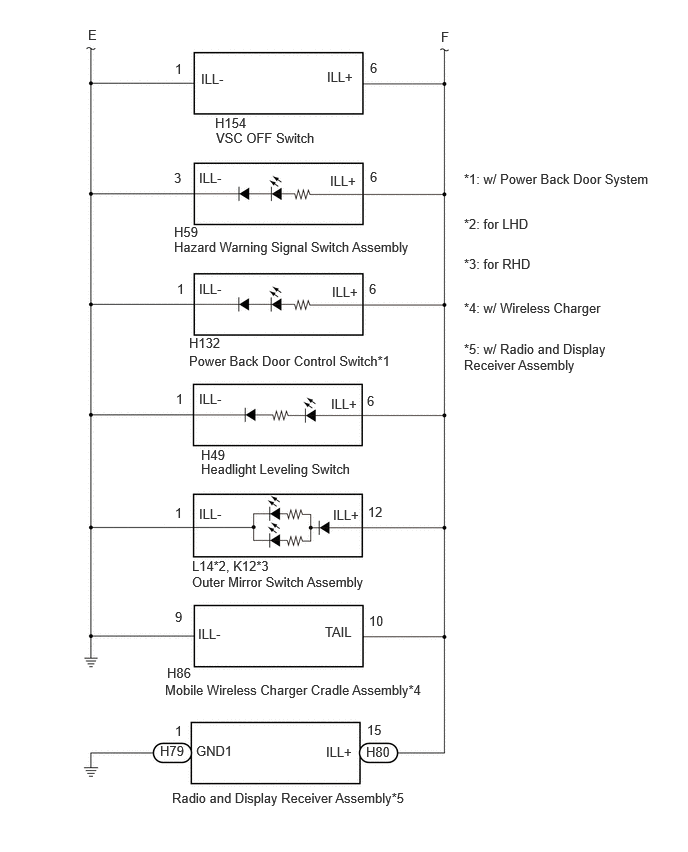
CAUTION / NOTICE / HINT
- NOTICE:
- ·
Inspect the fuses for circuits related to this system before performing the following procedure.
·Before replacing the main body ECU (multiplex network body ECU), refer to Service Bulletin.*1
*1: w/ Entry and Start System
PROCEDURE
Turn the light control switch to the TAIL position.
Read the Data List according to the display on the GTS.
- Body Electrical > Power Distribution Box > Data List
-
Tester Display Measurement Item Range Normal Condition Diagnostic Note Panel Light Fuse Shut Off Status Panel Light Fuse condition OFF or ON OFF: Fuse not shut off
ON: Fuse shut off-
- Body Electrical > Power Distribution Box > Data List
-
Tester Display Panel Light Fuse Shut Off Status - 50003 475 1298
- OK:
The Data List value displays "OFF".
- Result:
Proceed to OK NG
OK
NG
Read the Data List according to the display on the GTS.
- Body Electrical > Power Distribution Box > Data List
-
Tester Display Measurement Item Range Normal Condition Diagnostic Note Panel Light Input Signal Panel light input condition OFF or ON OFF: Light control switch not in tail position
ON: Light control switch in tail position-
- Body Electrical > Power Distribution Box > Data List
-
Tester Display Panel Light Input Signal - 50003 475 1295
- OK:
The GTS display changes.
- Result:
Proceed to OK NG
OK
for LHD: Click herePower Source / Network>POWER DISTRIBUTION>MAIN BODY ECU (for LHD)>REMOVAL
for RHD: Click herePower Source / Network>POWER DISTRIBUTION>MAIN BODY ECU (for RHD)>REMOVAL
NG
for LHD: Click herePower Source / Network>POWER DISTRIBUTION>MAIN BODY ECU (for LHD)>REMOVAL
for RHD: Click herePower Source / Network>POWER DISTRIBUTION>MAIN BODY ECU (for RHD)>REMOVAL
Disconnect the L14*1 or K12*2 outer mirror switch assembly connector.
*1:for LHD
*2:for RHD
Turn the light control switch to the TAIL position.
Read the Data List according to the display on the GTS.
- Body Electrical > Power Distribution Box > Data List
-
Tester Display Measurement Item Range Normal Condition Diagnostic Note Panel Light Fuse Shut Off Status Panel Light Fuse condition OFF or ON OFF: Fuse not shut off
ON: Fuse shut off-
- Body Electrical > Power Distribution Box > Data List
-
Tester Display Panel Light Fuse Shut Off Status - 50003 475 1298
- OK:
The Data List value displays "OFF".
- Result:
Proceed to OK NG
OK
NG
Disconnect the L13*1 or K5*2 multiplex network master switch assembly connector.
*1:for LHD
*2:for RHD
Connect the GTS to the DLC3.
Turn the light control switch to the TAIL position.
Read the Data List according to the display on the GTS.
- Body Electrical > Power Distribution Box > Data List
-
Tester Display Measurement Item Range Normal Condition Diagnostic Note Panel Light Fuse Shut Off Status Panel Light Fuse condition OFF or ON OFF: Fuse not shut off
ON: Fuse shut off-
- Body Electrical > Power Distribution Box > Data List
-
Tester Display Panel Light Fuse Shut Off Status - 50003 475 1298
- OK:
The Data List value displays "OFF".
- Result:
Proceed to OK NG
OK
NG
Choose the model to be inspected.
- Result:
Result Proceed to w/ Toyota Safety Sense A w/o Toyota Safety Sense B
A
B
Disconnect the H47 auto high beam switch connector.
Turn the light control switch to the TAIL position.
Read the Data List according to the display on the GTS.
- Body Electrical > Power Distribution Box > Data List
-
Tester Display Measurement Item Range Normal Condition Diagnostic Note Panel Light Fuse Shut Off Status Panel Light Fuse condition OFF or ON OFF: Fuse not shut off
ON: Fuse shut off-
- Body Electrical > Power Distribution Box > Data List
-
Tester Display Panel Light Fuse Shut Off Status - 50003 475 1298
- OK:
The Data List value displays "OFF".
- Result:
Proceed to OK NG
OK
NG
Disconnect the H49 headlight leveling switch connector.
Turn the light control switch to the TAIL position.
Read the Data List according to the display on the GTS.
- Body Electrical > Power Distribution Box > Data List
-
Tester Display Measurement Item Range Normal Condition Diagnostic Note Panel Light Fuse Shut Off Status Panel Light Fuse condition OFF or ON OFF: Fuse not shut off
ON: Fuse shut off-
- Body Electrical > Power Distribution Box > Data List
-
Tester Display Panel Light Fuse Shut Off Status - 50003 475 1298
- OK:
The Data List value displays "OFF".
- Result:
Proceed to OK NG
OK
NG
Choose the model to be inspected.
- Result:
Result Proceed to w/ Panoramic View Monitor System A w/o Panoramic View Monitor System B
A
B
Disconnect the H22 panoramic view monitor switch connector.
Turn the light control switch to the TAIL position.
Read the Data List according to the display on the GTS.
- Body Electrical > Power Distribution Box > Data List
-
Tester Display Measurement Item Range Normal Condition Diagnostic Note Panel Light Fuse Shut Off Status Panel Light Fuse condition OFF or ON OFF: Fuse not shut off
ON: Fuse shut off-
- Body Electrical > Power Distribution Box > Data List
-
Tester Display Panel Light Fuse Shut Off Status - 50003 475 1298
- OK:
The Data List value displays "OFF".
- Result:
Proceed to OK NG
OK
Click hereAudio / Visual / Telematics>PARK ASSIST / MONITORING>PANORAMIC VIEW MONITOR SWITCH>REMOVAL
NG
Choose the model to be inspected.
- Result:
Result Proceed to for CVT A except CVT B
A
B
Disconnect the H66*1 or H65*2 indicator light wire sub-assembly connector.
*1: for TMC Made
*2: for TMMF Made
Turn the light control switch to the TAIL position.
Read the Data List according to the display on the GTS.
- Body Electrical > Power Distribution Box > Data List
-
Tester Display Measurement Item Range Normal Condition Diagnostic Note Panel Light Fuse Shut Off Status Panel Light Fuse condition OFF or ON OFF: Fuse not shut off
ON: Fuse shut off-
- Body Electrical > Power Distribution Box > Data List
-
Tester Display Panel Light Fuse Shut Off Status - 50003 475 1298
- OK:
The Data List value displays "OFF".
- Result:
Proceed to OK NG
OK
for TMC Made: Click hereDrivetrain>K320 (MULTIDRIVE / CVT)>SHIFT LEVER (for TMC Made)>DISASSEMBLY
for TMMF Made: Click hereDrivetrain>K320 (MULTIDRIVE / CVT)>SHIFT LEVER (for TMMF Made)>DISASSEMBLY
NG
Choose the model to be inspected.
- Result:
Result Proceed to w/ wireless Charger A w/o wireless Charger B
A
B
Disconnect the H86 mobile wireless charger cradle connector.
Turn the light control switch to the TAIL position.
Read the Data List according to the display on the GTS.
- Body Electrical > Power Distribution Box > Data List
-
Tester Display Measurement Item Range Normal Condition Diagnostic Note Panel Light Fuse Shut Off Status Panel Light Fuse condition OFF or ON OFF: Fuse not shut off
ON: Fuse shut off-
- Body Electrical > Power Distribution Box > Data List
-
Tester Display Panel Light Fuse Shut Off Status - 50003 475 1298
- OK:
The Data List value displays "OFF".
- Result:
Proceed to OK NG
OK
NG
Disconnect the H18 combination switch assembly connector.
Turn the light control switch to the TAIL position.
Read the Data List according to the display on the GTS.
- Body Electrical > Power Distribution Box > Data List
-
Tester Display Measurement Item Range Normal Condition Diagnostic Note Panel Light Fuse Shut Off Status Panel Light Fuse condition OFF or ON OFF: Fuse not shut off
ON: Fuse shut off-
- Body Electrical > Power Distribution Box > Data List
-
Tester Display Panel Light Fuse Shut Off Status - 50003 475 1298
- OK:
The Data List value displays "OFF".
- Result:
Proceed to OK NG
OK
NG
Disconnect the H140 electric parking brake switch assembly connector.
Turn the light control switch to the TAIL position.
Read the Data List according to the display on the GTS.
- Body Electrical > Power Distribution Box > Data List
-
Tester Display Measurement Item Range Normal Condition Diagnostic Note Panel Light Fuse Shut Off Status Panel Light Fuse condition OFF or ON OFF: Fuse not shut off
ON: Fuse shut off-
- Body Electrical > Power Distribution Box > Data List
-
Tester Display Panel Light Fuse Shut Off Status - 50003 475 1298
- OK:
The Data List value displays "OFF".
- Result:
Proceed to OK NG
OK
NG
Disconnect the H154 VSC OFF switch connector.
Turn the light control switch to the TAIL position.
Read the Data List according to the display on the GTS.
- Body Electrical > Power Distribution Box > Data List
-
Tester Display Measurement Item Range Normal Condition Diagnostic Note Panel Light Fuse Shut Off Status Panel Light Fuse condition OFF or ON OFF: Fuse not shut off ON: Fuse shut off -
- Body Electrical > Power Distribution Box > Data List
-
Tester Display Panel Light Fuse Shut Off Status - 50003 475 1298
- OK:
The Data List value displays "OFF".
- Result:
Proceed to OK NG
OK
Click hereBrake>BRAKE CONTROL / DYNAMIC CONTROL SYSTEMS>VSC OFF SWITCH (for Instrument Panel Side)>REMOVAL
NG
Choose the model to be inspected.
- Result:
Result Proceed to for AWD A for 2WD B
A
B
Disconnect the H133 downhill assist control switch connector.
Turn the light control switch to the TAIL position.
Read the Data List according to the display on the GTS.
- Body Electrical > Power Distribution Box > Data List
-
Tester Display Measurement Item Range Normal Condition Diagnostic Note Panel Light Fuse Shut Off Status Panel Light Fuse condition OFF or ON OFF: Fuse not shut off
ON: Fuse shut off-
- Body Electrical > Power Distribution Box > Data List
-
Tester Display Panel Light Fuse Shut Off Status - 50003 475 1298
- OK:
The Data List value displays "OFF".
- Result:
Proceed to OK NG
OK
NG
Disconnect the H134 No. 2 combination switch assembly connector.
Turn the light control switch to the TAIL position.
Read the Data List according to the display on the GTS.
- Body Electrical > Power Distribution Box > Data List
-
Tester Display Measurement Item Range Normal Condition Diagnostic Note Panel Light Fuse Shut Off Status Panel Light Fuse condition OFF or ON OFF: Fuse not shut off
ON: Fuse shut off-
- Body Electrical > Power Distribution Box > Data List
-
Tester Display Panel Light Fuse Shut Off Status - 50003 475 1298
- OK:
The Data List value displays "OFF".
- Result:
Proceed to OK NG
OK
NG
Choose the model to be inspected.
- Result:
Result Proceed to w/ Seat Heater System A w/o Seat Heater System B
A
B
Disconnect the H52*1 or H153*2 seat heater switch LH connector.
*1: for TMC Made
*2: for TMMF Made
Turn the light control switch to the TAIL position.
Read the Data List according to the display on the GTS.
- Body Electrical > Power Distribution Box > Data List
-
Tester Display Measurement Item Range Normal Condition Diagnostic Note Panel Light Fuse Shut Off Status Panel Light Fuse condition OFF or ON OFF: Fuse not shut off
ON: Fuse shut off-
- Body Electrical > Power Distribution Box > Data List
-
Tester Display Panel Light Fuse Shut Off Status - 50003 475 1298
- OK:
The Data List value displays "OFF".
- Result:
Proceed to OK NG
OK
NG
Disconnect the H50*1 or H152*2 seat heater switch RH connector.
*1: for TMC Made
*2: for TMMF Made
Turn the light control switch to the TAIL position.
Read the Data List according to the display on the GTS.
- Body Electrical > Power Distribution Box > Data List
-
Tester Display Measurement Item Range Normal Condition Diagnostic Note Panel Light Fuse Shut Off Status Panel Light Fuse condition OFF or ON OFF: Fuse not shut off
ON: Fuse shut off-
- Body Electrical > Power Distribution Box > Data List
-
Tester Display Panel Light Fuse Shut Off Status - 50003 475 1298
- OK:
The Data List value displays "OFF".
- Result:
Proceed to OK NG
OK
NG
Choose the model to be inspected.
- Result:
Result Proceed to for Automatic Air Conditioning System A for Manual Air Conditioning System B
A
B
Disconnect the H31 air conditioning control assembly connector.
Turn the light control switch to the TAIL position.
Read the Data List according to the display on the GTS.
- Body Electrical > Power Distribution Box > Data List
-
Tester Display Measurement Item Range Normal Condition Diagnostic Note Panel Light Fuse Shut Off Status Panel Light Fuse condition OFF or ON OFF: Fuse not shut off
ON: Fuse shut off-
- Body Electrical > Power Distribution Box > Data List
-
Tester Display Panel Light Fuse Shut Off Status - 50003 475 1298
- OK:
The Data List value displays "OFF".
- Result:
Proceed to OK NG
OK
NG
Disconnect the H56 No. 1 heater control sub-assembly connector.
Turn the light control switch to the TAIL position.
Read the Data List according to the display on the GTS.
- Body Electrical > Power Distribution Box > Data List
-
Tester Display Measurement Item Range Normal Condition Diagnostic Note Panel Light Fuse Shut Off Status Panel Light Fuse condition OFF or ON OFF: Fuse not shut off
ON: Fuse shut off-
- Body Electrical > Power Distribution Box > Data List
-
Tester Display Panel Light Fuse Shut Off Status - 50003 475 1298
- OK:
The Data List value displays "OFF".
- Result:
Proceed to OK NG
OK
NG
Disconnect the H33 No. 2 heater control sub-assembly connector.
Turn the light control switch to the TAIL position.
Read the Data List according to the display on the GTS.
- Body Electrical > Power Distribution Box > Data List
-
Tester Display Measurement Item Range Normal Condition Diagnostic Note Panel Light Fuse Shut Off Status Panel Light Fuse condition OFF or ON OFF: Fuse not shut off
ON: Fuse shut off-
- Body Electrical > Power Distribution Box > Data List
-
Tester Display Panel Light Fuse Shut Off Status - 50003 475 1298
- OK:
The Data List value displays "OFF".
- Result:
Proceed to OK NG
OK
NG
Disconnect the H26 No. 3 heater control sub-assembly connector.
Turn the light control switch to the TAIL position.
Read the Data List according to the display on the GTS.
- Body Electrical > Power Distribution Box > Data List
-
Tester Display Measurement Item Range Normal Condition Diagnostic Note Panel Light Fuse Shut Off Status Panel Light Fuse condition OFF or ON OFF: Fuse not shut off
ON: Fuse shut off-
- Body Electrical > Power Distribution Box > Data List
-
Tester Display Panel Light Fuse Shut Off Status - 50003 475 1298
- OK:
The Data List value displays "OFF".
- Result:
Proceed to OK NG
OK
NG
Disconnect the H60 spiral cable sub-assembly connector.
Turn the light control switch to the TAIL position.
Read the Data List according to the display on the GTS.
- Body Electrical > Power Distribution Box > Data List
-
Tester Display Measurement Item Range Normal Condition Diagnostic Note Panel Light Fuse Shut Off Status Panel Light Fuse condition OFF or ON OFF: Fuse not shut off
ON: Fuse shut off-
- Body Electrical > Power Distribution Box > Data List
-
Tester Display Panel Light Fuse Shut Off Status - 50003 475 1298
- OK:
The Data List value displays "OFF".
- Result:
Proceed to OK NG
OK
NG
Disconnect the z2 steering pad switch assembly connector.
Turn the light control switch to the TAIL position.
Read the Data List according to the display on the GTS.
- Body Electrical > Power Distribution Box > Data List
-
Tester Display Measurement Item Range Normal Condition Diagnostic Note Panel Light Fuse Shut Off Status Panel Light Fuse condition OFF or ON OFF: Fuse not shut off
ON: Fuse shut off-
- Body Electrical > Power Distribution Box > Data List
-
Tester Display Panel Light Fuse Shut Off Status - 50003 475 1298
- OK:
The Data List value displays "OFF".
- Result:
Proceed to OK NG
OK
NG
Choose the model to be inspected.
- Result:
Result Proceed to w/ Steering Heater System A w/o Steering Heater System B
A
B
Disconnect the H57 steering heater switch assembly connector.
Turn the light control switch to the TAIL position.
Read the Data List according to the display on the GTS.
- Body Electrical > Power Distribution Box > Data List
-
Tester Display Measurement Item Range Normal Condition Diagnostic Note Panel Light Fuse Shut Off Status Panel Light Fuse condition OFF or ON OFF: Fuse not shut off
ON: Fuse shut off-
- Body Electrical > Power Distribution Box > Data List
-
Tester Display Panel Light Fuse Shut Off Status - 50003 475 1298
- OK:
The Data List value displays "OFF".
- Result:
Proceed to OK NG
OK
NG
Choose the model to be inspected.
- Result:
Result Proceed to w/ Windshield Deicer System A w/o Windshield Deicer System B
A
B
Disconnect the H151 windshield deicer switch assembly connector.
Turn the light control switch to the TAIL position.
Read the Data List according to the display on the GTS.
- Body Electrical > Power Distribution Box > Data List
-
Tester Display Measurement Item Range Normal Condition Diagnostic Note Panel Light Fuse Shut Off Status Panel Light Fuse condition OFF or ON OFF: Fuse not shut off
ON: Fuse shut off-
- Body Electrical > Power Distribution Box > Data List
-
Tester Display Panel Light Fuse Shut Off Status - 50003 475 1298
- OK:
The Data List value displays "OFF".
- Result:
Proceed to OK NG
OK
NG
Disconnect the H59 hazard warning signal switch assembly connector.
Turn the light control switch to the TAIL position.
Read the Data List according to the display on the GTS.
- Body Electrical > Power Distribution Box > Data List
-
Tester Display Measurement Item Range Normal Condition Diagnostic Note Panel Light Fuse Shut Off Status Panel Light Fuse condition OFF or ON OFF: Fuse not shut off
ON: Fuse shut off-
- Body Electrical > Power Distribution Box > Data List
-
Tester Display Panel Light Fuse Shut Off Status - 50003 475 1298
- OK:
The Data List value displays "OFF".
- Result:
Proceed to OK NG
OK
NG
Choose the model to be inspected.
- Result:
Result Proceed to w/ Power Back Door System A w/o Power Back Door System B
A
B
Disconnect the H132 power back door control switch connector.
Turn the light control switch to the TAIL position.
Read the Data List according to the display on the GTS.
- Body Electrical > Power Distribution Box > Data List
-
Tester Display Measurement Item Range Normal Condition Diagnostic Note Panel Light Fuse Shut Off Status Panel Light Fuse condition OFF or ON OFF: Fuse not shut off
ON: Fuse shut off-
- Body Electrical > Power Distribution Box > Data List
-
Tester Display Panel Light Fuse Shut Off Status - 50003 475 1298
- OK:
The Data List value displays "OFF".
- Result:
Proceed to OK NG
OK
NG
Choose the model to be inspected.
- Result:
Result Proceed to w/ Radio and Display Receiver Assembly A w/o Radio and Display Receiver Assembly B
A
B
Disconnect the H80 radio and display receiver assembly connector.
Turn the light control switch to the TAIL position.
Read the Data List according to the display on the GTS.
- Body Electrical > Power Distribution Box > Data List
-
Tester Display Measurement Item Range Normal Condition Diagnostic Note Panel Light Fuse Shut Off Status Panel Light Fuse condition OFF or ON OFF: Fuse not shut off
ON: Fuse shut off-
- Body Electrical > Power Distribution Box > Data List
-
Tester Display Panel Light Fuse Shut Off Status - 50003 475 1298
- OK:
The Data List value displays "OFF".
- Result:
Proceed to OK NG
OK
NG
Disconnect the K5 multiplex network master switch assembly connector. (for RHD)
Disconnect the L13 multiplex network master switch assembly connector. (for LHD)
Disconnect the K12 outer mirror switch assembly connector. (for RHD)
Disconnect the L14 outer mirror switch assembly connector. (for LHD)
Disconnect the H47 auto high beam switch connector. (w/ Toyota Safety Sense)
Disconnect the H49 headlight leveling switch connector.
Disconnect the H22 panoramic view monitor switch connector. (w/ Panoramic View Monitor System)
Disconnect the H65 indicator light wire sub-assembly connector. (for TMMF Made with CVT)
Disconnect the H66 indicator light wire sub-assembly connector. (for TMC Made with CVT)
Disconnect the H18 combination switch assembly connector.
Disconnect the H140 electric parking brake switch assembly connector.
Disconnect the H154 VSC OFF switch connector.
Disconnect the H133 downhill assist control switch connector. (for AWD)
Disconnect the H134 No. 2 combination switch assembly connector. (for AWD)
Disconnect the H52 seat heater switch LH connector. (for TMC Made with Seat Heater System)
Disconnect the H50 seat heater switch RH connector. (for TMC Made with Seat Heater System)
Disconnect the H153 seat heater switch LH connector. (for TMMF Made with Seat Heater System)
Disconnect the H152 seat heater switch RH connector. (for TMMF Made with Seat Heater System)
Disconnect the H31 air conditioning control assembly connector. (for Automatic Air Conditioning System)
Disconnect the H56 No. 1 heater control sub-assembly connector. (for Manual Air Conditioning System)
Disconnect the H33 No. 2 heater control sub-assembly connector. (for Manual Air Conditioning System)
Disconnect the H26 No. 3 heater control sub-assembly connector. (for Manual Air Conditioning System)
Disconnect the z2 steering pad switch assembly connector.
Disconnect the H60 spiral cable sub-assembly connector.
Disconnect the H57 steering heater switch connector. (w/ Steering Heater System)
Disconnect the H151 windshield deicer switch connector. (w/ Windshield Deicer System)
Disconnect the H59 hazard warning signal switch assembly connector.
Disconnect the H132 power back door control switch connector. (w/ Power Back Door System)
Disconnect the H86 mobile wireless charger cradle assembly connector. (w/ Wireless Charger)
Disconnect the H80 radio and display receiver assembly connector. (w/ Radio and Display Receiver Assembly)
Disconnect the cable from the negative (-) auxiliary battery terminal.
Disconnect the 4E and 4C power distribution box assembly connectors.
Measure the resistance according to the value(s) in the table below.
- Standard Resistance:
*1: for RHD
*2: for LHD
*3: w/ Toyota Safety Sense
*4: w/ Panoramic View Monitor System
*5: for TMMF Made with CVT
*6: for TMC Made with CVT
*7: for AWD
*8: for TMC Made with Seat Heater System
*9: for TMMF Made with Seat Heater System
*10: for Automatic Air Conditioning System
*11: for Manual Air Conditioning System
*12: w/ Power Back Door System
*13: w/ Radio and Display Receiver Assembly
*14: w/ Steering Heater System
*15: w/ Windshield Deicer System
*16: w/ Wireless Charger
- Result:
Proceed to OK NG
OK
for LHD: Click herePower Source / Network>POWER DISTRIBUTION>MAIN BODY ECU (for LHD)>REMOVAL
for RHD: Click herePower Source / Network>POWER DISTRIBUTION>MAIN BODY ECU (for RHD)>REMOVAL
NG