DRIVE SHAFT / PROPELLER SHAFT FRONT DRIVE SHAFT ASSEMBLY REMOVAL
PROCEDURE

 51442C
1.REMOVE ENGINE UNDER COVER LH (for Plastic Type)
51441C
2.REMOVE ENGINE UNDER COVER RH (for Plastic Type)
51405A
3.REMOVE NO. 1 ENGINE UNDER COVER SUB-ASSEMBLY (for Metal Type)
4.DRAIN TRANSAXLE OIL (for Manual Transaxle)
5.DRAIN AUTOMATIC TRANSAXLE FLUID (for Automatic Transaxle)
6.REMOVE FRONT WHEEL
43502H
7.REMOVE FRONT AXLE SHAFT NUT LH
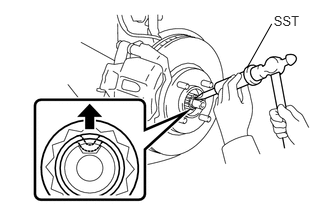
Using SST and a hammer, release the staked part of the front axle shaft nut.
- SST
- 09930-00010
- NOTICE:
- ·
Insert SST into the groove with the flat surface facing up.
·Do not damage the tip of SST using grinders.
·Completely unstake the staked part before removing the front axle shaft nut.
·Do not damage the threads of the front drive shaft.
Using a deep socket wrench 30 mm, remove the front axle shaft nut.
43501H
8.REMOVE FRONT AXLE SHAFT NUT RH
- HINT:
-
Use the same procedure for the RH side as for the LH side.
89543
9.SEPARATE FRONT SPEED SENSOR LH (w/ ABS)
89542
10.SEPARATE FRONT SPEED SENSOR RH (w/ ABS)
- HINT:
-
Use the same procedure for the RH side as for the LH side.
48810
11.SEPARATE FRONT STABILIZER LINK ASSEMBLY LH
48820B
12.SEPARATE FRONT STABILIZER LINK ASSEMBLY RH
- HINT:
-
Use the same procedure for the RH side as for the LH side.
45047
13.SEPARATE TIE ROD END SUB-ASSEMBLY LH
45046
14.SEPARATE TIE ROD END SUB-ASSEMBLY RH
- HINT:
-
Use the same procedure for the RH side as for the LH side.
48069
15.SEPARATE FRONT LOWER SUSPENSION ARM SUB-ASSEMBLY LH
48068
16.SEPARATE FRONT LOWER SUSPENSION ARM SUB-ASSEMBLY RH
- HINT:
-
Use the same procedure for the RH side as for the LH side.
17.SEPARATE FRONT AXLE ASSEMBLY LH
Using a plastic hammer, tap the end of the drive shaft and disengage the fitting between the drive shaft and front axle.
- HINT:
-
If it is difficult to disengage the fitting, tap the end of the drive shaft with a brass bar and hammer.
Push the front axle out of the vehicle to remove the drive shaft from the front axle.
- NOTICE:
- ·
Do not push the front axle further out of the vehicle than is necessary.
·Do not damage the outboard joint boot.
·Do not damage the speed sensor rotor.
·Suspend the drive shaft with a piece of string or the equivalent.
18.SEPARATE FRONT AXLE ASSEMBLY RH
- HINT:
-
Use the same procedure for the RH side as for the LH side.
43420
19.REMOVE FRONT DRIVE SHAFT ASSEMBLY LH
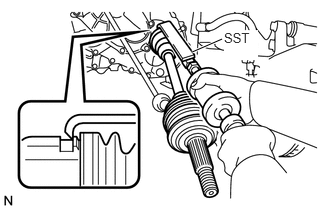
Using SST, remove the drive shaft as shown in the illustration.
- SST
- 09520-01010
09520-24010 (09520-32040)
- NOTICE:
- ·
Do not damage the oil seal.
·Do not damage the inboard joint boot.
·Do not drop the drive shaft.
43410
20.REMOVE FRONT DRIVE SHAFT ASSEMBLY RH
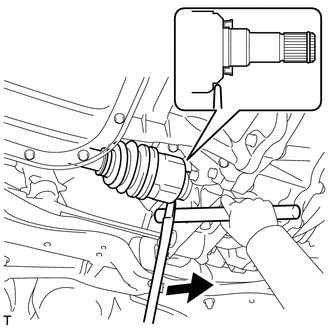
Using a tire lever and brass bar, remove the drive shaft.
- NOTICE:
- ·
Do not damage the oil seal.
·Do not damage the inboard joint boot.
·Do not drop the drive shaft.
21.FIX FRONT AXLE ASSEMBLY
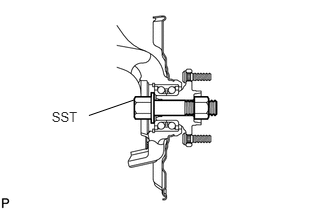
- SST
- 09608-16042 (09608-02021, 09608-02041)
- HINT:
-
The hub bearing could be damaged if it is subjected to the vehicle's full weight, such as when moving the vehicle with the drive shaft removed. If it is absolutely necessary to place the vehicle's full weight on the hub bearing, first support it with SST.