WINDOW / GLASS QUARTER WINDOW GLASS REMOVAL
CAUTION / NOTICE / HINT
- HINT:
- ·
Use the same procedure for both the RH and LH sides.
·The procedure described below is for the LH side.
PROCEDURE

 58410B
1.REMOVE DECK BOARD ASSEMBLY
64771G
2.REMOVE SPARE WHEEL COVER
3.REMOVE REAR SEAT ASSEMBLY (for 60/40 Split Seat Type LH Side)
4.REMOVE REAR SEAT ASSEMBLY (for 60/40 Split Seat Type RH Side)
5.REMOVE REAR SEAT ASSEMBLY (for Fold Down Seat Type)
67914
6.REMOVE FRONT DOOR SCUFF PLATE
- HINT:
-
Use the same procedure as for the RH side (See page Vehicle Interior>INTERIOR PANELS / TRIM>ROOF HEADLINING(for 3 Door)>REMOVAL).
62312B
7.SEPARATE FRONT DOOR OPENING TRIM WEATHERSTRIP
- HINT:
-
Use the same procedure as for the RH side (See page Vehicle Interior>INTERIOR PANELS / TRIM>ROOF HEADLINING(for 3 Door)>REMOVAL).
73202B
8.REMOVE FRONT SEAT OUTER BELT BAR SUB-ASSEMBLY
- HINT:
-
Use the same procedure as for the RH side (See page Vehicle Interior>SEAT BELT>FRONT SEAT OUTER BELT ASSEMBLY(for 3 Door)>REMOVAL).
62520P
9.REMOVE FRONT QUARTER TRIM PANEL ASSEMBLY
- HINT:
-
Use the same procedure as for the RH side (See page Vehicle Interior>INTERIOR PANELS / TRIM>ROOF HEADLINING(for 3 Door)>REMOVAL).
62412B
10.REMOVE CENTER PILLAR UPPER GARNISH
- HINT:
-
Use the same procedure as for the RH side (See page Vehicle Interior>INTERIOR PANELS / TRIM>ROOF HEADLINING(for 3 Door)>REMOVAL).
81250
11.REMOVE NO. 2 ROOM LIGHT ASSEMBLY (w/ Luggage Compartment Room Light)
09113
12.REMOVE JACK HANDLE (for RH Side)
58387B
13.REMOVE REAR FLOOR FINISH PLATE
73370
14.SEPARATE REAR SEAT 3 POINT TYPE OUTER BELT ASSEMBLY
- HINT:
-
Use the same procedure as for the RH side (See page Vehicle Interior>SEAT BELT>REAR SEAT OUTER BELT ASSEMBLY(for 3 Door)>REMOVAL).
64740C
15.REMOVE DECK TRIM SIDE PANEL ASSEMBLY
- HINT:
-
Use the same procedure as for the RH side (See page Vehicle Interior>INTERIOR PANELS / TRIM>ROOF HEADLINING(for 3 Door)>REMOVAL).
62472A
16.REMOVE ROOF SIDE INNER GARNISH
- HINT:
-
Use the same procedure as for the RH side (See page Vehicle Interior>INTERIOR PANELS / TRIM>ROOF HEADLINING(for 3 Door)>REMOVAL).
62452C
17.REMOVE REAR ROOF SIDE RAIL GARNISH
- HINT:
-
Use the same procedure as for the RH side (See page Vehicle Interior>INTERIOR PANELS / TRIM>ROOF HEADLINING(for 3 Door)>REMOVAL).
75642E
18.REMOVE QUARTER WINDOW MOULDING
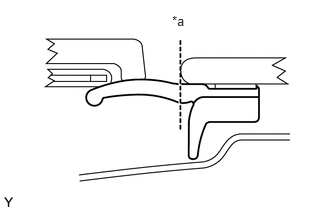
Using a knife, cut off the quarter window moulding, as shown in the illustration.
| *a | Cut |
- NOTICE:
-
Do not damage the vehicle body with the knife.
- HINT:
-
Make a partial cut in the quarter window moulding. Then pull and remove it by hand.
62712
19.REMOVE QUARTER WINDOW GLASS
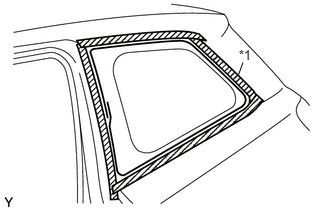
Apply protective tape to the installation area on the quarter window glass on the vehicle body.
| *1 | Protective Tape |
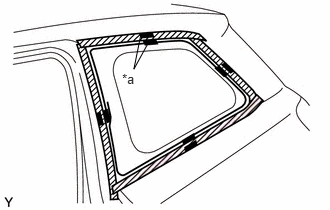
Place matchmarks on the quarter window glass and vehicle body on the locations indicated in the illustration.
| *a | Mark |
- HINT:
-
Matchmarks do not need to be placed if the quarter window glass is not going to be reused.
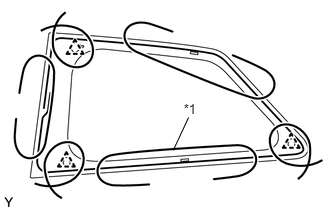
Pass a piano wire between the vehicle body and glass from the interior.
| *1 | Piano Wire |
Tie both wire ends to wooden blocks or similar objects.
Cut through the adhesive by pulling the piano wire around the quarter window glass.
- NOTICE:
-
When separating the quarter window glass, take care not to damage the paint or the interior and exterior ornaments.
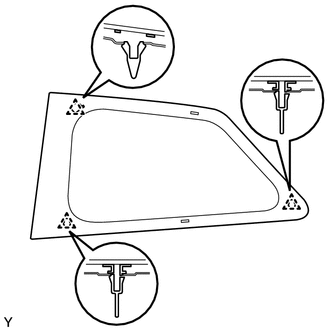
Using suction cups, disengage the 3 clips and remove the quarter window glass.
62775B
20.REMOVE QUARTER WINDOW CLIP
Using a scraper, remove the 3 quarter window clips.
- NOTICE:
-
Be sure to replace the quarter window clip with a new one.
62785A
21.REMOVE QUARTER WINDOW GLASS SPACER
Using a scraper, remove the 2 quarter window glass spacers.
- NOTICE:
-
Be sure to replace the quarter window glass spacer with a new one.