2NZ-FE ENGINE MECHANICAL ENGINE UNIT REASSEMBLY
PROCEDURE

 15104E
1.INSTALL STUD BOLT
Using an E5 "TORX" socket wrench, install the 4 stud bolts to the oil pan sub-assembly.
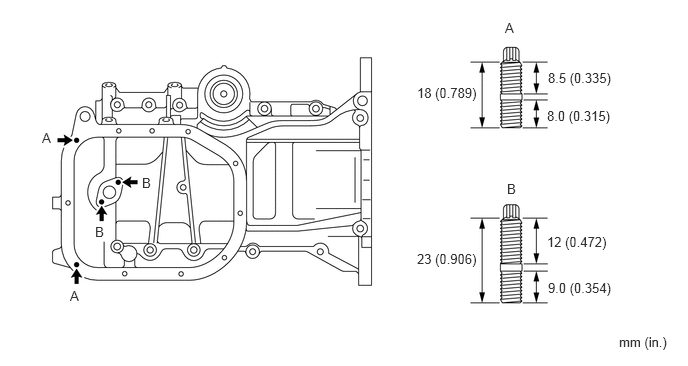
- Torque:
- 5.0 N*m (51 kgf*cm, 44 in.*lbf)
12101
2.INSTALL OIL PAN SUB-ASSEMBLY
Remove any old packing material from the contact surface.
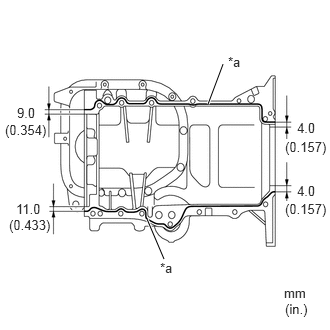
| *a | Seal Packing |
Apply a continuous bead of seal packing (Diameter 2.0 to 3.0 mm (0.079 to 0.118 in.)) to the oil pan sub-assembly contact surface as shown in the illustration.
- Seal packing:
Toyota Genuine Seal Packing Black, Three Bond 1207B or equivalent
- NOTICE:
- ·
Install the oil pan sub-assembly within 3 minutes of applying seal packing.
·Do not expose the seal to engine oil for at least 2 hours after the installation.
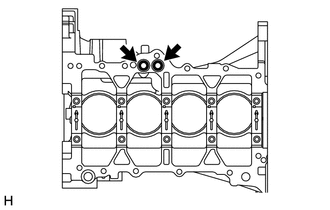
Install 2 new O-rings to the cylinder block sub-assembly.
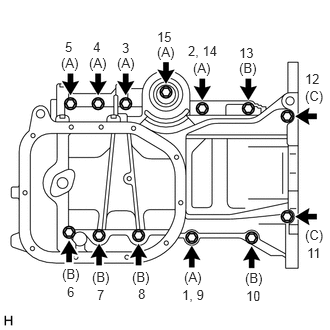
Using several steps, install and tighten the 13 bolts uniformly in the order shown in the illustration.
- Torque:
- 24 N*m (245 kgf*cm, 18 ft.*lbf)
- Bolt Length:
Item Length Bolt A 49 mm (1.929 in.) Bolt B 88 mm (3.465 in.) Bolt C 144 mm (5.669 in.)
15104
3.INSTALL OIL STRAINER SUB-ASSEMBLY
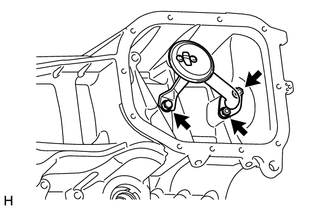
Install a new oil strainer gasket and oil strainer sub-assembly to the oil pan sub-assembly with the 2 nuts and bolt.
- Torque:
- 16 N*m (163 kgf*cm, 12 ft.*lbf)
12102A
4.INSTALL NO. 2 OIL PAN SUB-ASSEMBLY
Remove any old packing material from the contact surface.
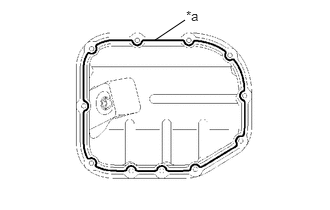
| *a | Seal Packing |
Apply a continuous bead of seal packing (Diameter 2.5 to 3.5 mm (0.0984 to 0.1378 in.)) to the No. 2 oil pan sub-assembly contact surface as shown in the illustration.
- Seal packing:
Toyota Genuine Seal Packing Black, Three Bond 1207B or equivalent
- NOTICE:
- ·
Install the No. 2 oil pan sub-assembly within 3 minutes of applying seal packing.
·Do not expose the seal to engine oil within 2 hours of installation.
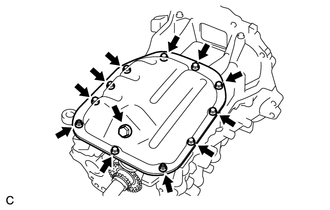
Install the No. 2 oil pan sub-assembly to the oil pan sub-assembly with the 9 bolts and 2 nuts.
- Torque:
- 9.0 N*m (92 kgf*cm, 80 in.*lbf)
Install the oil pan drain plug with a new gasket to the No. 2 oil pan sub-assembly.
- Torque:
- 37.5 N*m (382 kgf*cm, 28 ft.*lbf)
11401L
5.INSTALL REAR ENGINE OIL SEAL
15600A
6.INSTALL OIL FILTER UNION
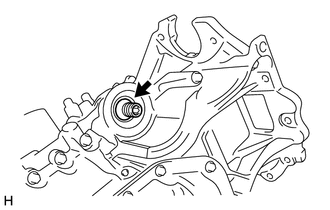
Using a 12 mm (0.47 in.) hexagon wrench, install the oil filter union to the oil pan sub-assembly.
- Torque:
- 30 N*m (306 kgf*cm, 22 ft.*lbf)
15601
7.INSTALL OIL FILTER SUB-ASSEMBLY
11115
8.INSTALL CYLINDER HEAD GASKET
11101
9.INSTALL CYLINDER HEAD SUB-ASSEMBLY
13050
10.INSTALL CAMSHAFT TIMING GEAR ASSEMBLY
- NOTICE:
-
Install the camshaft timing gear assembly onto the camshaft with the lock pin of the camshaft timing gear assembly released.
Clamp the camshaft in a vise, and confirm that it is locked.
- NOTICE:
-
Do not damage the camshaft.
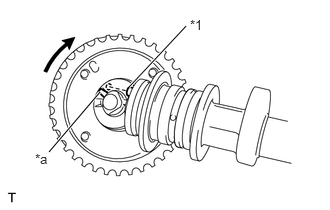
| *1 | Straight Pin |
| *a | Groove |
Put the camshaft timing gear assembly and camshaft together with the straight pin of the groove.
Turn the camshaft timing gear assembly clockwise while pushing it gently toward the camshaft. When the straight pin fits into the groove, push to ensure a good fit.
- NOTICE:
-
Do not turn the camshaft timing gear assembly in the retard direction (to the right).
Check that there is no clearance between the gear flange and camshaft.
Tighten the bolt with the camshaft timing gear assembly fixed.
- Torque:
- 64 N*m (653 kgf*cm, 47 ft.*lbf)
- NOTICE:
- ·
Do not lock the camshaft timing gear assembly when tightening the bolt.
·Release the lock pin of the camshaft timing gear assembly first, and tighten the bolt when the lock pin is locked in the most retarded position.
·Tightening the bolts with the lock pin locked could cause breakage of the lock pin.
Check that the camshaft timing gear assembly can move in the retard direction (to the right) and is locked in the most retarded position.
13511
11.INSTALL CAMSHAFT
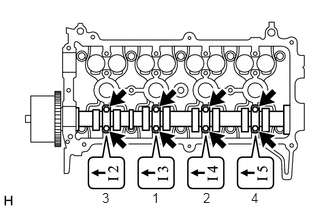
Apply a light coat of engine oil to the camshaft and camshaft journals.
Place the camshaft on the cylinder head sub-assembly with the timing mark on the camshaft timing gear facing upward.
Examine the front marks and numbers on the 4 No. 2 camshaft bearing caps and check that the sequence is as shown in the illustration. Then uniformly tighten the 8 bolts in several steps, in the sequence shown in the illustration.
- Torque:
- 15.4 N*m (157 kgf*cm, 11 ft.*lbf)
- NOTICE:
-
Tighten each bolt uniformly while keeping the camshaft level.
13523
12.INSTALL CAMSHAFT TIMING SPROCKET
Clamp the No. 2 camshaft in a vise, and confirm that it is locked.
- NOTICE:
-
Do not damage the No. 2 camshaft.
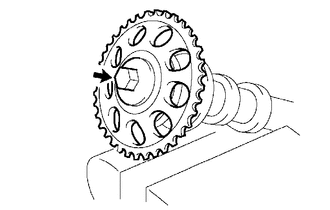
Align the knock pin hole the camshaft timing sprocket with the knock pin of the No. 2 camshaft, and install the camshaft timing sprocket with the bolt.
- Torque:
- 64 N*m (653 kgf*cm, 47 ft.*lbf)
13512
13.INSTALL NO. 2 CAMSHAFT
Apply a light coat of engine oil to the No. 2 camshaft and camshaft journals.
Place the No. 2 camshaft on the cylinder head sub-assembly with the timing mark on the camshaft timing gear facing upward.
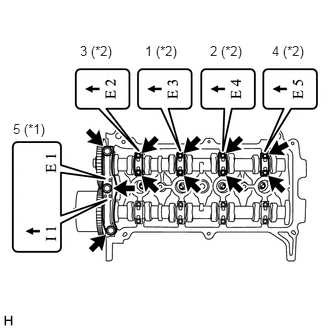
| *1 | No. 1 Camshaft Bearing Cap |
| *2 | No. 2 Camshaft Bearing Cap |
Examine the front marks and numbers on the No. 1 camshaft bearing cap and 4 No. 2 camshaft bearing caps and check that the sequence is as shown in the illustration. Then uniformly tighten the 11 bolts in several steps, in the sequence shown in the illustration.
- Torque:
- No. 1 Camshaft Bearing Cap : 23 N*m (235 kgf*cm, 17 ft.*lbf)
- No. 2 Camshaft Bearing Cap : 15.4 N*m (157 kgf*cm, 11 ft.*lbf)
- NOTICE:
-
Tighten each bolt uniformly while keeping the No. 2 camshaft level.
11101E
14.INSTALL CAMSHAFT POSITION SENSOR
13506
15.INSTALL CHAIN SUB-ASSEMBLY
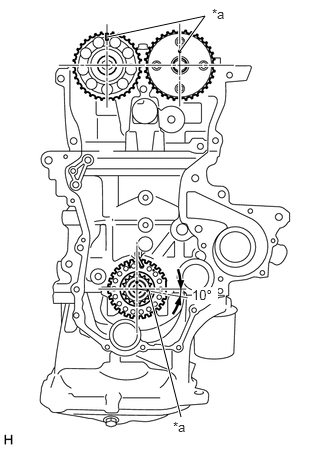
| *a | Timing Mark |
Make sure that all the timing marks are in the positions (TDC) shown in the illustration.
- HINT:
-
The positions of the timing marks may differ the predetermined positions due to the force of the valve spring.
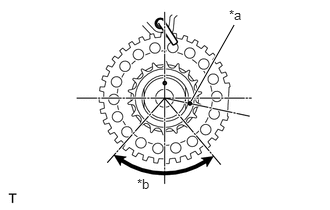
| *a | Timing Mark |
| *b | 40 to 140° ATDC |
Set the timing mark of the crankshaft in a position between 40 to 140° ATDC, as shown in the illustration.
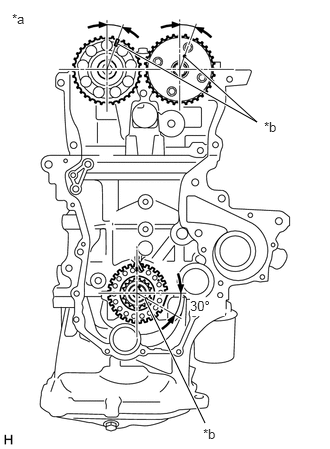
| *a | 20° ATDC |
| *b | Timing Mark |
Set the camshaft timing gear assembly and camshaft timing sprocket in the positions (20° ATDC) shown in the illustration.
Set the crankshaft in the position (20° ATDC) shown in the illustration.
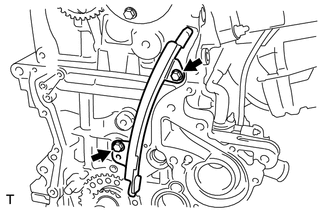
Install the No. 1 chain vibration damper to the cylinder head sub-assembly and cylinder block sub-assembly with the 2 bolts.
- Torque:
- 9.0 N*m (92 kgf*cm, 80 in.*lbf)
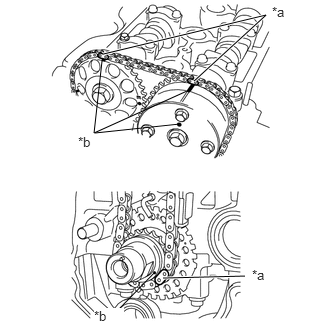
| *a | Mark Plate |
| *b | Timing Mark |
Align the timing marks of the camshaft with the mark plates of the chain sub-assembly and install the chain sub-assembly.
- HINT:
-
Align the timing marks with the mark plates while turning the hexagonal service portion of the camshaft using a wrench.
13559
16.INSTALL CHAIN TENSIONER SLIPPER
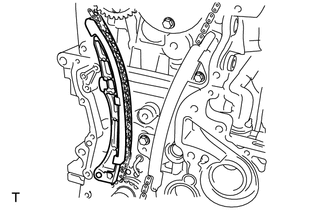
Install the chain tensioner slipper to the cylinder block sub-assembly.
13540
17.INSTALL NO. 1 CHAIN TENSIONER ASSEMBLY
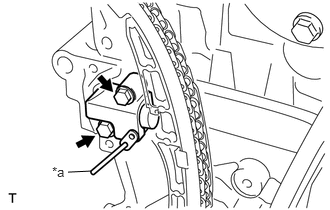
| *a | 3 mm Diameter Bar |
Install the No. 1 chain tensioner assembly to the cylinder block sub-assembly with the 2 bolts.
- Torque:
- 9.0 N*m (92 kgf*cm, 80 in.*lbf)
Remove the 3 mm (0.12 in.) diameter bar from the No. 1 chain tensioner assembly.
18.INSPECT VALVE CLEARANCE
19.ADJUST VALVE CLEARANCE
15100C
20.INSTALL OIL PUMP SEAL
15100
21.INSTALL OIL PUMP ASSEMBLY
16100
22.INSTALL ENGINE WATER PUMP ASSEMBLY
12315A
23.INSTALL ENGINE MOUNTING BRACKET RH
13407
24.INSTALL CRANKSHAFT DAMPER SUB-ASSEMBLY
16173
25.INSTALL WATER PUMP PULLEY
11452
26.INSTALL OIL LEVEL DIPSTICK GUIDE
Apply engine oil to a new O-ring.
Install the O-ring to the oil level dipstick guide.
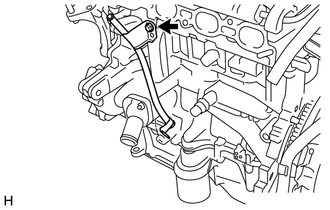
Install the oil level dipstick guide to the cylinder block sub-assembly with the bolt.
- Torque:
- 10 N*m (102 kgf*cm, 89 in.*lbf)
11101J
27.INSTALL CAMSHAFT TIMING OIL CONTROL VALVE ASSEMBLY
23250
28.INSTALL FUEL INJECTOR ASSEMBLY
23291
29.INSTALL INJECTOR VIBRATION INSULATOR
23891
30.INSTALL FUEL DELIVERY SPACER
23807
31.INSTALL FUEL DELIVERY PIPE SUB-ASSEMBLY
11201
32.INSTALL CYLINDER HEAD COVER SUB-ASSEMBLY
Install a new cylinder head cover gasket to the cylinder head cover sub-assembly.
Remove any old packing material from the contact surface.
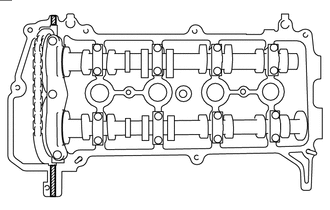

|
Seal Packing |
Apply seal packing to the cylinder head sub-assembly, as shown in the illustration.
- Seal packing:
Toyota Genuine Seal Packing Black, Three Bond 1207B or equivalent
- NOTICE:
- ·
Install the cylinder head cover sub-assembly within 3 minutes and tighten the bolts within 15 minutes after applying seal packing.
·Do not start engine for at least 2 hours after the installation.
Temporarily install the cylinder head cover sub-assembly to the cylinder head sub-assembly with the 9 bolts, 2 nuts and 2 new cylinder head cover seal washers.
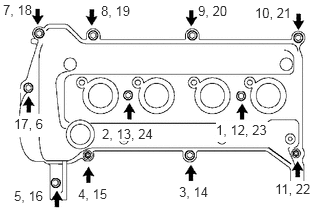
Using several steps, tighten the 9 bolts and 2 nuts in the sequence shown in the illustration.
- Torque:
- 10 N*m (102 kgf*cm, 7 ft.*lbf)
12204
33.INSTALL VENTILATION VALVE SUB-ASSEMBLY
15100Q
34.INSTALL CRANKSHAFT POSITION SENSOR
12108A
35.INSTALL OIL FILLER CAP GASKET
Install a new oil filler cap gasket to the oil filler cap sub-assembly.
12108
36.INSTALL OIL FILLER CAP SUB-ASSEMBLY
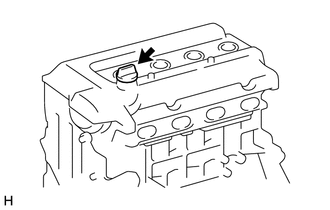
Install the oil filler cap sub-assembly to the cylinder head cover sub-assembly.
16331A
37.INSTALL THERMOSTAT
16321
38.INSTALL WATER INLET
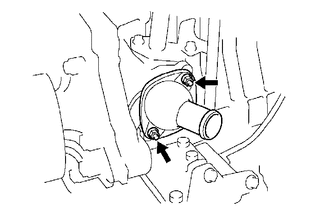
Install the water inlet to the cylinder block sub-assembly with the 2 nuts.
- Torque:
- 9.0 N*m (92 kgf*cm, 80 in.*lbf)
19100P
39.INSTALL SPARK PLUG