C54 MANUAL TRANSMISSION / TRANSAXLE TRANSMISSION CONTROL CABLE(for 1NR-FE) INSTALLATION
PROCEDURE

 33820B
1.INSTALL TRANSMISSION CONTROL CABLE ASSEMBLY
Install the transmission control cable assembly to the body with the 3 nuts.
- Torque:
- 5.0 N*m (51 kgf*cm, 44 in.*lbf)
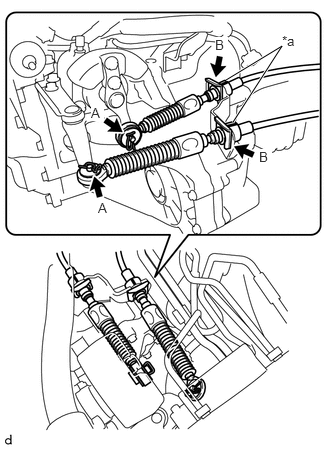
| *a | Paint Mark |
Install the transmission control cable assembly to the No. 1 transmission control cable bracket with 2 new clips B.
- NOTICE:
-
Make sure that the paint marks on the transmission control cable assembly are aligned with the slits in the No. 1 transmission control cable bracket before installing the clips.
Connect the transmission control cable assembly to the manual transaxle assembly with the 2 washers and 2 clips A.
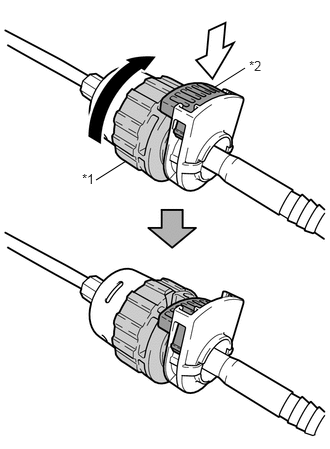
| *1 | Nut |
| *2 | Lock |

|
Rotate approximately 180° |

|
Push in |
Rotate the 2 nuts of the transmission control cable assembly approximately 180° in the direction shown in the illustration, and while holding the nut, push in the lock.
- NOTICE:
-
Do not rotate the nut excessively as it may damage the internal spring and transmission control cable assembly will not be reusable.
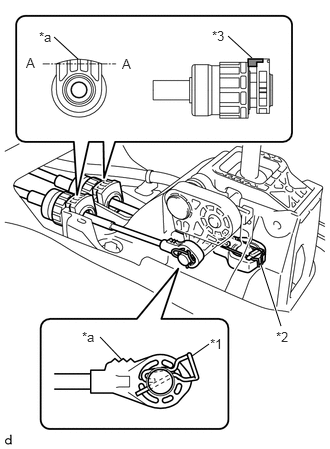
| *1 | Clip A |
| *2 | Clip B |
| *3 | Lock |
| *a | Protrusion |
Install the transmission control cable assembly to the floor shift shift lever assembly.
- NOTICE:
- ·
Install the transmission control cable assembly with the protrusion of the cable outer facing upwards.
·After installation, make sure that the lock is projecting from A as shown in the illustration.
Engage the clip B to connect the shift cable end of the transmission control cable assembly to the floor shift shift lever assembly.
Connect the select cable end of the transmission control cable assembly to the floor shift shift lever assembly with the clip A.
- NOTICE:
- ·
Install the transmission control cable assembly with the protrusion of the select cable end facing upwards.
·Perform the installation with the clip A at the correct direction as shown in the illustration.
58151
2.INSTALL FRONT NO. 1 FLOOR HEAT INSULATOR
Install the front No. 1 floor heat insulator to the body with the 2 bolts and nut.
- Torque:
- 5.5 N*m (56 kgf*cm, 49 in.*lbf)
17410
3.INSTALL FRONT EXHAUST PIPE ASSEMBLY (for TMMIN Made)
17410
4.INSTALL FRONT EXHAUST PIPE ASSEMBLY (for TMT Made)
57533B
5.INSTALL FRONT FLOOR CENTER BRACE (for TMMIN Made)
57533B
6.INSTALL FRONT FLOOR CENTER BRACE (for TMT Made)
58810J
7.INSTALL CONSOLE BOX ASSEMBLY (for TMT Made)
58839A
8.INSTALL CONSOLE BOX HOLE COVER (for TMT Made)
58916
9.INSTALL BOX BOTTOM MAT (for TMT Made)
58912C
10.INSTALL NO. 2 SIDE BOX PANEL (for TMT Made)
58911A
11.INSTALL NO. 1 SIDE BOX PANEL (for TMT Made)
58817A
12.INSTALL NO. 2 FRONT CONSOLE BOX INSERT (for TMT Made)
58816D
13.INSTALL NO. 1 FRONT CONSOLE BOX INSERT (for TMT Made)
for LHD:
Click hereVehicle Interior>INTERIOR PANELS / TRIM>UPPER INSTRUMENT PANEL>INSTALLATION
for RHD:
Click hereVehicle Interior>INTERIOR PANELS / TRIM>LOWER INSTRUMENT PANEL>INSTALLATION
58910C
14.INSTALL REAR CONSOLE BOX ASSEMBLY (for Integrated Type)
58910C
15.INSTALL REAR CONSOLE BOX ASSEMBLY (for Separate Type)
74410
16.INSTALL BATTERY CARRIER ASSEMBLY
74431
17.INSTALL BATTERY TRAY
18.INSTALL BATTERY
17701
19.INSTALL AIR CLEANER CASE SUB-ASSEMBLY
17801
20.INSTALL AIR CLEANER FILTER ELEMENT SUB-ASSEMBLY
21.INSTALL AIR CLEANER CAP SUB-ASSEMBLY
17880
22.INSTALL AIR CLEANER HOSE ASSEMBLY
12262
23.CONNECT NO. 2 VENTILATION HOSE
24.INSPECT FOR EXHAUST GAS LEAK
- HINT:
-
Perform "Inspection After Repairs" after repairing gas leaks in the exhaust system.
-
Click hereEngine / Hybrid System>1NR-FE ENGINE CONTROL>SFI SYSTEM>INITIALIZATION