Home › Vehicle Exterior › WINDOW / GLASS › WINDOW DEFOGGER SYSTEM › 2017.10–2018.01
RM30M0E _59 Vehicle Exterior _017121 WINDOW / GLASS _0086992 WINDOW DEFOGGER SYSTEM J

WINDOW / GLASS  WINDOW DEFOGGER SYSTEM  Rear Window Defogger System does not Operate  


DESCRIPTION

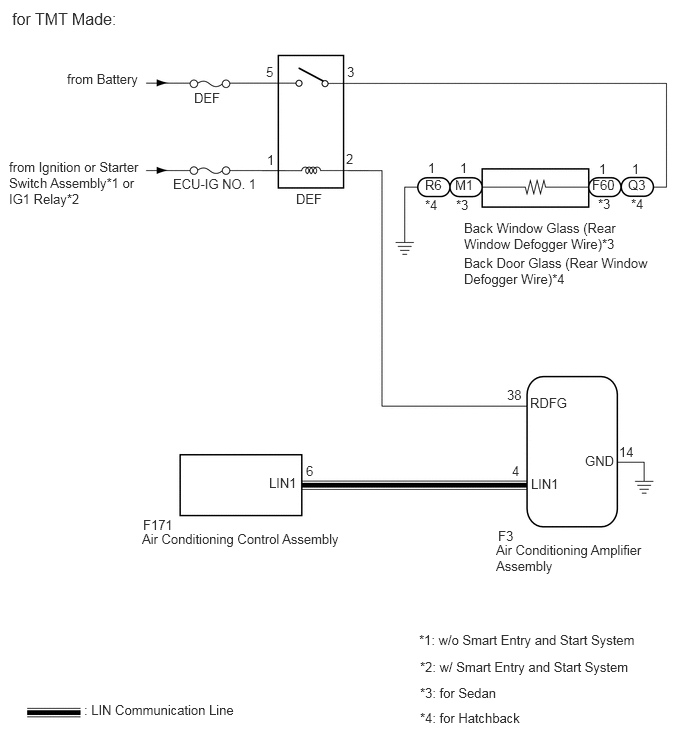
When the rear window defogger switch on the air conditioning control assembly is pressed, the operation signal is transmitted to the air conditioning amplifier assembly via LIN communication. When the air conditioning amplifier assembly receives the signal, it turns on the defogger relay to operate the window defogger system.

WIRING DIAGRAM
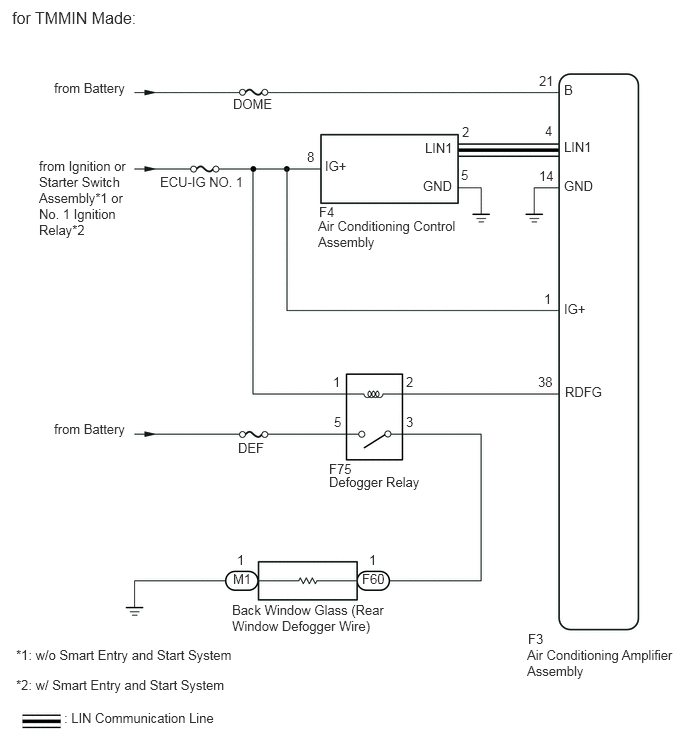
E381696E02
5.615,0.76 5.927,0.958 0.313,0.198 10 false 21 5.875,0.854 6.188,1.052 0.313,0.198 10 false B 5.875,1.448 6.323,1.656 0.448,0.208 10 false LIN1 5.875,1.854 6.323,2.063 0.448,0.208 10 false GND 5.875,3.135 6.323,3.344 0.448,0.208 10 false IG+ 5.885,4 6.333,4.208 0.448,0.208 10 false RDFG 5.5,6.573 5.948,6.781 0.448,0.208 10 false F3 5.49,6.74 7.052,7.417 1.563,0.677 10 false Air Conditioning Amplifier Assembly 2.417,6.271 4.063,6.729 1.646,0.458 10 false Back Window Glass (Rear Window Defogger Wire) 3.771,5.948 4.219,6.156 0.448,0.208 10 false F60 2.427,5.948 2.698,6.188 0.271,0.24 10 false M1 2.469,5.75 2.656,5.99 0.188,0.24 10 false 1 3.844,5.75 4.031,5.99 0.188,0.24 10 false 1 3.427,4.802 3.875,5.01 0.448,0.208 10 false F75 3.427,4.938 4.469,5.188 1.042,0.25 10 false Defogger Relay 3.469,3.896 3.656,4.135 0.188,0.24 10 false 1 4.229,3.896 4.417,4.135 0.188,0.24 10 false 2 4.229,4.313 4.417,4.552 0.188,0.24 10 false 3 3.479,4.313 3.667,4.552 0.188,0.24 10 false 5 5.604,3.896 5.885,4.135 0.281,0.24 10 false 38 5.667,3.031 5.854,3.271 0.188,0.24 10 false 1 5.615,1.75 5.896,1.99 0.281,0.24 10 false 14 5.677,1.281 5.865,1.521 0.188,0.24 10 false 4 4.813,1.292 5,1.531 0.188,0.24 10 false 2 4.802,1.74 4.99,1.979 0.188,0.24 10 false 5 4.406,1.854 4.854,2.063 0.448,0.208 10 false GND 4.427,1.458 4.875,1.667 0.448,0.208 10 false LIN1 3.385,1.646 3.833,1.854 0.448,0.208 10 false IG+ 3.198,1.552 3.385,1.792 0.188,0.24 10 false 8 1.667,1.813 2.615,1.979 0.948,0.167 10 false ECU-IG NO. 1 0.406,1.646 1.354,2.563 0.948,0.917 10 false from Ignition or Starter Switch Assembly*1 or No. 1 Ignition Relay*2 2.479,4.583 2.927,4.792 0.448,0.208 10 false DEF 0.563,4.385 1.563,4.635 1,0.25 10 false from Battery 0.563,0.833 1.563,1.083 1,0.25 10 false from Battery 2.427,1 3.042,1.208 0.615,0.208 10 false DOME 0.167,6.74 2.75,7.073 2.583,0.333 10 false *1: w/o Smart Entry and Start System 0.167,7.052 2.75,7.385 2.583,0.333 10 false *2: w/ Smart Entry and Start System 0.667,7.396 3.25,7.729 2.583,0.333 10 false : LIN Communication Line 0.125,0.083 1.844,0.354 1.719,0.271 12 false for TMMIN Made: 3.313,2.271 4.771,2.802 1.458,0.531 10 false Air Conditioning Control Assembly 3.323,2.125 3.771,2.333 0.448,0.208 10 false F4

E381698E05
0.094,1.656 1.49,2.344 1.396,0.688 10 false from Ignition or Starter Switch Assembly*1 or IG1 Relay*2 0.698,0.74 1.531,0.979 0.833,0.24 10 false from Battery 2.021,0.938 2.448,1.198 0.427,0.26 10 false DEF 1.802,1.833 2.729,2.063 0.927,0.229 10 false ECU-IG NO. 1 3.083,1.99 3.854,2.26 0.771,0.271 10 false DEF 2.771,0.667 2.958,0.875 0.188,0.208 10 false 5 3.615,0.667 3.802,0.875 0.188,0.208 10 false 3 2.781,1.583 2.969,1.792 0.188,0.208 10 false 1 3.604,1.573 3.792,1.781 0.188,0.208 10 false 2 4.458,1.667 4.646,1.875 0.188,0.208 10 false 1 4.792,1.667 4.979,1.875 0.188,0.208 10 false 1 4.74,1.844 5.031,2.052 0.292,0.208 10 false M1 4.427,1.844 4.719,2.052 0.292,0.208 10 false R6 4.427,2.052 4.615,2.26 0.188,0.208 10 false *4 4.75,2.052 4.938,2.26 0.188,0.208 10 false *3 6.167,1.844 6.458,2.052 0.292,0.208 10 false F60 6.24,1.677 6.427,1.885 0.188,0.208 10 false 1 6.583,1.677 6.771,1.885 0.188,0.208 10 false 1 6.542,1.844 6.833,2.052 0.292,0.208 10 false Q3 6.573,2.042 6.76,2.25 0.188,0.208 10 false *4 6.229,2.042 6.417,2.25 0.188,0.208 10 false *3 2.802,4.948 3.146,5.167 0.344,0.219 10 false LIN1 5.531,4.958 5.875,5.177 0.344,0.219 10 false LIN1 1.49,5.385 1.875,5.615 0.385,0.229 10 false F171 1.479,5.531 3.75,5.781 2.271,0.25 10 false Air Conditioning Control Assembly 5.167,5.646 6.729,6.052 1.563,0.406 10 false Air Conditioning Amplifier Assembly 5.188,5.5 5.573,5.729 0.385,0.229 10 false F3 0.875,7.313 3.146,7.563 2.271,0.25 10 false : LIN Communication Line 5.521,4.115 6,4.365 0.479,0.25 10 false RDFG 6.094,4.719 6.573,4.969 0.479,0.25 10 false GND 6.448,4.625 6.729,4.865 0.281,0.24 10 false 14 5.333,4.823 5.615,5.063 0.281,0.24 10 false 4 5.281,4.031 5.563,4.271 0.281,0.24 10 false 38 3.188,4.823 3.469,5.063 0.281,0.24 10 false 6 4.833,2.292 6.479,2.698 1.646,0.406 10 false Back Window Glass (Rear Window Defogger Wire)*3 4.833,2.656 6.792,3.042 1.958,0.385 10 false Back Door Glass (Rear Window Defogger Wire)*4 4.365,6.583 7,6.813 2.635,0.229 10 false *1: w/o Smart Entry and Start System 4.375,6.865 7.01,7.094 2.635,0.229 10 false *2: w/ Smart Entry and Start System 4.375,7.135 7.01,7.365 2.635,0.229 10 false *3: for Sedan 4.375,7.396 7.01,7.625 2.635,0.229 10 false *4: for Hatchback 0.125,0.094 1.625,0.354 1.5,0.26 12 false for TMT Made:

CAUTION / NOTICE / HINT

NOTICE:

Inspect the fuses for circuits related to this system before performing the following procedure.


PROCEDURE

1.CHECK VEHICLE TYPE
a.

Choose the model to be inspected.


Result:
Proceed to Proceed to
for TMMIN Made A
for TMT Made B


A

2.CHECK AIR CONDITIONING SYSTEM

B

10.CHECK AIR CONDITIONING SYSTEM
2.CHECK AIR CONDITIONING SYSTEM
a.

Check the air conditioning system.

HINT:

Both the window defogger system operation signal and air conditioning system operation signal are transmitted to the air conditioning amplifier assembly via the same communication line.


OK:

The air conditioning system operates normally.


Result:
Proceed to
OK
NG


OK

3.PERFORM ACTIVE TEST USING GTS (DEFFOGGER RELAY (REAR))

NG

3.PERFORM ACTIVE TEST USING GTS (DEFFOGGER RELAY (REAR))
a.

Connect the GTS to the DLC3.


b.

Turn the ignition switch to ON.


c.

Turn the GTS on.


d.

Enter the following menus: Body Electrical / Air Conditioner / Active Test.


e.

According to the display on the GTS, perform the Active Test.

Body Electrical > Air Conditioner > Active Test
Tester Display Measurement Item Control Range Diagnostic Note
Defogger Relay (Rear) Defogger relay OFF or ON -
Body Electrical > Air Conditioner > Active Test
Tester Display
Defogger Relay (Rear)
50004 121 22
OK:

The window defogger system operates normally.


Result:
Proceed to
OK
NG


OK

4.REPLACE AIR CONDITIONING AMPLIFIER ASSEMBLY

NG

5.INSPECT DEFOGGER RELAY
4.REPLACE AIR CONDITIONING AMPLIFIER ASSEMBLY
a.

b.

Check that the window defogger system operates normally.

OK:

The window defogger system operates normally.


Result:
Proceed to
OK
NG


OK

END (AIR CONDITIONING AMPLIFIER ASSEMBLY WAS DEFECTIVE)

NG

5.INSPECT DEFOGGER RELAY
a.

Remove the defogger relay.


b.

Inspect the defogger relay.

Click hereVehicle Exterior>WINDOW / GLASS>RELAY>INSPECTION


Result:
Proceed to
OK
NG


OK

6.CHECK HARNESS AND CONNECTOR (DEFOGGER RELAY - POWER SOURCE)

NG

REPLACE DEFOGGER RELAY

6.CHECK HARNESS AND CONNECTOR (DEFOGGER RELAY - POWER SOURCE)
a.
E281480C01
1.563,0.135 1.969,0.354 0.406,0.219 1.656,0.146 1.938,0.323 0.281,0.177 10 false F75 0.115,0.083 0.396,0.26 0.281,0.177 10 false *1
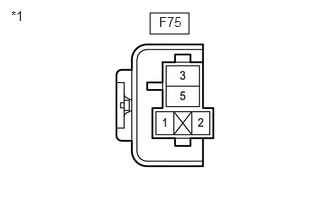
*1 Defogger Relay Holder


Remove the defogger relay.


b.

Measure the voltage according to the value(s) in the table below.

Standard Voltage:
Tester Connection Switch Condition Specified Condition
F75-1 - Body ground Ignition switch ON 11 to 14 V
F75-5 - Body ground Always 11 to 14 V


Result:
Proceed to
OK
NG


OK

7.CHECK HARNESS AND CONNECTOR (DEFOGGER RELAY - AIR CONDITIONING AMPLIFIER ASSEMBLY)

NG

REPAIR OR REPLACE HARNESS OR CONNECTOR

7.CHECK HARNESS AND CONNECTOR (DEFOGGER RELAY - AIR CONDITIONING AMPLIFIER ASSEMBLY)
a.

Remove the F75 defogger relay.


b.

Disconnect the F3 air conditioning amplifier assembly connector.


c.

Measure the resistance according to the value(s) in the table below.

Standard Resistance:
Tester Connection Condition Specified Condition
F75-2 - F3-38 (RDFG) Always Below 1 Ω
F75-2 or F3-38 (RDFG) - Body ground Always 10 kΩ or higher


Result:
Proceed to
OK
NG


OK

8.CHECK AIR CONDITIONING AMPLIFIER ASSEMBLY

NG

REPAIR OR REPLACE HARNESS OR CONNECTOR

8.CHECK AIR CONDITIONING AMPLIFIER ASSEMBLY
a.
E182281C13
1.104,0.156 1.594,0.448 0.49,0.292 0.74,1.125 0.542,1.771 true 1.073,1.031 1.615,1.792 true 1.24,0.229 1.677,0.5 0.438,0.271 10 false F3 1.49,1.802 1.938,2.042 0.448,0.24 10 false GND 0.354,1.792 0.917,2.01 0.563,0.219 10 false RDFG 0.115,0.052 0.76,0.354 0.646,0.302 10 false *a
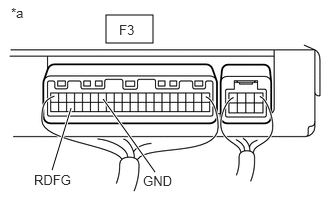
*a Component with harness connected
(Air Conditioning Amplifier Assembly)


Reconnect the air conditioning amplifier assembly connector.


b.

Reinstall the defogger relay.


c.

Remove the air conditioning amplifier assembly with its connectors still connected.

Click hereVehicle Interior>HEATING / AIR CONDITIONING>AIR CONDITIONING AMPLIFIER(for TMMIN Made)>REMOVAL


d.

Measure the voltage according to the value(s) in the table below.

Standard Voltage:
Tester Connection Switch Condition Specified Condition
F3-38 (RDFG) - F3-14 (GND) Ignition switch ON, rear window defogger switch on Below 1 V
F3-38 (RDFG) - F3-14 (GND) Ignition switch ON, rear window defogger switch off 11 to 14 V


Result:
Proceed to
OK
NG


OK

9.CHECK HARNESS AND CONNECTOR (BACK WINDOW GLASS OR BACK DOOR GLASS - DEFOGGER RELAY AND BODY GROUND)

NG

9.CHECK HARNESS AND CONNECTOR (BACK WINDOW GLASS OR BACK DOOR GLASS - DEFOGGER RELAY AND BODY GROUND)
a.

Disconnect the F60 and M1 back window glass connectors.


b.

Remove the F75 defogger relay.


c.

Measure the resistance according to the value(s) in the table below.

Standard Resistance:
Tester Connection Condition Specified Condition
F60-1 - F75-3 Always Below 1 Ω
M1-1 - Body ground Always Below 1 Ω
F60-1 - Body ground Always 10 kΩ or higher
F75-3 - Body ground Always 10 kΩ or higher


Result:
Proceed to
OK
NG


OK

NG

REPAIR OR REPLACE HARNESS OR CONNECTOR

10.CHECK AIR CONDITIONING SYSTEM
a.

Check the air conditioning system.

HINT:

Both the window defogger system operation signal and air conditioning system operation signal are transmitted to the air conditioning amplifier assembly via the same communication line.


OK:

The air conditioning system operates normally.


Result:
Proceed to
OK
NG


OK

11.PERFORM ACTIVE TEST USING GTS

NG

11.PERFORM ACTIVE TEST USING GTS
a.

Connect the GTS to the DLC3.


b.

Turn the ignition switch to ON.


c.

Turn the GTS on.


d.

Enter the following menus: Body Electrical / Air Conditioner / Active Test.


e.

According to the display on the GTS, perform the Active Test.

Body Electrical > Air Conditioner > Active Test
Tester Display Measurement Item Control Range Diagnostic Note
Defogger Relay (Rear) DEF relay OFF or ON -
Body Electrical > Air Conditioner > Active Test
Tester Display
Defogger Relay (Rear)
50004 121 22
OK:

The window defogger system operates normally.


Result:
Proceed to
OK
NG


OK

12.REPLACE AIR CONDITIONING AMPLIFIER ASSEMBLY

NG

13.INSPECT DEF RELAY
12.REPLACE AIR CONDITIONING AMPLIFIER ASSEMBLY
a.

b.

Check that the window defogger system operates normally.

OK:

The window defogger system operates normally.


Result:
Proceed to
OK
NG


OK

END (AIR CONDITIONING AMPLIFIER ASSEMBLY WAS DEFECTIVE)

NG

13.INSPECT DEF RELAY
a.

Inspect the DEF relay.

Click hereVehicle Exterior>WINDOW / GLASS>RELAY>INSPECTION


Result:
Proceed to
OK
NG


OK

14.CHECK HARNESS AND CONNECTOR (DEF RELAY - POWER SOURCE)

NG

REPLACE DEF RELAY

14.CHECK HARNESS AND CONNECTOR (DEF RELAY - POWER SOURCE)
a.

Remove the DEF relay.


b.
E377171C01
0.26,0.219 0.573,0.375 0.313,0.156 10 false *1 0.708,0.573 1.021,0.729 0.313,0.156 10 false *a
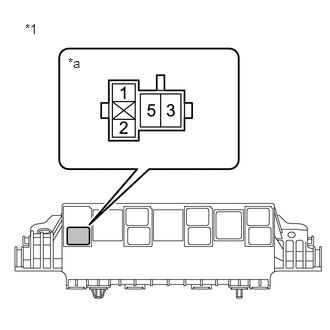
*1 NO. 3 RELAY BLOCK
*a DEF Relay Holder


Measure the voltage according to the value(s) in the table below.

Standard Voltage:
Tester Connection Switch Condition Specified Condition
DEF relay holder terminal 1 - Body ground Ignition switch ON 11 to 14 V
DEF relay holder terminal 5 - Body ground Always 11 to 14 V


Result:
Proceed to
OK
NG


OK

15.CHECK HARNESS AND CONNECTOR (DEF RELAY - AIR CONDITIONING AMPLIFIER ASSEMBLY)

NG

REPAIR OR REPLACE HARNESS OR CONNECTOR

15.CHECK HARNESS AND CONNECTOR (DEF RELAY - AIR CONDITIONING AMPLIFIER ASSEMBLY)
a.

Remove the DEF relay.


b.

Disconnect the F3 air conditioning amplifier assembly connector.


c.

Measure the resistance according to the value(s) in the table below.

Standard Resistance:
Tester Connection Condition Specified Condition
DEF relay holder terminal 2 - F3-38 (RDFG) Always Below 1 Ω
DEF relay holder terminal 2 - Body ground Always 10 kΩ or higher
F3-38 (RDFG) - Body ground Always 10 kΩ or higher


Result:
Proceed to
OK
NG


OK

16.CHECK AIR CONDITIONING AMPLIFIER ASSEMBLY

NG

REPAIR OR REPLACE HARNESS OR CONNECTOR

16.CHECK AIR CONDITIONING AMPLIFIER ASSEMBLY
a.
E182281C13
1.104,0.156 1.594,0.448 0.49,0.292 0.74,1.125 0.542,1.771 true 1.073,1.031 1.615,1.792 true 1.24,0.229 1.677,0.5 0.438,0.271 10 false F3 1.49,1.802 1.938,2.042 0.448,0.24 10 false GND 0.354,1.792 0.917,2.01 0.563,0.219 10 false RDFG 0.115,0.052 0.76,0.354 0.646,0.302 10 false *a
*a Component with harness connected
(Air Conditioning Amplifier Assembly)


Reconnect the air conditioning amplifier assembly connector.


b.

Reinstall the DEF relay.


c.

Remove the air conditioning amplifier assembly with its connectors still connected.

Click hereVehicle Interior>HEATING / AIR CONDITIONING>AIR CONDITIONING AMPLIFIER(for TMT Made)>REMOVAL


d.

Measure the voltage according to the value(s) in the table below.

Standard Voltage:
Tester Connection Switch Condition Specified Condition
F3-38 (RDFG) - F3-14 (GND) Ignition switch ON, rear window defogger switch on Below 1 V
F3-38 (RDFG) - F3-14 (GND) Ignition switch ON, rear window defogger switch off 11 to 14 V


Result:
Proceed to
OK
NG


OK

17.CHECK HARNESS AND CONNECTOR (BACK WINDOW GLASS OR BACK DOOR GLASS - DEF RELAY AND BODY GROUND)

NG

17.CHECK HARNESS AND CONNECTOR (BACK WINDOW GLASS OR BACK DOOR GLASS - DEF RELAY AND BODY GROUND)
a.

for Sedan

i.

Disconnect the F60 and M1 back window glass connectors.


b.

for Hatchback

i.

Disconnect the Q3 and R6 back door glass connectors.


c.

Remove the DEF relay.


d.

Measure the resistance according to the value(s) in the table below.

Standard Resistance:
for Sedan
Tester Connection Condition Specified Condition
F60-1 - DEF relay holder terminal 3 Always Below 1 Ω
M1-1 - Body ground Always Below 1 Ω
F60-1 - Body ground Always 10 kΩ or higher
DEF relay holder terminal 3 - Body ground Always 10 kΩ or higher

for Hatchback
Tester Connection Condition Specified Condition
Q3-1 - DEF relay holder terminal 3 Always Below 1 Ω
R6-1 - Body ground Always Below 1 Ω
Q3-1 - Body ground Always 10 kΩ or higher
DEF relay holder terminal 3 - Body ground Always 10 kΩ or higher


Result:
Result Proceed to
OK (for Sedan) A
OK (for Hatchback) B
NG C


A

B

C

REPAIR OR REPLACE HARNESS OR CONNECTOR