M15A-FXE COOLING RADIATOR INSTALLATION
PROCEDURE

 1.INSTALL RADIATOR DRAIN COCK PLUG
Install the 2 O-rings to the 2 radiator drain cock plugs.
- NOTICE:
-
Replace the O-ring if it is damaged.
Install the 2 radiator drain cock plugs.
16535
2.INSTALL LOWER RADIATOR SUPPORT
Install the 2 lower radiator supports to the radiator assembly.
16523A
3.INSTALL RADIATOR SUPPORT CUSHION
Install the 2 radiator support cushions to the radiator assembly.
16400
4.INSTALL RADIATOR ASSEMBLY
Engage the 2 claws and 2 guides to install the fan shroud to the radiator assembly.
- NOTICE:
-
Do not damage the radiator assembly when installing the fan shroud.
Install the radiator assembly together with the fan shroud to the vehicle body.
- NOTICE:
-
Do not apply excessive force to the cooler condenser assembly or pipe when installing the radiator assembly with the fan with motor assembly.
Engage the clamp and connect the wire harness.
88460
5.INSTALL COOLER CONDENSER ASSEMBLY
Engage the 2 claws and 2 guides to install the cooler condenser assembly to the radiator assembly.
- NOTICE:
-
Do not damage the cooler condenser assembly or radiator assembly when installing the cooler condenser assembly.
16572D
6.CONNECT NO. 2 RADIATOR HOSE
Connect the No. 2 radiator hose to the radiator assembly and slide the clip to secure it.
G922AA
7.CONNECT NO. 1 INVERTER COOLING INLET HOSE
Connect the No. 1 inverter cooling inlet hose to the radiator assembly and slide the clip to secure it.
Engage the clamp.
G922E
8.CONNECT HYBRID WATER PUMP INLET HOSE
Engage the 2 clamps and connect the hybrid water pump inlet hose to the fan shroud.
G922F
9.CONNECT NO. 1 HYBRID WATER PUMP OUTLET HOSE
Engage the clamp and connect the No. 1 hybrid water pump outlet hose to the fan shroud.
G922H
10.CONNECT HYBRID RADIATOR INLET HOSE
Connect the hybrid radiator inlet hose to the radiator assembly and slide the clip to secure it.
Engage the clamp.
G9040
11.INSTALL INVERTER WATER PUMP ASSEMBLY
G922C
12.CONNECT NO. 1 INVERTER COOLING OUTLET HOSE
Engage the 2 clamps and connect the No. 1 inverter cooling outlet hose to the fan shroud.
16573B
13.CONNECT NO. 3 RADIATOR HOSE
Connect the No. 3 radiator hose to the radiator assembly and slide the clip to secure it.
16502
14.INSTALL WATER FILLER SUB-ASSEMBLY
Install the water filler sub-assembly to the fan shroud with the 2 bolts.
- Torque:
- 5.0 N*m (51 kgf*cm, 44 in.*lbf)
Engage the 3 clamps.
Connect the connector.
15.CONNECT RADIATOR RESERVOIR TANK HOSE
Connect the radiator reservoir tank hose to the water filler sub-assembly.
16261G
16.CONNECT NO. 1 WATER BY-PASS HOSE
Connect the No. 1 water by-pass hose to the radiator assembly and slide the clip to secure it.
Engage the 3 clamps.
16595D
17.INSTALL NO. 1 RADIATOR AIR GUIDE LH
Engage the claw and guide to install the No. 1 radiator air guide LH.
Engage the 2 clamps and connect the wire harness.
16561D
18.INSTALL NO. 1 RADIATOR TO SUPPORT SEAL
Engage the claw and guide to install the No. 1 radiator to support seal.
16562L
19.INSTALL NO. 2 RADIATOR TO SUPPORT SEAL
16695A
20.INSTALL FRONT RADIATOR SIDE AIR GUIDE PLATE LH
16691A
21.INSTALL FRONT RADIATOR SIDE AIR GUIDE PLATE RH
53213C
22.INSTALL UPPER FRONT RADIATOR SUPPORT
When replacing upper front radiator support:
Align the upper front radiator support according to the reference values and point-to-point distances, and temporarily install it with the 4 bolts.
for Reference Values:
Body Repair Manual > Vehicle Exterior > BODY PANEL > RADIATOR SUPPORT> REFERENCE VALUE
for Point-to-point Distances:
Body Repair Manual > Vehicle Exterior > BODY DIMENSIONS > ENGINE COMPARTMENT REFERENCE VALUES > POINT-TO-POINT DISTANCE
When reusing upper front radiator support:
Align the upper front radiator support with the matchmark positions and temporarily install it with the 4 bolts as shown in the illustration.
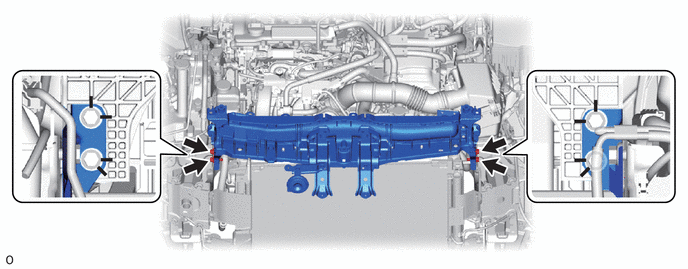
Tighten the 4 bolts.
- Torque:
- 7.1 N*m (72 kgf*cm, 63 in.*lbf)
Connect the 2 connectors.
Connect the wire harness with the bolt.
- Torque:
- 10 N*m (102 kgf*cm, 7 ft.*lbf)
Engage the 3 clamps and connect the wire harness.
Connect the 2 airbag connectors.
- NOTICE:
-
When connecting any airbag connector, take care not to damage the airbag wire harness.
- HINT:
-
Refer to How to Connect or Disconnect Airbag Connector:
Connect the hood lock control cable assembly.
17701
23.INSTALL AIR CLEANER CASE SUB-ASSEMBLY
Engage the 3 grommets to install the air cleaner case sub-assembly to the vehicle body.
Connect the air cleaner hose assembly to the throttle body with motor assembly and tighten the hose clamp.
- Torque:
- 3.0 N*m (31 kgf*cm, 27 in.*lbf)
Connect the No. 2 ventilation hose to the air cleaner hose and slide the clip to secure it.
Engage the clamp and connect the engine wire.
Connect the mass air flow meter sub-assembly connector.
53510
24.INSTALL HOOD LOCK ASSEMBLY
52131A
25.INSTALL FRONT BUMPER REINFORCEMENT
52611
26.INSTALL FRONT BUMPER ENERGY ABSORBER
16681A
27.INSTALL RADIATOR UPPER AIR GUIDE PLATE
28.INSTALL HEADLIGHT ASSEMBLY LH
for Halogen Headlight:
Click hereVehicle Exterior>LIGHTING (EXT)>HEADLIGHT ASSEMBLY (for Halogen Headlight)>INSTALLATION
for LED Headlight:
Click hereVehicle Exterior>LIGHTING (EXT)>HEADLIGHT ASSEMBLY (for LED Headlight)>INSTALLATION
29.INSTALL HEADLIGHT ASSEMBLY RH
- HINT:
-
Use the same procedure as for the LH side.
30.CONNECT CABLE TO NEGATIVE AUXILIARY BATTERY TERMINAL
31.ADD ENGINE COOLANT (for Engine)
32.ADD COOLANT (for Inverter)
33.INSPECT FOR COOLANT LEAK (for Engine)
34.INSPECT FOR COOLANT LEAK (for Inverter)
51451A
35.INSTALL CENTER ENGINE UNDER COVER
36.INSPECT SRS WARNING LIGHT
53301
37.INSPECT HOOD SUB-ASSEMBLY
53510
38.ADJUST HOOD LOCK ASSEMBLY
39. INITIALIZATION AFTER RECONNECTING BATTERY TERMINAL
Click hereGeneral>SETUP>WHEN DISCONNECTING OR RECONNECTING BATTERY TERMINAL>WORK PROCEDURE
- HINT:
-
When disconnecting and reconnecting the auxiliary battery, there is an automatic learning function that completes learning when the respective system is used.
-
Click hereGeneral>SETUP>WHEN DISCONNECTING OR RECONNECTING BATTERY TERMINAL>AUTOMATIC LEARNING CHART