M15A-FKS LUBRICATION OIL PUMP INSTALLATION
CAUTION / NOTICE / HINT
- NOTICE:
-
This procedure includes the installation of small-head bolts. Refer to Small-Head Bolts of Basic Repair Hint to identify the small-head bolts.
-
Click hereGeneral>INTRODUCTION>REPAIR INSTRUCTION>PRECAUTION
PROCEDURE

 11320B
1.INSTALL NO. 2 TIMING CHAIN COVER ASSEMBLY
Install a new oil pump gasket to the cylinder block sub-assembly.
Clean the contact surfaces of the No. 2 timing chain cover assembly and timing chain cover assembly, and confirm that no oil, moisture, or other foreign matter is on the surfaces.
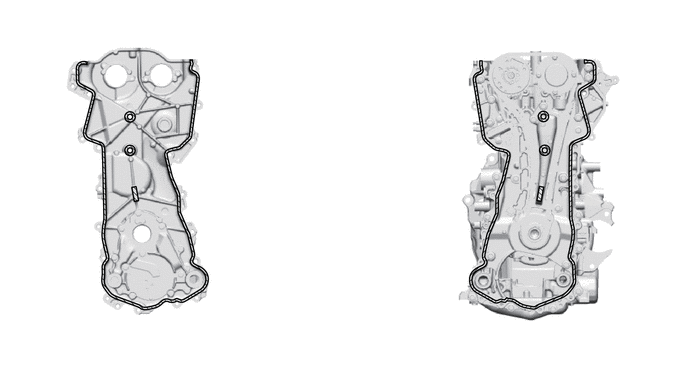
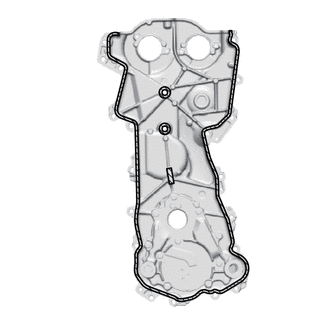
Apply seal packing in a continuous line to the No. 2 timing chain cover assembly as shown in the illustration.
- Seal Packing:
Toyota Genuine Seal Packing Black, Three Bond 1207B or equivalent
- Standard Seal Packing Diameter:
2.5 to 3.5 mm (0.0984 to 0.138 in.)
- NOTICE:
- ·
Clean the surfaces with non-residue solvent before applying seal packing.
·Install the No. 2 timing chain cover assembly within 3 minutes and tighten the bolts within 10 minutes of applying seal packing.
·Do not add engine oil for at least 2 hours after installation.
·Do not start the engine for at least 2 hours after installation.
·Make sure that the diameter at the start and end of each line of seal packing is 5 +/- 2 mm (0.197 +/- 0.0787 in.).
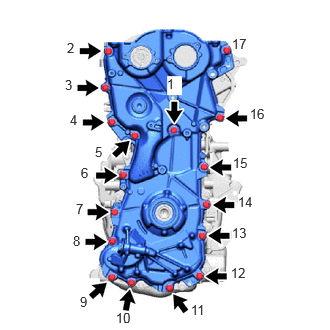
Temporarily install the No. 2 timing chain cover assembly to the timing chain cover assembly with the 17 bolts.
- NOTICE:
-
Make sure there is no oil on the bolts. If oil is found on any bolt, clean it before installation.
Tighten the 17 bolts in the order shown in the illustration.
- Torque:
- 24 N*m (245 kgf*cm, 18 ft.*lbf)
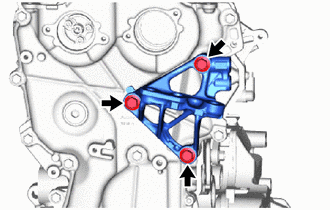
Install the engine mounting bracket RH with the 3 bolts in the order shown in the illustration.
- Torque:
- 43 N*m (438 kgf*cm, 32 ft.*lbf)
- NOTICE:
-
After applying seal packing to the No. 2 timing chain cover assembly, install the engine mounting bracket RH within 10 minutes.
2.INSTALL STRAIGHT SCREW PLUG
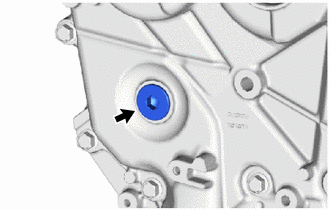
Using a 10 mm hexagon wrench, install the straight screw plug to the No. 2 timing chain cover assembly.
- Torque:
- 40 N*m (408 kgf*cm, 30 ft.*lbf)
11301C
3.INSTALL TIMING CHAIN COVER OIL SEAL
11193
4.INSTALL SPARK PLUG TUBE GASKET
11201
5.INSTALL CYLINDER HEAD COVER SUB-ASSEMBLY
13470
6.INSTALL CRANKSHAFT PULLEY ASSEMBLY
15370
7.INSTALL CAMSHAFT TIMING OIL CONTROL SOLENOID ASSEMBLY
8.INSTALL O-RING
15370
9.INSTALL CAM TIMING OIL CONTROL SOLENOID ASSEMBLY
19500
10.INSTALL IGNITION COIL ASSEMBLY
23100X
11.INSTALL FUEL PUMP ASSEMBLY (for High Pressure)
23801P
12.INSTALL NO. 1 FUEL PIPE SUB-ASSEMBLY
23901
13.INSTALL NO. 2 FUEL TUBE SUB-ASSEMBLY
23902
14.INSTALL FUEL TUBE SUB-ASSEMBLY
44771
15.INSTALL VACUUM TUBE CONNECTOR HOSE
12262
16.INSTALL NO. 2 VENTILATION HOSE
17.INSTALL ENGINE HANGER
18.REMOVE ENGINE STAND