BRAKE SYSTEM (OTHER) BRAKE BOOSTER(for HV Model LHD) INSTALLATION
CAUTION / NOTICE / HINT
- NOTICE:
-
After performing the update ECU security key procedure, make sure to perform the initialization procedure for when the cable has been disconnected and reconnected to the negative (-) auxiliary battery terminal.
PROCEDURE

 44785
1.INSTALL BRAKE BOOSTER GASKET
Install a new brake booster gasket to the brake booster with master cylinder assembly.
47210L
2.INSTALL BRAKE BOOSTER WITH MASTER CYLINDER ASSEMBLY
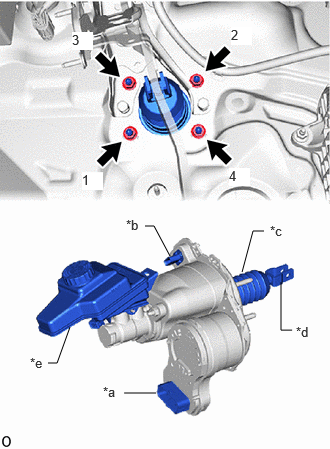
| *a | ECU Connector |
| *b | Connector |
| *c | Boot |
| *d | Brake Master Cylinder Push Rod Clevis |
| *e | Brake Master Cylinder Reservoir Assembly |
Install the brake booster with master cylinder assembly with the 4 nuts.
- Torque:
- 12.7 N*m (130 kgf*cm, 9 ft.*lbf)
- NOTICE:
- ·
Tighten the nuts in the order shown in the illustration.
·Do not kink or damage the brake lines.
·Do not carry the brake booster with master cylinder assembly by the parts shown in the illustration.
·Be careful not to allow brake fluid to enter the connector.
·If installing a new brake booster with master cylinder assembly, do not remove the hole plugs before connecting the brake lines because the brake booster with master cylinder is filled with brake fluid.
47264A
3.INSTALL PUSH ROD PIN
47101A
4.INSTALL BRAKE PEDAL RETURN SPRING
45260
5.CONNECT NO. 2 STEERING INTERMEDIATE SHAFT ASSEMBLY
45259A
6.INSTALL COLUMN HOLE COVER SILENCER SHEET
55606
7.INSTALL NO. 1 INSTRUMENT PANEL UNDER COVER SUB-ASSEMBLY
8.CONNECT BRAKE LINE
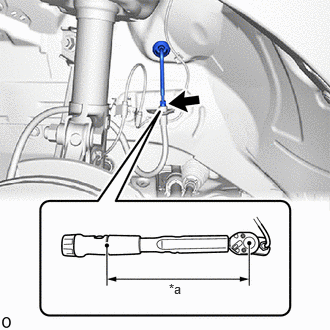
| *a | Torque Wrench Fulcrum Length |
Using a union nut wrench, connect the brake line to the front flexible hose.
- Torque:
- Specified tightening torque : 15.2 N*m (155 kgf*cm, 11 ft.*lbf)
- NOTICE:
- ·
Do not kink or damage the brake lines.
·Do not allow the brake lines to twist or interfere with other parts or the vehicle body during tightening.
·Do not allow any foreign matter such as dirt or dust to enter the brake lines from the connecting parts.
- HINT:
- ·
Calculate the torque wrench reading when changing the fulcrum length of the torque wrench.
Click hereGeneral>INTRODUCTION>REPAIR INSTRUCTION>PRECAUTION
·When using a union nut wrench (fulcrum length of 22 mm (0.866 in.)) + torque wrench (fulcrum length of 162 mm (6.38 in.)): 13.4 N*m (137 kgf*cm, 10 ft.*lbf)
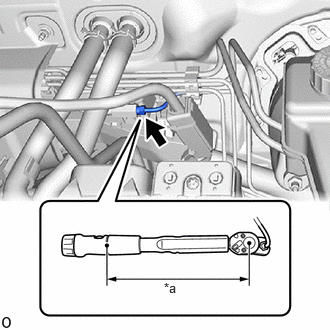
| *a | Torque Wrench Fulcrum Length |
Using a union nut wrench, connect the brake line to the front No. 2 brake tube way.
- Torque:
- Specified tightening torque : 15.2 N*m (155 kgf*cm, 11 ft.*lbf)
- NOTICE:
- ·
Do not kink or damage the brake lines.
·Do not allow the brake lines to twist or interfere with other parts or the vehicle body during tightening.
·Do not allow any foreign matter such as dirt or dust to enter the brake lines from the connecting parts.
- HINT:
- ·
Calculate the torque wrench reading when changing the fulcrum length of the torque wrench.
Click hereGeneral>INTRODUCTION>REPAIR INSTRUCTION>PRECAUTION
·When using a union nut wrench (fulcrum length of 22 mm (0.866 in.)) + torque wrench (fulcrum length of 162 mm (6.38 in.)): 13.4 N*m (137 kgf*cm, 10 ft.*lbf)
Engage the 8 clamps to install a new No. 1 brake tube clamp and No. 5 brake tube clamp to the brake lines.
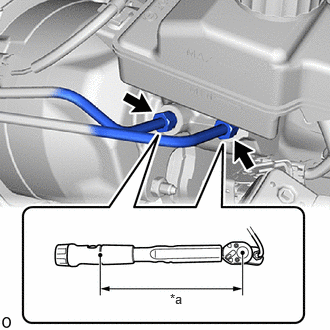
| *a | Torque Wrench Fulcrum Length |
Using a union nut wrench, connect the 2 brake lines to the brake master cylinder sub-assembly.
- Torque:
- Specified tightening torque : 19.5 N*m (199 kgf*cm, 14 ft.*lbf)
- NOTICE:
- ·
Do not kink or damage the brake lines.
·Do not allow the brake lines to twist or interfere with other parts or the vehicle body during tightening.
·Do not allow any foreign matter such as dirt or dust to enter the brake lines from the connecting parts.
- HINT:
- ·
Calculate the torque wrench reading when changing the fulcrum length of the torque wrench.
Click hereGeneral>INTRODUCTION>REPAIR INSTRUCTION>PRECAUTION
·When using a union nut wrench (fulcrum length of 20 mm (0.787 in.)) + torque wrench (fulcrum length of 162 mm (6.38 in.)):
17.4 N*m (177 kgf*cm, 13 ft.*lbf)
82111
9.CONNECT ENGINE ROOM MAIN WIRE
Engage the clamp.
Install the engine room main wire with the bolt.
- Torque:
- 10 N*m (102 kgf*cm, 7 ft.*lbf)
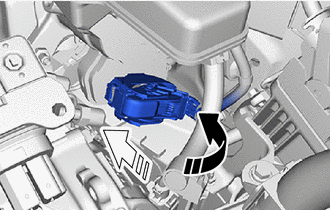

|
Lock the lock lever |

|
Connect the connector |
Connect the connector to the brake booster with master cylinder assembly and lock the lock lever as shown in the illustration.
- NOTICE:
- ·
Make sure that the connector is locked securely.
·Make sure that the connector can be connected smoothly. Do not allow water, oil or dirt to enter the connector.
Connect the connector to the brake master cylinder reservoir assembly.
Engage the clamp.
Connect the connector.
G9200
10.INSTALL INVERTER WITH CONVERTER ASSEMBLY
11.CONNECT CABLE TO NEGATIVE AUXILIARY BATTERY TERMINAL
12. UPDATE ECU SECURITY KEY
13.BLEED BRAKE LINE
14.INSPECT AND ADJUST BRAKE PEDAL
15.PERFORM INITIALIZATION AND CALIBRATION
16. CHECK FOR CLEAR DTCS
17. INITIALIZATION AFTER RECONNECTING AUXILIARY BATTERY TERMINAL
Click hereGeneral>SETUP>WHEN DISCONNECTING OR RECONNECTING BATTERY TERMINAL>WORK PROCEDURE
- HINT:
-
When disconnecting and reconnecting the auxiliary battery, there is an automatic learning function that completes learning when the respective system is used.
-
Click hereGeneral>SETUP>WHEN DISCONNECTING OR RECONNECTING BATTERY TERMINAL>AUTOMATIC LEARNING CHART