EA67F MANUAL TRANSMISSION / TRANSAXLE TRANSMISSION CONTROL CABLE INSTALLATION
PROCEDURE

 33820B
1.INSTALL TRANSMISSION CONTROL CABLE ASSEMBLY
Pass the transmission control cable assembly through the hole to the outside of the vehicle and install the transmission control cable assembly to the vehicle body with the 2 bolts.
- Torque:
- 6.0 N*m (61 kgf*cm, 53 in.*lbf)
Install the nut.
- Torque:
- 6.0 N*m (61 kgf*cm, 53 in.*lbf)
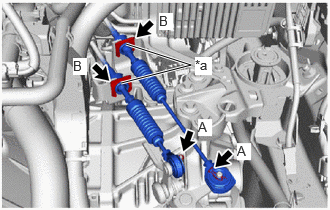
| *a | Paint Mark |
Install the transmission control cable assembly to the control cable bracket assembly with 2 new clips (B).
- NOTICE:
-
Make sure that the paint marks on the transmission control cable assembly are aligned with the slits in the control cable bracket assembly before installing the clips.
Connect the transmission control cable assembly to the manual transaxle assembly with the 2 clips (A).
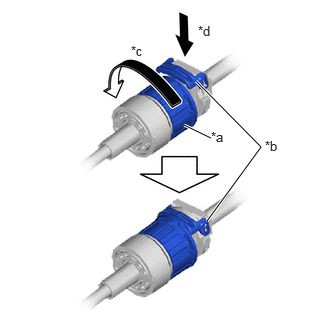
| *a | Nut |
| *b | Stopper |
| *c | Turn |
| *d | Push |
Rotate the nut counterclockwise approximately 180° and, while holding the nut in that position, press in the stopper.
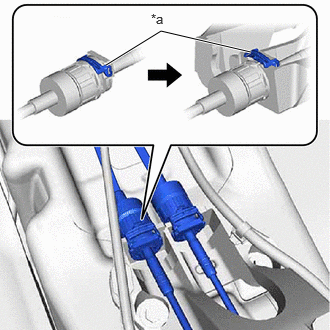
| *a | Stopper |
Install the transmission control shift cable to the floor shift lever assembly, check that the position of the stopper is the same as shown in the illustration.
- NOTICE:
-
Do not forcibly pull the transmission control cable assembly into the cabin.
Install the transmission control select cable to the floor shift lever assembly, check that the position of the stopper is the same as shown in the illustration.
- NOTICE:
-
Do not forcibly pull the transmission control cable assembly into the cabin.
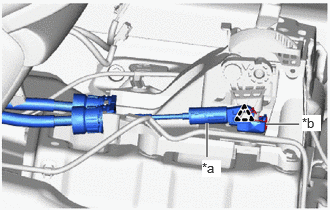
| *a | Transmission Control Select Cable |
| *b | Transmission Control Shift Cable |
Connect the transmission control shift cable assembly to the shift lever assembly.
Connect the transmission control select cable to the floor shift lever assembly with the clip.
33820B
2.ADJUST TRANSMISSION CONTROL CABLE ASSEMBLY
17701
3.INSTALL AIR CLEANER CASE SUB-ASSEMBLY
4.INSTALL AIR CONDITIONER UNIT ASSEMBLY
5. INITIALIZATION AFTER RECONNECTING BATTERY TERMINAL
Click hereGeneral>SETUP>WHEN DISCONNECTING OR RECONNECTING BATTERY TERMINAL>WORK PROCEDURE
- HINT:
-
When disconnecting and reconnecting the battery, there is an automatic learning function that completes learning when the respective system is used.
-
Click hereGeneral>SETUP>WHEN DISCONNECTING OR RECONNECTING BATTERY TERMINAL>AUTOMATIC LEARNING CHART