HEATING / AIR CONDITIONING AIR CONDITIONING UNIT(for LHD) INSTALLATION
PROCEDURE

 1.TEMPORARILY INSTALL AIR CONDITIONER UNIT ASSEMBLY
Temporarily install the air conditioner unit assembly to the instrument panel reinforcement assembly with the 3 bolts.
2.INSTALL INSTRUMENT PANEL REINFORCEMENT ASSEMBLY WITH AIR CONDITIONER UNIT ASSEMBLY
Engage the guides to install the instrument panel reinforcement assembly with air conditioner unit assembly as shown in the illustration.
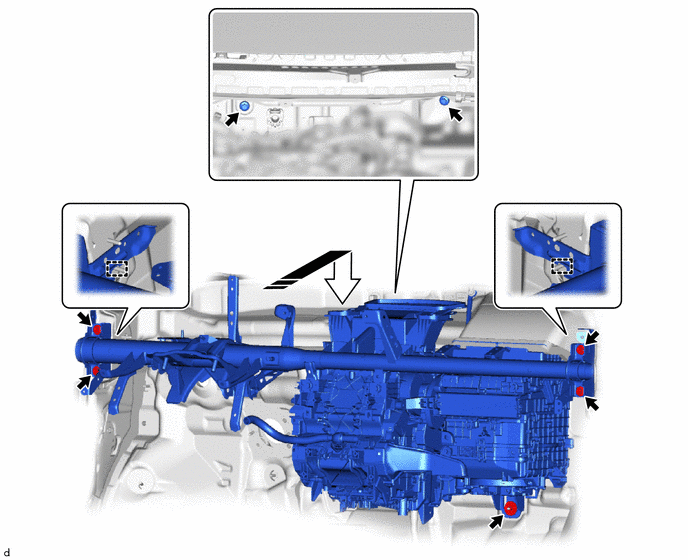

|
Install in this Direction | - | - |
Install the 6 bolts.
- Torque:
- 25 N*m (255 kgf*cm, 18 ft.*lbf)
Temporarily install the nut.
- NOTICE:
-
Do not fully tighten the nut.
55306A
3.INSTALL NO. 1 INSTRUMENT PANEL BRACE SUB-ASSEMBLY
Install the No. 1 instrument panel brace sub-assembly with the bolt and nut.
- Torque:
- Bolt : 20 N*m (204 kgf*cm, 15 ft.*lbf)
- Nut : 18 N*m (184 kgf*cm, 13 ft.*lbf)
Temporarily install the screw.
- NOTICE:
-
Do not fully tighten the screw.
4.INSTALL AIR CONDITIONER UNIT ASSEMBLY
Tighten the 3 bolts, screws and nut in the order shown in the illustration to install the air conditioner unit assembly.
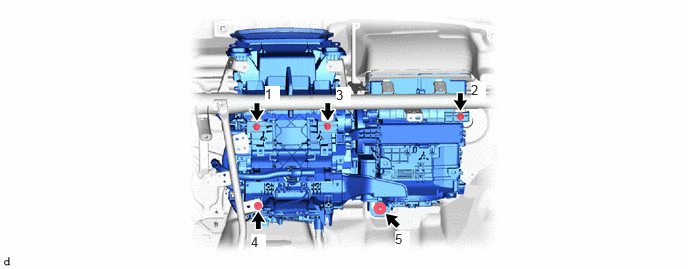
- Torque:
- Bolt : 9.5 N*m (97 kgf*cm, 84 in.*lbf)
- Nut : 6.0 N*m (61 kgf*cm, 53 in.*lbf)
82141
5.INSTALL INSTRUMENT PANEL WIRE
Engage the each clamp to install the instrument panel wire.
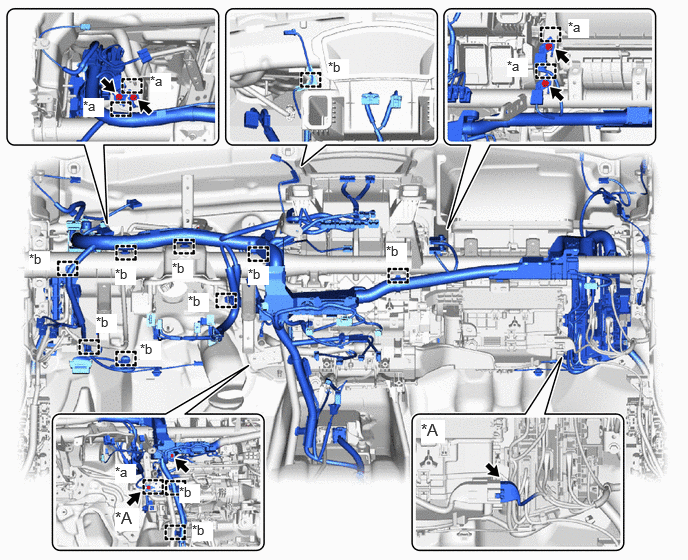
| *A | for Cold Area Specification Vehicles | - | - |
| *a | Guide | *b | Clamp |
Connect the each connector.
for Cold Area Specification Vehicles:
Engage the guide to connect the ground wire with the bolt to the No. 1 instrument panel brace sub-assembly.
- Torque:
- 10 N*m (102 kgf*cm, 7 ft.*lbf)
Connect the connector.
Connect the instrument panel wire with the bolt.
- Torque:
- 10 N*m (102 kgf*cm, 7 ft.*lbf)
Install the 4 ground wires with the 4 bolts.
- Torque:
- 10 N*m (102 kgf*cm, 7 ft.*lbf)
for Manual Air Conditioning System:
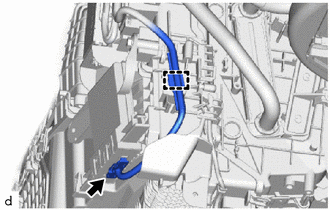
Engage the clamp.
Connect the connector.
for Automatic Air Conditioning System:
Engage the clamp.
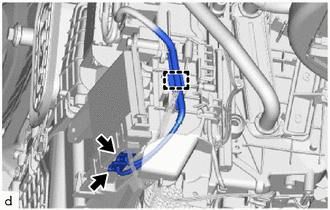
Connect the 2 connectors.
for Manual Air Conditioning System Single Layer Type:
Engage the clamp.
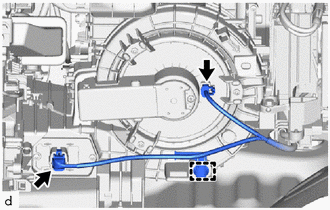
Connect the 2 connectors.
for Manual Air Conditioning System Double Layer Type:
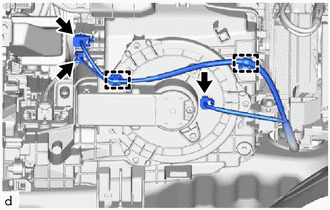
Engage the clamps.
Connect the 3 connectors.
for Automatic Air Conditioning System:
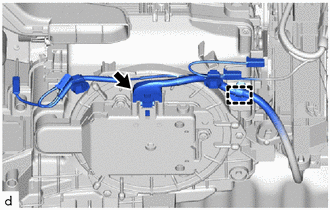
Engage the clamp.
Connect the connector.
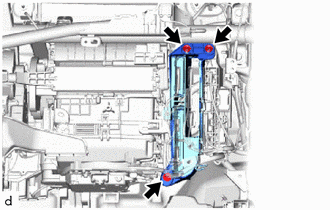
Install the instrument panel junction block assembly RH with the 2 nuts and bolt.
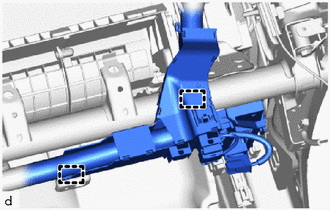
Engage the clamps.
6.INSTALL TELEMATICS TRANSCEIVER WITH BRACKET (w/ Telematics Transceiver)
7.INSTALL INSTRUMENT PANEL JUNCTION BLOCK ASSEMBLY WITH MULTIPLEX NETWORK BODY ECU
55308B
8.INSTALL NO. 3 INSTRUMENT PANEL TO COWL BRACE SUB-ASSEMBLY
83108
9.INSTALL METER MIRROR SUB-ASSEMBLY (w/ Headup Display)
88539G
10.INSTALL COOLER UNIT DRAIN HOSE GROMMET
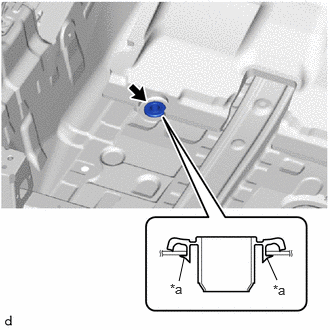
| *a | Lip |
Install a new cooler unit drain hose grommet.
- NOTICE:
- ·
If the drain cooler hose is disconnected from the cooler unit drain hose grommet, make sure to replace the cooler unit drain hose grommet with a new one. Failure to do so may lead to water ingress.
·Make sure that the entire lip of the cooler unit drain hose grommet is securely engaged to the vehicle body.
88539J
11.INSTALL DRAIN COOLER HOSE
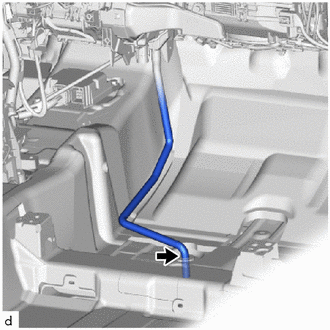
Connect the drain cooler hose.
55216C
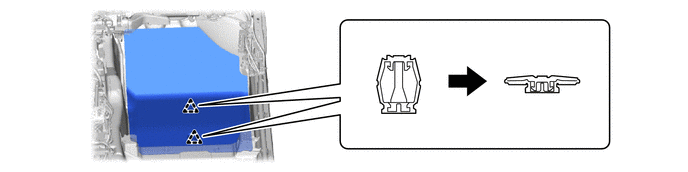
12.INSTALL NO. 4 DASH PANEL INSULATOR PAD
Engage the 2 clips to install the No. 4 dash panel insulator pad.
87212
13.INSTALL NO. 1 REAR AIR DUCT (for Cold Area Specification Vehicles)
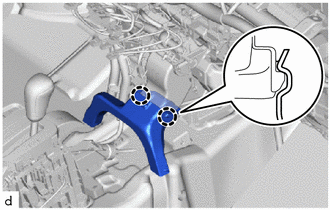
Engage the claws to install the No. 1 rear air duct.
87212F
14.INSTALL NO. 2 REAR AIR DUCT (for Cold Area Specification Vehicles)
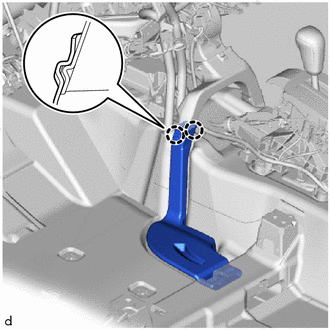
Engage the claws to install the No. 2 rear air duct.
87212H
15.INSTALL NO. 4 REAR AIR DUCT (for Cold Area Specification Vehicles)
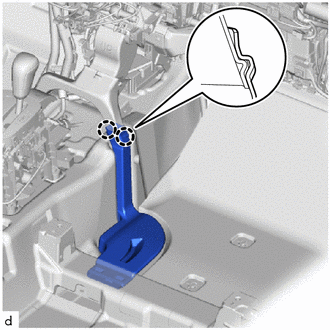
Engage the claws to install the No. 4 rear air duct.
58510D
16.INSTALL FLOOR CARPET ASSEMBLY (for Cold Area Specification Vehicles)
Install the front floor carpet assembly with the 2 clips as shown in the illustration.
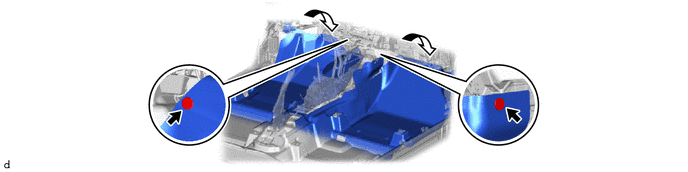
87212G
17.INSTALL NO. 3 REAR AIR DUCT (for Cold Area Specification Vehicles)
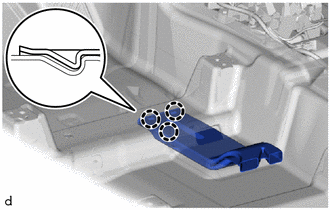
Engage the claws to install the No. 3 rear air duct.
87212J
18.INSTALL NO. 5 REAR AIR DUCT (for Cold Area Specification Vehicles)
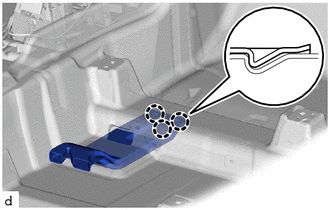
Engage the claws to install the No. 5 rear air duct.
58510D
19.INSTALL FRONT FLOOR CARPET ASSEMBLY (except Cold Area Specification Vehicles)
Install the front floor carpet assembly with the 2 clips as shown in the illustration.

77306
20.INSTALL FUEL LID LOCK OPEN LEVER SUB-ASSEMBLY (for Cold Area Specification Vehicles)
58569D
21.INSTALL FRONT FLOOR CAUTION PLATE COVER (for Cold Area Specification Vehicles)
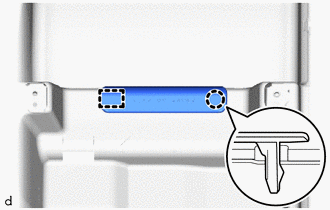
Engage the guide and claw to install the front floor caution plate cover.
22.INSTALL FRONT SEAT ASSEMBLY LH
for 5 Door:
Click hereVehicle Interior>SEAT>FRONT SEAT ASSEMBLY (for 5 Door)>INSTALLATION
for 3 Door:
Click hereVehicle Interior>SEAT>FRONT SEAT ASSEMBLY (for 3 Door)>INSTALLATION
23.INSTALL FRONT SEAT ASSEMBLY RH
- HINT:
-
Use the same procedure as for the LH side.
55084E
24.INSTALL NO. 1 HEATER TO REGISTER DUCT SUB-ASSEMBLY
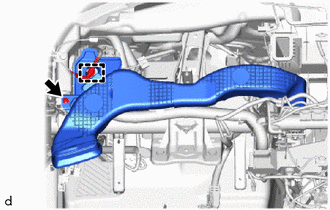
Engage the clamp to install the No. 1 heater to register duct sub-assembly.
Install the clip.
55085
25.INSTALL NO. 2 HEATER TO REGISTER DUCT SUB-ASSEMBLY
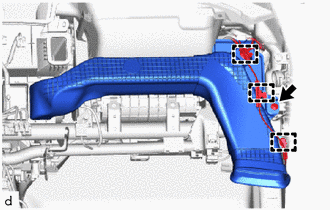
Engage the clamps to install the No. 2 heater to register duct sub-assembly.
Install the clip.
55086A
26.INSTALL CENTER HEATER TO REGISTER DUCT SUB-ASSEMBLY
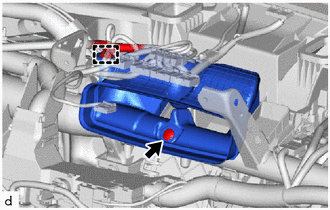
Engage the clamp to install the center heater to register duct sub-assembly.
Install the clip.
27.INSTALL STEERING COLUMN ASSEMBLY
87211
28.INSTALL NO. 1 AIR DUCT
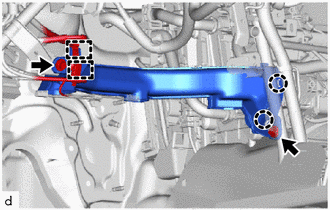
Engage the claws and clamps to install the No. 1 air duct.
Install the 2 bolts.
29.INSTALL INSTRUMENT PANEL ASSEMBLY
87245
30.INSTALL INLET HEATER WATER HOSE
for M15A-FKS:
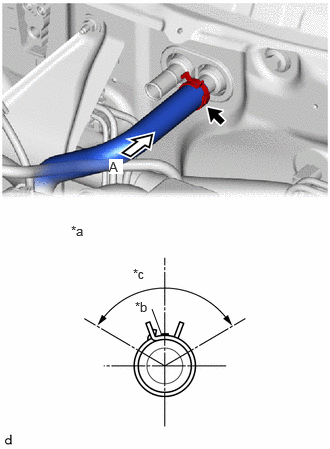
| *a | View A |
| *b | Marking (White) |
| *c | Clip Installation Angle (120°) |
Connect the inlet heater water hose with the marking (white) facing up and engage the clip within the area shown in the illustration.
- NOTICE:
-
Do not apply excessive force to the inlet heater water hose.
except M15A-FKS:
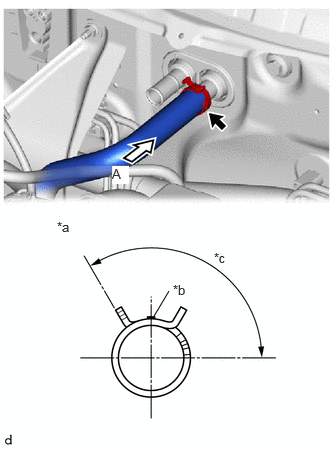
| *a | View A |
| *b | Marking |
| *c | Clip Installation Angle (120°) |
Connect the inlet heater water hose with the marking facing up and engage the clip within the area shown in the illustration.
- Paint Mark:
Engine Color 1KR-FE Yellow M15A-FXE White
- NOTICE:
-
Do not apply excessive force to the inlet heater water hose.
for G16E-GTS:
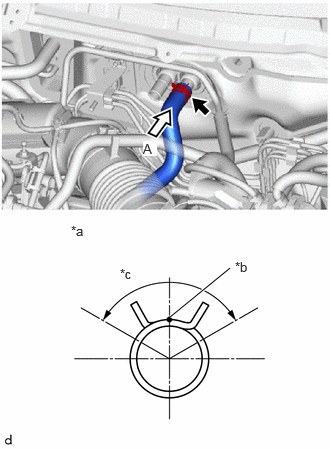
| *a | View A |
| *b | Marking (White) |
| *c | Clip Installation Angle (120°) |
Connect the inlet heater water hose with the marking (white) facing up and engage the clip within the area shown in the illustration.
- NOTICE:
-
Do not apply excessive force to the inlet heater water hose.
16290F
31.INSTALL NO. 3 WATER BY-PASS HOSE ASSEMBLY
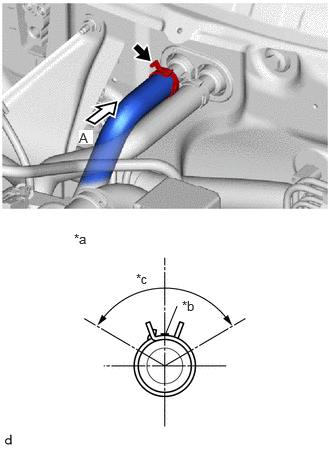
| *a | View A |
| *b | Marking (White) |
| *c | Clip Installation Angle (120°) |
for M15A-FKS:
Connect the No. 3 water by-pass hose assembly with the marking (white) facing up and engage the clip within the area shown in the illustration.
- NOTICE:
-
Do not apply excessive force to the No. 3 water by-pass hose assembly.
except M15A-FKS:
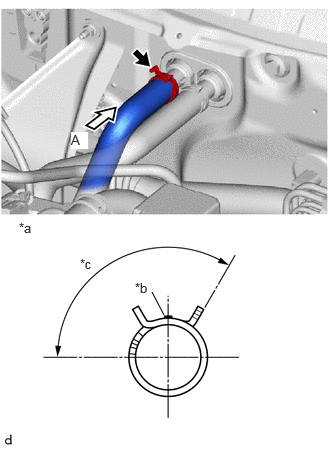
| *a | View A |
| *b | Marking (White) |
| *c | Clip Installation Angle (120°) |
Connect the No. 3 water by-pass hose assembly with the marking (white) facing up and engage the clip within the area shown in the illustration.
- NOTICE:
-
Do not apply excessive force to the No. 3 water by-pass hose assembly.
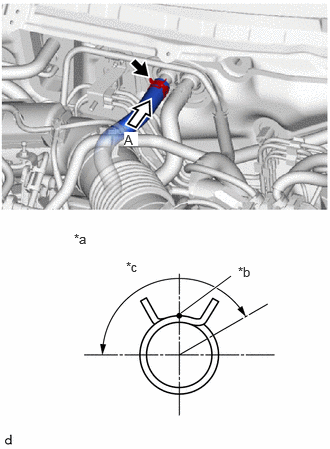
| *a | View A |
| *b | Marking (White) |
| *c | Clip Installation Angle (150°) |
for G16E-GTS:
Connect the No. 3 water by-pass hose assembly with the marking (white) facing up and engage the clip within the area shown in the illustration.
- NOTICE:
-
Do not apply excessive force to the No. 3 water by-pass hose assembly.
88716A
32.INSTALL COOLER REFRIGERANT LIQUID PIPE A (except 1KR-FE, G16E-GTS)
Remove the vinyl tape from the cooler refrigerant liquid pipe A.
Apply sufficient compressor oil to a new O-ring and fitting surface of the cooler refrigerant liquid pipe A.
- Compressor Oil:
for Gasoline Model (HFC-134a(R134a)):
ND-OIL 8 or equivalent
for Gasoline Model (HFO-1234yf(R1234yf)):
ND-OIL 12 or equivalent
for HV Model:
ND-OIL 11 or equivalent
Install the O-ring to the cooler refrigerant liquid pipe A.
- NOTICE:
-
Keep the O-ring and O-ring fitting surface free of foreign matter.
Connect the cooler refrigerant liquid pipe A.
88707
33.INSTALL SUCTION PIPE SUB-ASSEMBLY (except 1KR-FE, G16E-GTS)
Remove the vinyl tape from the suction pipe sub-assembly.
Apply sufficient compressor oil to a new O-ring and fitting surface of the suction pipe sub-assembly.
- Compressor Oil:
for Gasoline Model (HFC-134a(R134a)):
ND-OIL 8 or equivalent
for Gasoline Model (HFO-1234yf(R1234yf)):
ND-OIL 12 or equivalent
for HV Model:
ND-OIL 11 or equivalent
Install the O-ring to the suction pipe sub-assembly.
- NOTICE:
-
Keep the O-ring and O-ring fitting surface free of foreign matter.
Connect the suction pipe sub-assembly.
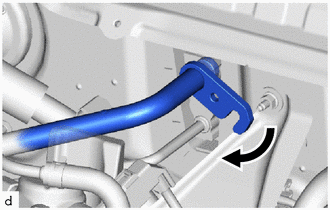
Rotate the hook connector as shown in the illustration.
Insert the hose joint into the fitting hole securely and install the bolt.
- Torque:
- 9.5 N*m (97 kgf*cm, 84 in.*lbf)
88710E
34.INSTALL AIR CONDITIONING TUBE AND ACCESSORY ASSEMBLY (for 1KR-FE, G16E-GTS)
Remove the vinyl tape from the air conditioning tube and accessory assembly.
Apply sufficient compressor oil to 2 new O-rings and fitting surface of the air conditioning tube and accessory assembly.
- Compressor Oil:
for HFC-134a(R134a):
ND-OIL 8 or equivalent
for (HFO-1234yf(R1234yf):
ND-OIL 12 or equivalent
Install the 2 O-rings to the air conditioning tube and accessory assembly.
- NOTICE:
-
Keep the O-ring and O-ring fitting surface free of foreign matter.
Connect the air conditioning tube and accessory assembly.
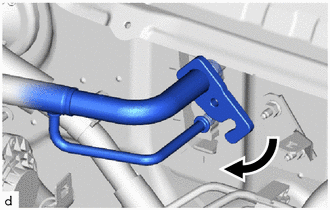
Rotate the hook connector as shown in the illustration.
Insert the hose joint into the fitting hole securely and install the bolt.
- Torque:
- 9.5 N*m (97 kgf*cm, 84 in.*lbf)
55225
35.INSTALL DASH PANEL HEAT INSULATOR (for G16E-GTS)
55701J
36.INSTALL OUTER COWL TOP PANEL SUB-ASSEMBLY
Install outer cowl top panel sub-assembly with the 11 bolts.
- Torque:
- 12 N*m (122 kgf*cm, 9 ft.*lbf)
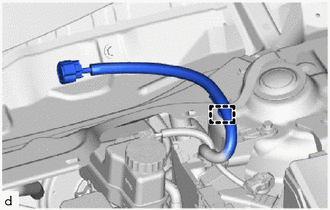
Engage the clamp.
55815E
37.INSTALL NO. 1 FRONT VENTILATOR SEAL
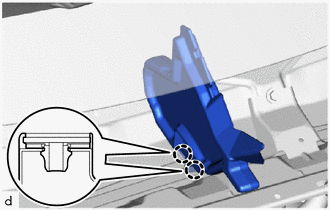
Engage the claws to install the No. 1 front ventilator seal.
55734A
38.INSTALL WATER GUARD PLATE RH
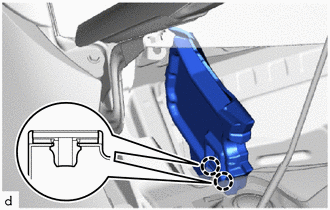
Engage the claws to install the water guard plate RH.
39.INSTALL WINDSHIELD WIPER MOTOR AND LINK
40.ADD ENGINE COOLANT
for 1KR-FE:
for M15A-FKS:
for M15A-FXE:
Click hereGeneral>MAINTENANCE>M15A-FXE COOLANT (for Engine)>REPLACEMENT
for G16E-GTS:
41.CHARGE AIR CONDITIONING SYSTEM WITH REFRIGERANT
for HFC-134a(R134a):
Click hereVehicle Interior>HEATING / AIR CONDITIONING>REFRIGERANT (for HFC-134a(R134a))>REPLACEMENT
for HFO-1234yf(R1234yf):
Click hereVehicle Interior>HEATING / AIR CONDITIONING>REFRIGERANT (for HFO-1234yf(R1234yf))>REPLACEMENT
42.INSPECT FOR COOLANT LEAK
for 1KR-FE:
Click hereEngine / Hybrid System>1KR-FE (COOLING)>COOLING SYSTEM>ON-VEHICLE INSPECTION
for M15A-FKS:
Click hereEngine / Hybrid System>M15A-FKS (COOLING)>COOLING SYSTEM>ON-VEHICLE INSPECTION
for M15A-FXE:
Click hereEngine / Hybrid System>M15A-FXE (COOLING)>COOLING SYSTEM>ON-VEHICLE INSPECTION
for G16E-GTS:
Click hereEngine / Hybrid System>G16E-GTS (COOLING)>COOLING SYSTEM>ON-VEHICLE INSPECTION
43. WARM UP ENGINE (for Gasoline Model)
for HFC-134a(R134a):
Click hereVehicle Interior>HEATING / AIR CONDITIONING>REFRIGERANT (for HFC-134a(R134a))>REPLACEMENT
for HFO-1234yf(R1234yf):
Click hereVehicle Interior>HEATING / AIR CONDITIONING>REFRIGERANT (for HFO-1234yf(R1234yf))>REPLACEMENT
44.WARM UP COMPRESSOR (for HV Model)
for HFC-134a(R134a):
Click hereVehicle Interior>HEATING / AIR CONDITIONING>REFRIGERANT (for HFC-134a(R134a))>REPLACEMENT
for HFO-1234yf(R1234yf):
Click hereVehicle Interior>HEATING / AIR CONDITIONING>REFRIGERANT (for HFO-1234yf(R1234yf))>REPLACEMENT
45.INSPECT FOR REFRIGERANT LEAK
for HFC-134a(R134a):
Click hereVehicle Interior>HEATING / AIR CONDITIONING>REFRIGERANT (for HFC-134a(R134a))>REPLACEMENT
for HFO-1234yf(R1234yf):
Click hereVehicle Interior>HEATING / AIR CONDITIONING>REFRIGERANT (for HFO-1234yf(R1234yf))>REPLACEMENT
51451A
46.INSTALL CENTER ENGINE UNDER COVER (except G16E-GTS)
51410
47.INSTALL NO. 1 ENGINE UNDER COVER ASSEMBLY (for G16E-GTS)
48. INITIALIZATION SERVO MOTOR (for Automatic Air Conditioning System)
49.PERFORM REGISTRATION (w/ Stop And Start System)