P0810 Clutch Position Control Error
Diagnostic trouble codes · Vehicles built from Nov 2005
DESCRIPTION
In the multi-mode manual transmission system, the clutch is engaged and disengaged by the transmission control ECU using a clutch actuator. The clutch actuator consists of an electric motor which moves the push rod to push the release lever, a clutch stroke sensor which detects the push rod position, and a worm gear which engages the push rod with the motor.This DTC is set if an error occurs with the stroke speed of the clutch actuator or the difference between the target clutch position and the actual clutch position. Therefore, if malfunctions occur in the clutch stroke sensor or the clutch motor circuit, the DTCs relating to the sensor or motor circuit open/short (DTC P0806, P0807, P0808, and/or P0900) are set before this DTC is set.
| DTC No. |
DTC Detection Conditions |
Trouble Areas |
| P0810 |
The transmission control ECU detects the following conditions simultaneously: (1 trip detection logic)
|
|
- HINT:
- The monitor runs when the vehicle is driven at a vehicle speed of 20 km/h (12.4 mph) or more.
WIRING DIAGRAM
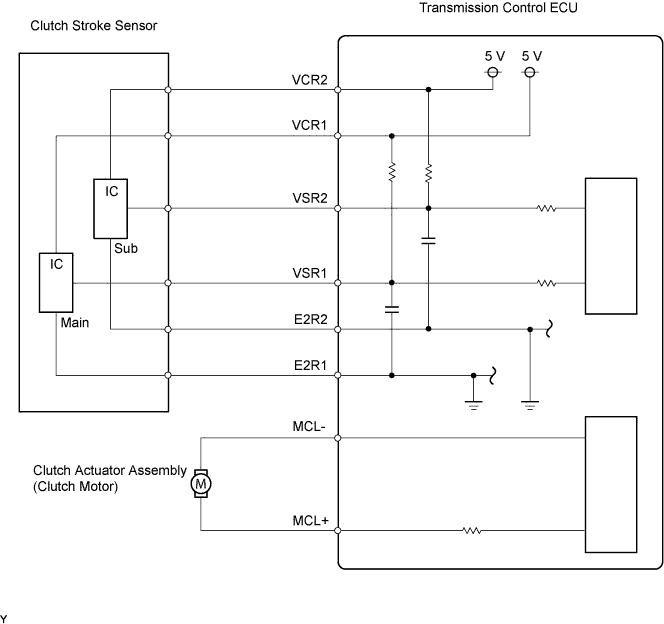

INSPECTION PROCEDURE
- NOTICE:
- In new clutch actuator assembly installation, perform Clamp Position Adjustment before installing the actuator. The push rods of new clutch actuator assemblies (service supply parts) are not set to the clutch clamp position.
- In clutch stroke sensor or clutch actuator assembly replacement, perform Initialization and Learning of the multi-mode manual transmission system after installing the sensor or actuator (Click here). If the sensor or actuator is installed without performing the initialization and learning, it may cause driving performance degradation or system component breakage.
- In new clutch actuator assembly installation, perform Clamp Position Adjustment before installing the actuator. The push rods of new clutch actuator assemblies (service supply parts) are not set to the clutch clamp position.
- HINT:
- If the symptom still occurs even after checking the following parts for dirt, wear, and any defects and replacing the defective parts, replace the transmission control ECU.
- Clutch Disc and Clutch Cover
- Release Bearing
- Clutch Release Fork
- Clutch Disc and Clutch Cover
| 1. CHECK ANY OTHER DTCS OUTPUT (IN ADDITION TO DTC P0810) |

Connect the intelligent tester to the DLC3.
Turn the ignition switch on (IG) and turn the tester ON.
Select the following menu items: Powertrain / Multi-Mode M/T / DTC.
Read DTCs.
- Result:
Display (DTC Output)
Proceed To
P0810
A
P0810 and other DTCs
B
|
|
||||

| A | |
 |
| 2. INSPECT TRANSMISSION CONTROL ECU ASSEMBLY |
Check the clutch actuator motor terminal output using an oscilloscope.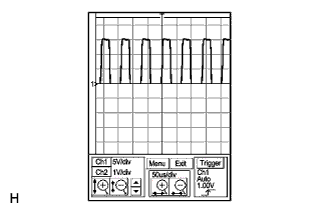
Connect the intelligent tester to the DLC3.
Turn the ignition switch on (IG) and turn the tester ON.
Clear the DTC after saving the recorded freeze frame data.
Turn the ignition switch off within 2 seconds of clearing the DTC.
Connect the oscilloscope probes to the transmission control ECU terminals.
Check the waveform when the ignition switch is turned on (IG).
Tester settings Items
Contents
Terminals
MCL- (A37-6) - GND (D79-6)
MCL+ (A37-7) - GND (D79-6)
Gauge set
5 V/DIV, 50 μs/DIV
Condition
Soon after ignition switch on (IG)
- Standard:
- Correct waveform shown in the illustration.
- HINT:
- The waveform is displayed for several seconds before the DTC is set.
|
|
||||
| OK | |
|
| 3. INSPECT TRANSMISSION CONTROL ECU ASSEMBLY |
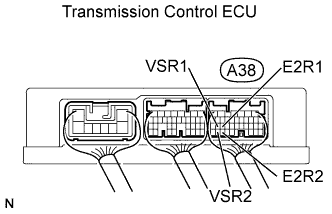 |
Remove the clutch stroke sensor from the clutch actuator assembly.
Connect the clutch stroke sensor connector.
Turn the ignition switch on (IG).
Check the voltage change between the terminals of the transmission control ECU connector when moving the sensor arm of the clutch stroke sensor.
- Standard voltage:
Tester Connections
Specified Conditions
VSR1 (A38-26) - E2R1 (A38-25)
Voltage changes in accordance with sensor arm position
VSR2 (A38-34) - E2R2 (A38-33)
Voltage changes in accordance with sensor arm position
Reinstall the clutch stroke sensor (Click here).
Perform initialization and learning (Click here).
|
|
||||

| NG | |
|
| 4. INSPECT CLUTCH STROKE SENSOR |
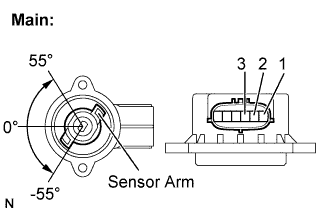 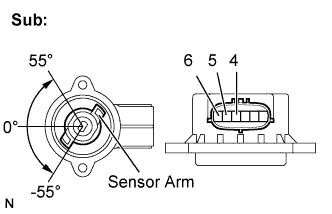 |
Remove the clutch stroke sensor.
Measure the voltage between the terminals of the clutch stroke sensor connector (main).
Prepare 3 dry cell batteries (1.5 V) and 2 leads for connecting the batteries and the sensor.
Connect the batteries in series.
Connect the positive battery terminal to sensor terminal 3, and the negative battery terminal to sensor terminal 2.
Check the voltage between terminals 1 and 2.
- Standard voltage (combined dry cell battery voltage of 4.5 V):
Sensor Angle
Terminal (1-2) Output Voltage
55°
Approximately 4.05 V
0°
Approximately 2.25 V
-55°
Approximately 0.45 V
- Reference voltage (combined dry cell battery voltage of 5.0 +- 0.3 V):
Sensor Angle
Terminal (1-2) Output Voltage
55°
Approximately 4.5 V
0°
Approximately 2.5 V
-55°
Approximately 0.5 V
Measure the voltage between the terminals of the clutch stroke sensor connector (sub).
Connect the positive battery terminal to sensor terminal 6, and the negative battery terminal to sensor terminal 5.
Check the voltage between terminals 4 and 5.
- Standard voltage (combined dry cell battery voltage of 4.5 V):
Sensor Angle
Terminal (4-5) Output Voltage
55°
Approximately 4.05 V
0°
Approximately 2.25 V
-55°
Approximately 0.45 V
- Reference voltage (combined dry cell battery voltage of 5.0 +- 0.3 V):
Sensor Angle
Terminal (4-5) Output Voltage
55°
Approximately 4.5 V
0°
Approximately 2.5 V
-55°
Approximately 0.5 V
- NOTICE:
- Do not apply more than 6 V
- Do not use a sensor which has been dropped.
- Do not apply more than 6 V
Reinstall the clutch stroke sensor (Click here).
Perform initialization and learning (Click here).
|
|
||||
| OK | ||
 |
||
| ||
| 5. PERFORM ACTIVE TEST USING INTELLIGENT TESTER |
Remove the clutch actuator (Click here).
Connect the clutch stroke sensor connector and the clutch actuator connector.
Connect the intelligent tester to the DLC3.
Turn the ignition switch on (IG) and the tester ON.
Clear the DTC after saving the recorded freeze frame data.
Turn the ignition switch off within 2 seconds of clearing the DTC.
Turn the ignition switch on (IG).
Select the following menu items: Powertrain / Multi-Mode M/T / Active Test / Target Clutch Control.
Perform the Active Test.
- OK:
- Clutch actuator moves smoothly in accordance with the tester operation.
Reinstall the clutch actuator.
Perform initialization and learning (Click here).
|
|
||||
| OK | |
|
| 6. CHECK CLUTCH SYSTEM (CLUTCH MECHANICAL OPERATION) |
Remove the transaxle assembly (Click here).
Check for dirt, wear and defects in the clutch system parts (clutch disc, clutch cover, release lever, release bearing and release fork).
- OK:
- No defective parts in the clutch mechanical system.
|
|
||||
| OK | ||
|
||
| ||