Speedometer Malfunction
Circuit diagnosis · Vehicles built from Aug 2005
DESCRIPTION
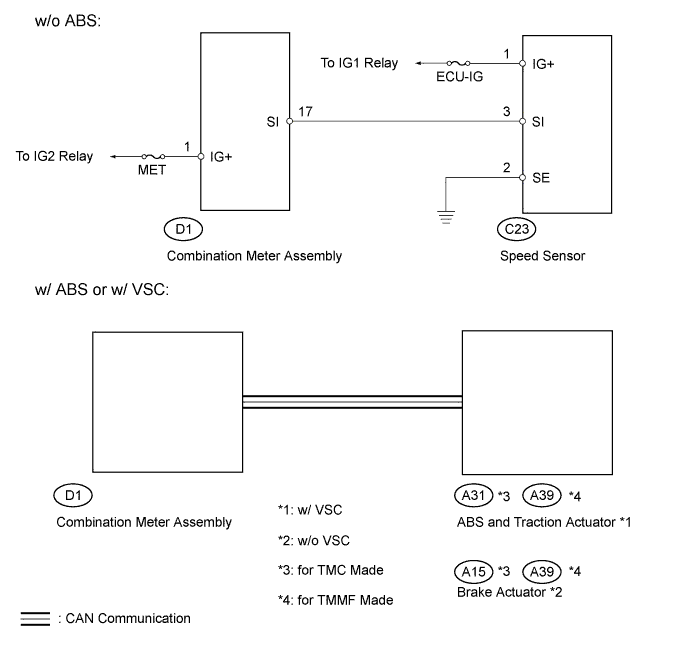
- w/o ABS:
The combination meter assembly controls the speedometer in accordance with vehicle speed signals from the speed sensor.
- w/ ABS or w/ VSC:
The combination meter assembly controls the speedometer in accordance with vehicle speed signals from the ABS and traction actuator or the brake actuator through the CAN communication system.
WIRING DIAGRAM

INSPECTION PROCEDURE
- HINT:
- If DTC U0129 has been stored, troubleshoot the CAN communication system first.
| 1. PERFORM ACTIVE TEST USING INTELLIGENT TESTER (SPEED METER) |

Connect an intelligent tester to the DLC3.
Turn the ignition switch on (IG) and turn the tester on.
Operate the intelligent tester according to the display and select "ACTIVE TEST" (Click here).
- Body / Combination Meter / ACTIVE TEST:
Item
Test Details
Diagnostic Note
Speed Meter Operation
0 / 40 (25) / 80 (50) / 120 (75) / 160 (99) km/h (mph)
Value selected during ACTIVE TEST is displayed
- OK:
- Vehicle speed displayed on the tester is approximately the same as that of the speedometer reading.
|
|
||||

| OK | |
 |
| 2. CHECK BRAKE CONTROL SYSTEM |
Check the brake control system.
- Result:
Brake control system
Proceed to
Vehicle with ABS
A
Vehicle without ABS
B
|
|
||||

| A | |
|
| 3. READ VALUE USING INTELLIGENT TESTER (VEHICLE SPEED METER) |
Connect an intelligent tester to the DLC3.
Turn the ignition switch on (IG) and turn the tester on.
Operate the intelligent tester according to the display and select "DATA LIST" (Click here).
- Body / Combination Meter / DATA LIST:
Item
Measurement Item / Range (Display)
Normal Condition
Diagnostic Note
Vehicle Speed Meter
Vehicle speed /
Min.: 0 km/h (0mph),
Max.: 255 km/h (158mph)
Approximately same as actual vehicle speed (When vehicle is driven)
-
- OK:
- Vehicle speed displayed on the tester is approximately the same as the actual vehicle speed.
- NOTICE:
- Determine whether the value displayed on the tester is within the acceptable range by referring to reference values described in "ON-VEHICLE INSPECTION" (Click here).
- Result:
Result
Proceed to
OK
A
NG (Vehicle with ABS)
B
NG (Vehicle with VSC)
C
|
|
||||
|
|
||||
| A | ||
 |
||
| ||
| 4. INSPECT SPEED SENSOR |
Remove the speed sensor.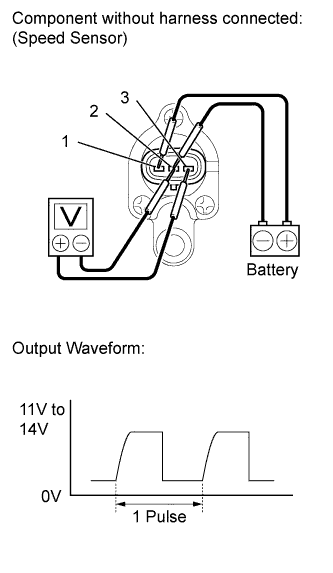
Connect the positive (+) lead from the battery to terminal 1 and the negative (-) lead to terminal 2.
Measure the voltage according to the value(s) in the table below.
- Standard voltage:
Tester connection
condition
Specified condition
2 - 3
Rotate the shaft
Voltage generated intermittently
- HINT:
- The output voltage should fluctuate up and down as shown in the illustration when the shaft is rotating slowly.
- OK:
- As shown in the illustration.
Reinstall the speed sensor.
|
|
||||
| OK | |
|
| 5. INSPECT FUSES (MET, ECU-IG FUSES) |
Remove the MET and ECU-IG fuse from the main body ECU.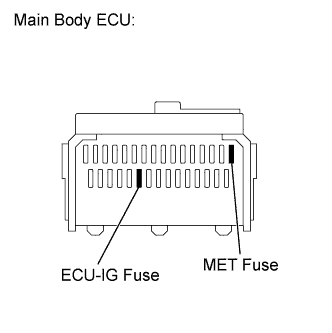
Measure the resistance according to the value(s) in the table below.
- Standard resistance:
Tester connection
Condition
Specified condition
MET fuse
Always
Below 1 Ω
ECU-IG fuse
Always
Below 1 Ω
Reinstall the fuses.
|
|
||||
| OK | |
|
| 6. CHECK HARNESS AND CONNECTOR (SPEED SENSOR - COMBINATION METER ASSEMBLY) |
Disconnect the D1 combination meter assembly connector.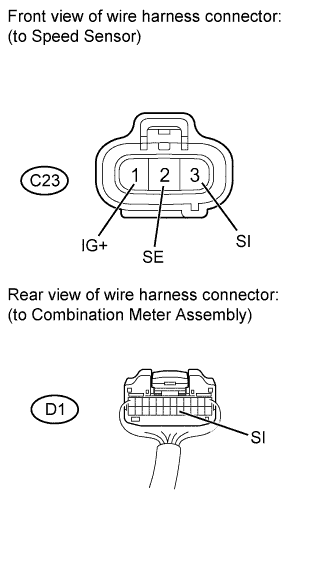
Disconnect the C23 speed sensor connector.
Measure the resistance according to the value(s) in the table below.
- Standard resistance:
Tester connection
Condition
Specified condition
D1-17 (SI) - C23-3 (SI)
Always
Below 1 Ω
C23-2 (SE) - Body ground
Always
Below 1 Ω
Reconnect the combination meter assembly connector.
Measure the voltage according to the value in the table below.
- Standard voltage:
Tester connection
Switch condition
Specified condition
C23-1 (IG+) - Body ground
Ignition switch on (IG)
11 to 14 V
Reconnect the speed sensor connector.
|
|
||||
| OK | ||
|
||
| ||