| Last Modified: 11-27-2007 | 1.6 A | |
| Service Category: Drivetrain | Section: Automatic Transmission/Transaxle | |
| Model Year: 2008 | Model: LX570 | Doc ID: RM0000018ZD00XX |
| Title: AB60F AUTOMATIC TRANSMISSION / TRANSAXLE: AUTOMATIC TRANSMISSION ASSEMBLY: REMOVAL (2008 LX570) | ||
REMOVAL
1. DISCONNECT CABLE FROM NEGATIVE BATTERY TERMINAL
NOTICE:
w/ Navigation System:
After the engine switch is turned off, the HDD navigation system requires approximately 6 minutes to record various types of memory and settings. As a result, after turning the engine switch off, wait 6 minutes or more before disconnecting the cable from the negative (-) battery terminal.
2. REMOVE FRONT FENDER SPLASH SHIELD SUB-ASSEMBLY LH

3. REMOVE FRONT FENDER SPLASH SHIELD SUB-ASSEMBLY RH
4. REMOVE NO. 2 ENGINE UNDER COVER
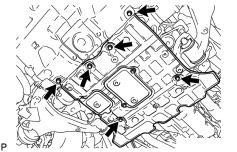
(a) Remove the 6 bolts and under cover.
5. REMOVE NO. 1 ENGINE UNDER COVER
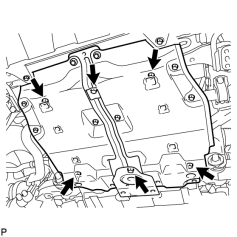
(a) Remove the 6 bolts and under cover.
6. REMOVE OIL PAN PROTECTOR ASSEMBLY
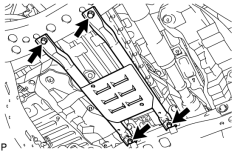
(a) Remove the 4 bolts and oil pan protector.
7. DRAIN AUTOMATIC TRANSMISSION FLUID
8. REMOVE ENGINE ROOM SIDE COVER LH
9. REMOVE ENGINE ROOM SIDE COVER RH
10. REMOVE UPPER RADIATOR SUPPORT SEAL
11. DRAIN ENGINE COOLANT
12. DISCONNECT FLOOR SHIFT GEAR SHIFTING ROD SUB-ASSEMBLY
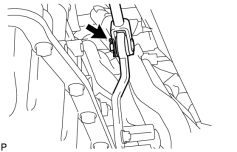
(a) Remove the clip and pin, and disconnect the gear shifting rod from the transmission control shaft lever RH.
13. REMOVE FRONT PROPELLER SHAFT ASSEMBLY
(a) Remove the front propeller shaft
.
14. REMOVE PROPELLER SHAFT ASSEMBLY
(a) Remove the propeller shaft
.
15. REMOVE TAILPIPE ASSEMBLY
16. REMOVE CENTER EXHAUST PIPE ASSEMBLY
17. REMOVE FRONT NO. 2 EXHAUST PIPE ASSEMBLY
18. REMOVE FRONT EXHAUST PIPE ASSEMBLY
19. REMOVE NO. 1 MANIFOLD STAY
20. REMOVE NO. 2 MANIFOLD STAY
21. REMOVE ENGINE OIL LEVEL DIPSTICK GUIDE
22. REMOVE NO. 1 EXHAUST MANIFOLD HEAT INSULATOR
23. REMOVE EXHAUST MANIFOLD SUB-ASSEMBLY RH
24. REMOVE STARTER COVER
25. REMOVE STARTER ASSEMBLY
26. REMOVE DRIVE PLATE AND TORQUE CONVERTER CLUTCH SETTING BOLT
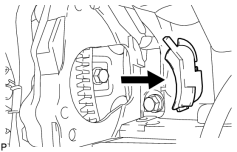
(a) Remove the flywheel housing side cover.
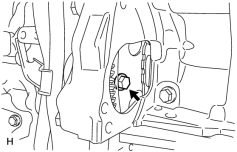
|
(b) Turn the crankshaft to gain access to the 6 bolts and remove the bolts while holding the crankshaft pulley setting bolt with a wrench. |
27. SUPPORT AUTOMATIC TRANSMISSION ASSEMBLY
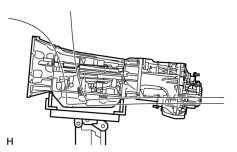
(a) Support the transmission with a transmission jack. Lift the transmission slightly from the crossmember.
NOTICE:
Support the oil pan bolts to prevent damage to the oil pan gasket.
28. REMOVE NO. 2 FRAME CROSSMEMBER SUB-ASSEMBLY
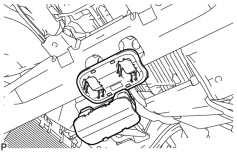
(a) Remove the engine mounting hole cover.
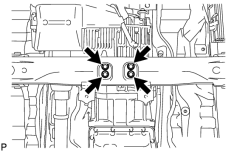
|
(b) Remove the 4 bolts of the rear engine mounting insulator. |
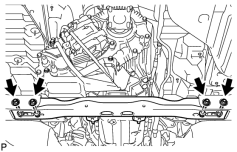
|
(c) Remove the 4 nuts, 4 bolts and frame crossmember. |
29. REMOVE REAR NO. 1 ENGINE MOUNTING INSULATOR
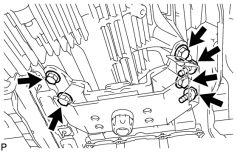
(a) Remove the 2 bolts and engine mounting heat insulator.
(b) Remove the 4 bolts and rear engine mounting insulator from the transmission.
30. DISCONNECT WIRE HARNESS AND CONNECTOR
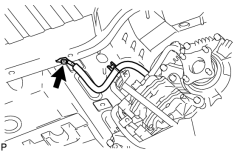
(a) Remove the bolt and disconnect the ground cable.
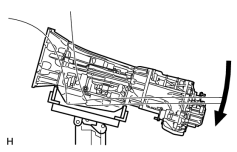
|
(b) Tilt the transmission downward. NOTICE:
|
(c) Disconnect the park/neutral position switch connector, 2 transmission wire connectors, 2 speed sensor connectors and 3 transfer control side connectors.
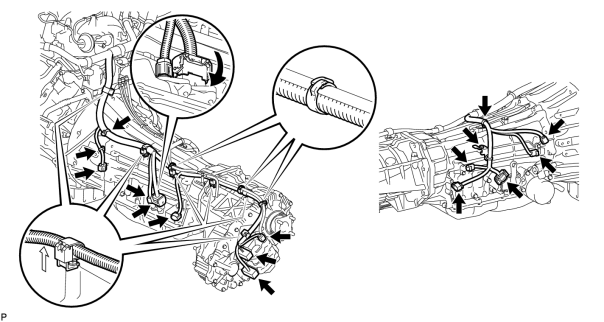
HINT:
Detach the claw, press down the lever, and then disconnect the transmission wire connector.
(d) Disconnect the 4 connector clamps and 6 harness clamps.
(e) Remove the bolt and disconnect the wire harness.
31. DISCONNECT NO. 2 WATER BY-PASS PIPE
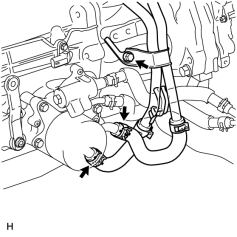
(a) Remove the bolt and disconnect the 2 water by-pass hoses from the transmission oil cooler. Then separate the by-pass pipe from the automatic transmission.
NOTICE:
Use a container to catch any coolant which flows out of the water by-pass hoses.
32. DISCONNECT TRANSMISSION OIL COOLER HOSE
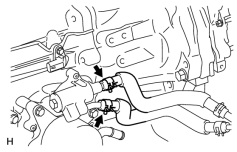
(a) Disconnect the 2 transmission oil cooler hoses from the transmission oil thermostat.
33. REMOVE AUTOMATIC TRANSMISSION ASSEMBLY
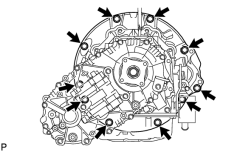
(a) Remove the 10 bolts and transmission.
NOTICE:
Do not use excess force to pry off the transmission assembly.
34. REMOVE TRANSMISSION OIL COOLER ASSEMBLY
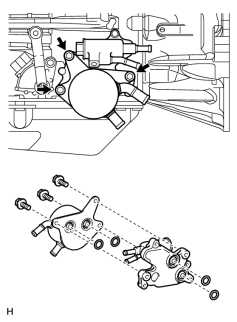
(a) Remove the 3 bolts and transmission oil cooler with transmission oil thermostat.
(b) Separate the transmission oil cooler from the transmission oil thermostat.
(c) Remove the 4 O-rings.
35. DISCONNECT BREATHER PLUG HOSE
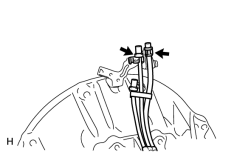
(a) Disconnect the 2 breather plug hoses from the harness clamp bracket.
36. REMOVE TRANSFER ASSEMBLY
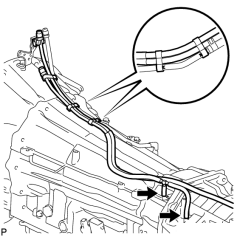
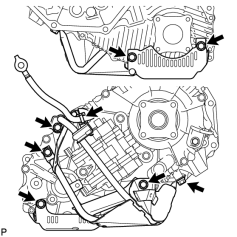
(a) Detach the 3 breather hose clamps from the automatic transmission breather tube.
|
(b) Disconnect the clamp of the ground cable from the transfer case lower protector. |
(c) Remove the 7 bolts and transfer case lower protector.
|
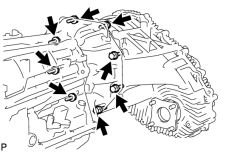
(d) Remove the 8 bolts and transfer. |
37. REMOVE HARNESS CLAMP BRACKET
(a) Remove the 5 bolts and 5 brackets.
38. REMOVE TORQUE CONVERTER CLUTCH ASSEMBLY
39. INSPECT TORQUE CONVERTER CLUTCH ASSEMBLY
(a) Inspect the torque converter clutch
.

|

|