WINDOW / GLASS BACK DOOR POWER WINDOW MOTOR INSTALLATION
PROCEDURE

 85720E
1.INSTALL BACK DOOR POWER WINDOW REGULATOR MOTOR ASSEMBLY
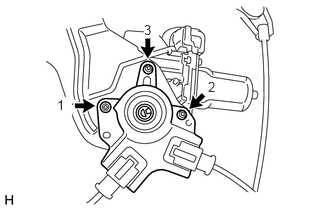
Using a T25 "TORX" socket wrench, install the power window regulator motor with the 3 screws.
- HINT:
- ·
Tighten the screws in the order shown in the illustration.
·A new back door power window regulator uses self-tapping screws to thread new installation holes when the self-tapping screws are installed.
- Torque:
- 5.5 N*m (56 kgf*cm, 49 in.*lbf)
69807
2.INSTALL BACK DOOR POWER WINDOW REGULATOR SUB-ASSEMBLY
68290A
3.INSTALL OUTER BACK DOOR GLASS WEATHERSTRIP ASSEMBLY
68131
4.INSTALL BACK DOOR GLASS
68275
5.INSTALL BACK DOOR GLASS RUN
67381A
6.INSTALL NO. 1 BACK WINDOW WIPER MOTOR BRACKET
85120R
7.INSTALL REAR WIPER MOTOR AND BRACKET ASSEMBLY
85241A
8.INSTALL REAR WIPER ARM
76085
9.INSTALL REAR SPOILER SUB-ASSEMBLY
76893
10.INSTALL REAR NO. 1 SPOILER COVER
75816
11.INSTALL BACK DOOR OUTSIDE MOULDING LH
75815
12.INSTALL BACK DOOR OUTSIDE MOULDING RH
67848
13.INSTALL BACK DOOR SERVICE HOLE COVER LH
67847
14.INSTALL BACK DOOR SERVICE HOLE COVER RH
67848C
15.INSTALL NO. 2 BACK DOOR SERVICE HOLE COVER
89222A
16.INSTALL MULTIPLEX NETWORK DOOR ECU
86160Y
17.INSTALL REAR NO. 2 SPEAKER ASSEMBLY
64780A
18.INSTALL BACK DOOR TRIM PANEL ASSEMBLY
19.CONNECT CABLE TO NEGATIVE BATTERY TERMINAL
- NOTICE:
-
When disconnecting the cable, some systems need to be initialized after the cable is reconnected (See page General>INTRODUCTION>REPAIR INSTRUCTION>INITIALIZATION).