DOOR / HATCH REAR DOOR DISASSEMBLY
CAUTION / NOTICE / HINT
- HINT:
- ·
Use the same procedure for the RH and LH sides.
·The procedure listed below is for the LH side.
PROCEDURE

 1.DISCONNECT CABLE FROM NEGATIVE BATTERY TERMINAL
- NOTICE:
-
When disconnecting the cable, some systems need to be initialized after the cable is reconnected (See page General>INTRODUCTION>REPAIR INSTRUCTION>INITIALIZATION).
69278C
2.REMOVE REAR DOOR INSIDE HANDLE BEZEL LH
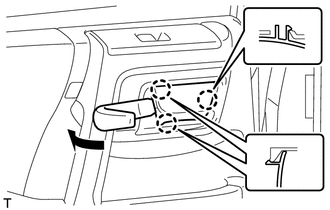
Using moulding remover A, detach the 3 claws and remove the rear door inside handle bezel as shown in the illustration.
67604
3.REMOVE REAR DOOR TRIM BOARD SUB-ASSEMBLY LH
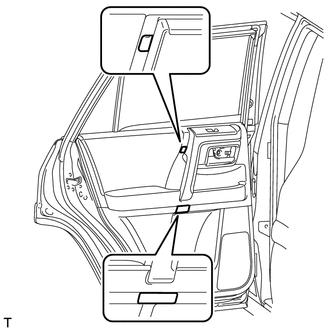
Detach the 4 claws and 2 door armrest caps.
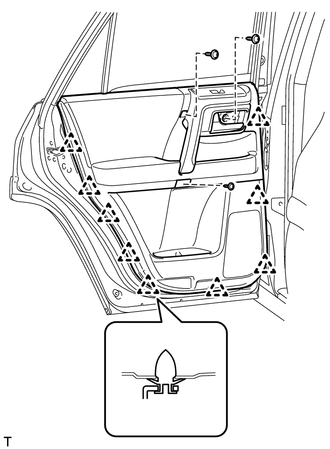
Remove the 3 screws.
Remove the 9 clips.
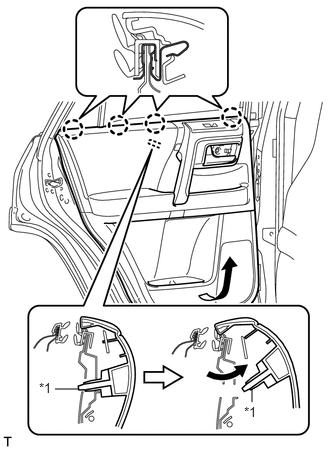
Pull out the rear door trim board sub-assembly in the direction indicated by the arrow as shown in the illustration.
| *1 | Reference Boss |
Raise the rear door trim board sub-assembly to detach the 4 claws and remove the rear door trim board sub-assembly together with the rear door inner glass weatherstrip.
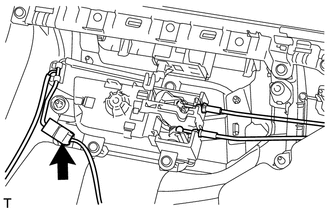
Disconnect the connector.
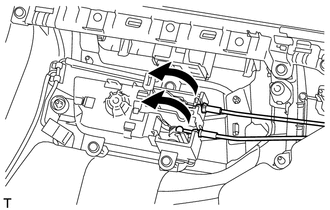
Disconnect the rear door lock remote control cable assembly and rear door inside locking cable assembly as shown in the illustration.
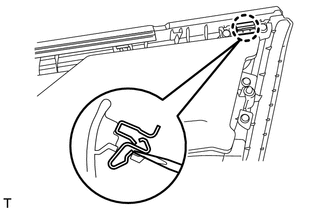
Using a screwdriver, detach the claw and remove the clamp.
68174A
4.REMOVE REAR DOOR INNER GLASS WEATHERSTRIP LH
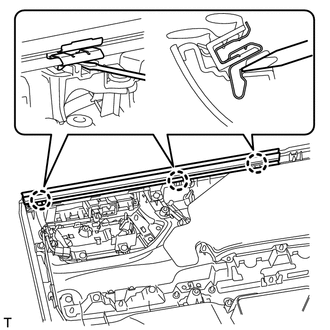
Using a screwdriver, detach the 3 claws and remove the rear door inner glass weatherstrip from the rear door trim board sub-assembly as shown in the illustration.
84810D
5.REMOVE REAR POWER WINDOW REGULATOR SWITCH ASSEMBLY
81230
6.REMOVE COURTESY LIGHT ASSEMBLY
86160B
7.REMOVE REAR SPEAKER ASSEMBLY
67842E
8.REMOVE REAR DOOR SERVICE HOLE COVER LH
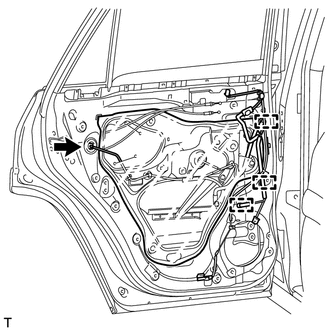
Disconnect the connector
Detach the 3 clamps, move the wire harness out of the way and remove the service hole cover.
- HINT:
-
Remove any remaining butyl tape from the door.
68152C
9.REMOVE REAR DOOR GLASS RUN LH
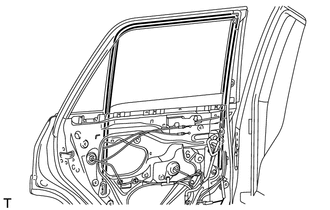
Remove the rear door glass run.
67674A
10.REMOVE REAR DOOR FRAME GARNISH LH
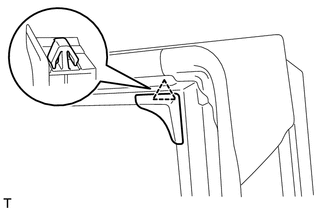
Detach the clip and remove the rear door frame garnish.
67408F
11.REMOVE REAR DOOR WINDOW REAR LOWER FRAME SUB-ASSEMBLY LH
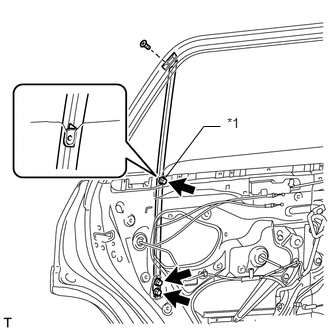
Loosen the temporary bolt.
| *1 | Temporary Bolt |
Remove the 2 bolts and screw.
Remove the rear door window rear lower frame sub-assembly.
- NOTICE:
-
When the rear door window rear lower frame sub-assembly is removed, do not allow the rear door quarter window glass to fall.
Remove the temporary bolt from the rear door window rear lower frame sub-assembly.
68124C
12.REMOVE REAR DOOR QUARTER WINDOW GLASS LH
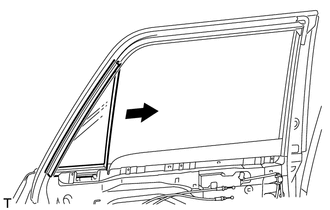
Remove the rear door quarter window glass and rear door quarter window weatherstrip as a unit as shown in the illustration.
68189
13.REMOVE REAR DOOR QUARTER WINDOW WEATHERSTRIP LH
Remove the rear door quarter window weatherstrip from the rear door quarter window glass.
68104
14.REMOVE REAR DOOR GLASS SUB-ASSEMBLY LH
Connect the cable to the negative (-) battery terminal and the rear power window regulator motor connector.
Connect the power window regulator switch assembly and move the arm of the regulator so that the roller on the arm can be seen through the service hole.
Disconnect the power window regulator switch assembly and rear power window regulator motor connector.
Disconnect the cable from the negative (-) battery terminal.
- NOTICE:
-
When disconnecting the cable, some systems need to be initialized after the cable is reconnected (See page General>INTRODUCTION>REPAIR INSTRUCTION>INITIALIZATION).
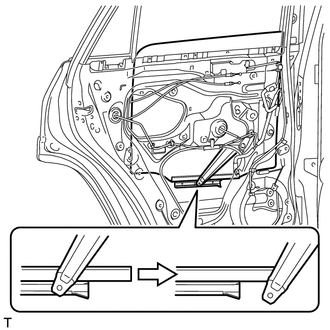
Remove the rear door glass sub-assembly from the rear door window regulator sub-assembly as shown in the illustration.
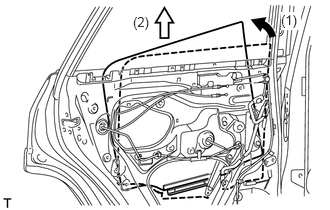
Remove the rear door glass sub-assembly as indicated by the arrows in the order shown in the illustration.
- NOTICE:
-
Do not damage the door glass.
69906B
15.REMOVE REAR DOOR GLASS CHANNEL SUB-ASSEMBLY LH
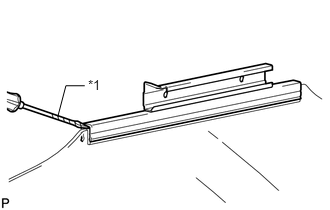
Using a screwdriver, remove the rear door glass channel sub-assembly.
| *1 | Protective Tape |
- HINT:
-
Tape the screwdriver tip before use.
69975A
16.REMOVE REAR DOOR GLASS CHANNEL FILLER
Remove the rear door glass channel filler.
69804
17.REMOVE REAR DOOR WINDOW REGULATOR SUB-ASSEMBLY LH
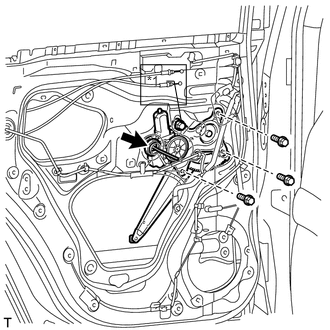
Disconnect the connector.
Loosen the temporary bolt.
| *1 | Temporary Bolt |
- NOTICE:
-
Do not remove the temporary bolt. If the temporary bolt is removed, the rear door window regulator may fall and cause damage.
Remove the 3 bolts.
Remove the rear door window regulator sub-assembly.
Remove the temporary bolt from the rear door window regulator sub-assembly.
85720G
18.REMOVE REAR POWER WINDOW REGULATOR MOTOR ASSEMBLY LH
69060A
19.REMOVE REAR DOOR LOCK ASSEMBLY LH
69740D
20.REMOVE REAR DOOR LOCK REMOTE CONTROL CABLE ASSEMBLY LH
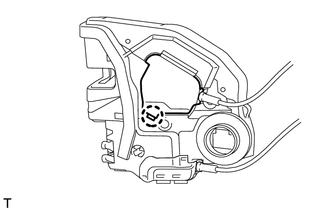
Using a screwdriver, detach the claw.
- HINT:
-
Tape the screwdriver tip before use.
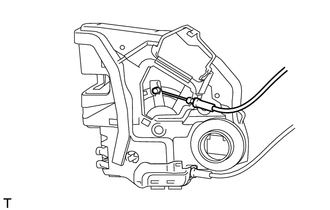
Remove the rear door lock remote control cable assembly.
69780B
21.REMOVE REAR DOOR INSIDE LOCKING CABLE ASSEMBLY LH
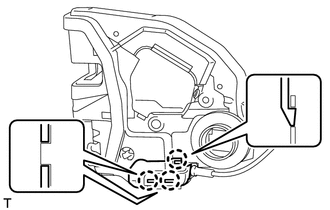
Using a screwdriver, detach the 3 claws.
- HINT:
-
Tape the screwdriver tip before use.
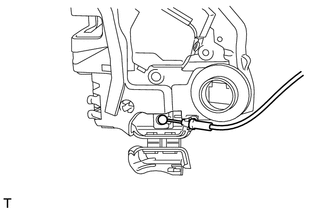
Remove the rear door inside locking cable assembly.
69227L
22.REMOVE REAR DOOR OUTSIDE HANDLE COVER LH
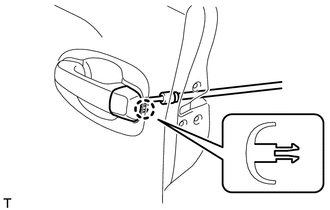
Using a T30 "TORX" socket wrench, loosen the screw.
- HINT:
-
The screw cannot be removed because it is integrated into the rear door outside handle frame sub-assembly.
Detach the claw and remove the rear door outside handle cover.
69240
23.REMOVE REAR DOOR OUTSIDE HANDLE ASSEMBLY LH
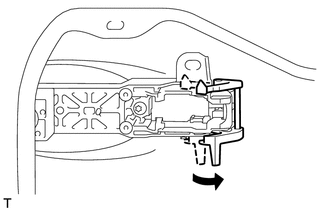
Move the lever in the direction indicated by the arrow in the illustration.
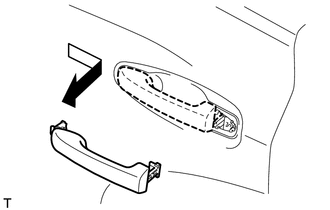
Remove the rear door outside handle assembly as shown in the illustration.
69241G
24.REMOVE REAR DOOR FRONT OUTSIDE HANDLE PAD
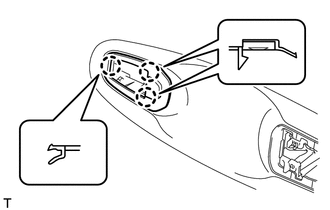
Detach the 3 claws and remove the rear door outside handle pad.
69242G
25.REMOVE REAR DOOR REAR OUTSIDE HANDLE PAD
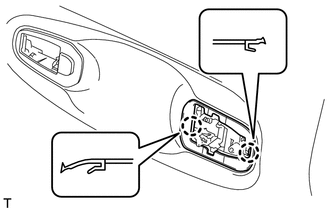
Detach the 2 claws and remove the rear door rear outside handle pad.
69204A
26.REMOVE REAR DOOR OUTSIDE HANDLE FRAME SUB-ASSEMBLY LH
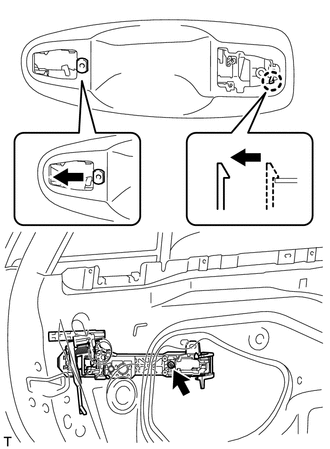
Using a T30 "TORX" socket wrench, loosen the screw.
Slide the rear door outside handle frame sub-assembly to detach the door handle nut and claw of the rear door outside handle frame sub-assembly. Then remove the rear door outside handle frame.
68640A
27.REMOVE REAR DOOR CHECK ASSEMBLY LH
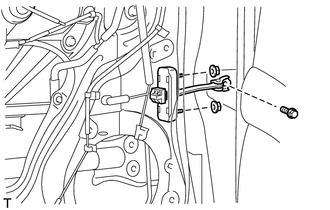
Remove the bolt, 2 nuts and rear door check assembly.
67872
28.REMOVE REAR DOOR WEATHERSTRIP LH
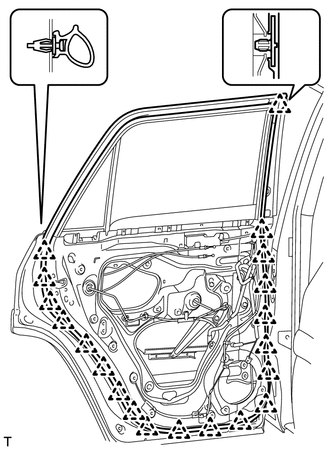
Using a clip remover, detach the 20 clips and remove the front door weatherstrip.
75722A
29.REMOVE REAR DOOR BELT MOULDING LH
75762A
30.REMOVE REAR DOOR FRONT WINDOW FRAME MOULDING LH
75924C
31.REMOVE NO. 2 BLACK OUT TAPE LH
75978H
32.REMOVE REAR DOOR LOWER OUTSIDE STRIPE LH
75988E
33.REMOVE REAR DOOR OUTSIDE STRIPE LH
67003C
34.REMOVE REAR DOOR PANEL CUSHION
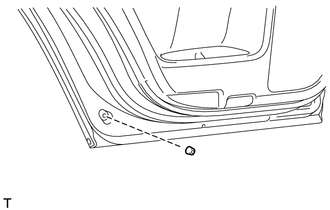
Using a clip remover, detach the clip and remove the door panel cushion.
75742
35.REMOVE REAR DOOR OUTSIDE MOULDING LH
75394A
36.REMOVE NO. 3 OUTSIDE MOULDING RETAINER