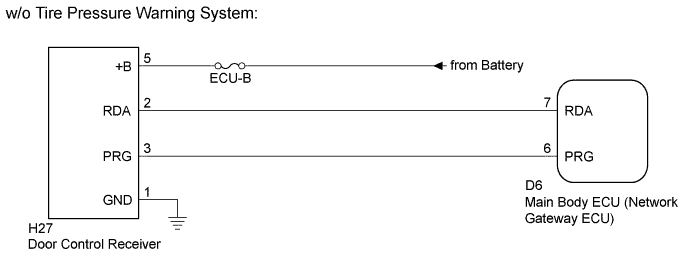
WIRELESS DOOR LOCK CONTROL SYSTEM (w/o Entry and Start System) > Only Wireless Control Function is Inoperative |
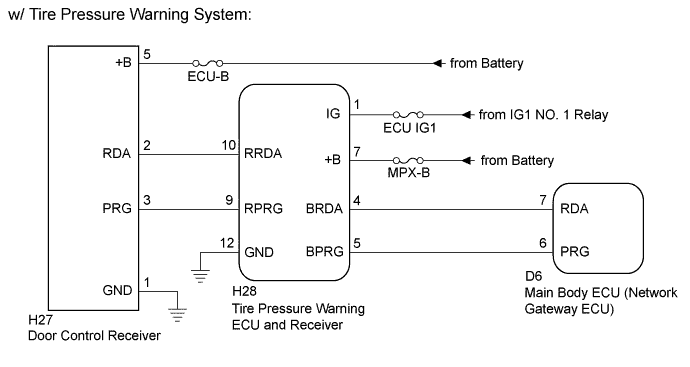
| 1.CONFIRM VEHICLE SPECIFICATION |
Confirm the vehicle specification.
| Result | Proceed to |
| w/ Tire Pressure Warning System | A |
| w/o Tire Pressure Warning System | B |
|
| ||||
| A | |
 |
| 2.CHECK FOR DTC (TIRE PRESSURE WARNING SYSTEM) |
Clear the DTCs (Click here).
Check for DTCs (Click here).
|
| ||||
| OK | |
|
| 3.CHECK POWER DOOR LOCK OPERATION |
When the door control switch on the power window regulator master switch assembly is operated, check that the locked doors unlock (Click here).
|
| ||||
| OK | |
|
| 4.CHECK KEY REMINDER WARNING SYSTEM |
Check that the key reminder warning buzzer operates normally (Click here).
|
| ||||
| OK | |
|
| 5.SWITCH TO SELF DIAGNOSTIC MODE |
Switch to self-diagnostic mode by operating the ignition key cylinder.
Insert the key into the ignition key cylinder and remove it.
Within 5 seconds after the key is removed, insert it into the ignition key cylinder and then turn the ignition switch to ON then off once. (End in off)
Within 30 seconds after turning the ignition switch off, perform the following 9 times: Turn the ignition switch to ON then off. (End in off)
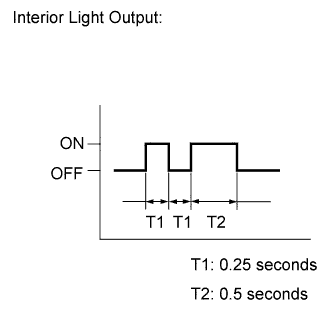 |
Check that the system has switched to self-diagnostic mode by checking the interior light output pattern.
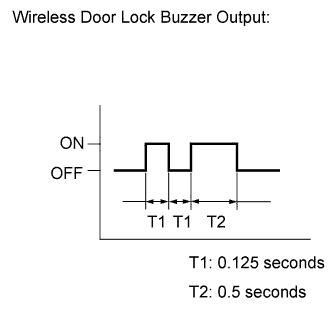 |
Check that the system has switched to self-diagnostic mode by checking the wireless door lock buzzer output pattern (w/ Wireless Door Lock Buzzer Control Function).
| NEXT | |
|
| 6.CHECK BY SELF DIAGNOSTIC MODE |
Check the diagnostic outputs when the door control transmitter module set sub-assembly switch is held down. The diagnostic outputs can be checked by the interior light and wireless door lock buzzer patterns.
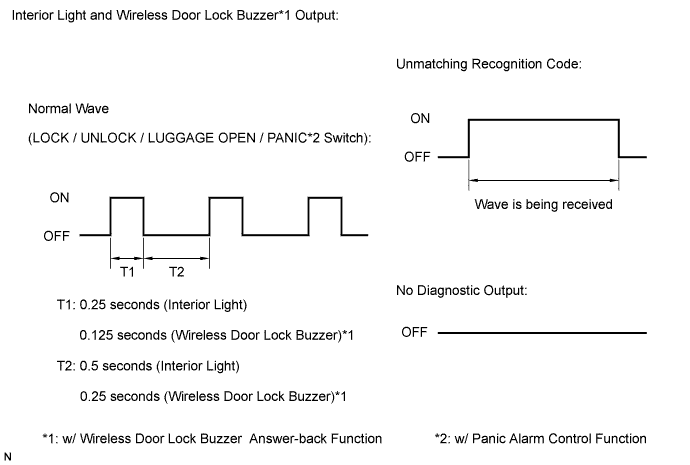
| Result | Proceed to |
| Normal wave (light flash pattern and buzzer pattern) is output. | A |
| Unmatching recognition code is output. | B |
| No diagnosis outputs | C |
|
| ||||
|
| ||||
| A | ||
 | ||
| ||
| 7.REGISTER RECOGNITION CODE |
Check that the system can be switched to rewrite mode or add mode, and that a recognition code can be registered.
|
| ||||
| OK | ||
| ||
| ||
| 8.CHECK RESPONSE OF DOOR CONTROL RECEIVER (RESPONSE) |
Prepare the door control transmitter from another vehicle.
Press and hold down the door control transmitter switch.
Check that an unmatching recognition code is output.
|
| ||||
| OK | |
|
| 9.INSPECT TRANSMITTER BATTERY (VOLTAGE) |
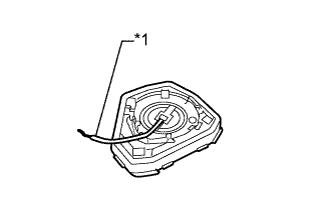 |
Remove the battery from the door control transmitter module that does not operate. Attach a lead wire (0.6 mm (0.0236 in.)) or less in diameter including wire sheath) with tape or equivalent to the negative terminal (Click here).
| *1 | Lead Wire |
Carefully pull the lead wire out from the position shown in the illustration and install the previously removed transmitter battery.
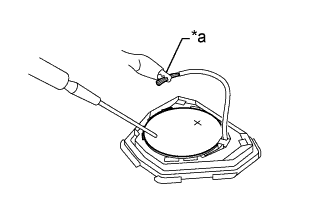 |
Measure the voltage according to the value(s) in the table below.
| Tester Connection | Switch Condition | Specified Condition |
| Battery positive (+) - Battery negative (-) | Ignition switch off, all doors closed and lock or unlock switch pushed | 2.5 to 3.2 V |
| *a | GND |
|
| ||||
| OK | ||
| ||
| ||
| 10.REPLACE TRANSMITTER BATTERY |
Replace the transmitter battery (Click here).
| NEXT | |
|
| 11.CHECK BY SELF DIAGNOSTIC MODE |
Inspect the diagnostic outputs when the door control transmitter module set sub-assembly switch is held down. The diagnostic outputs can be checked by the flash patterns of the interior lights and the buzzer patterns of the wireless door lock buzzer.
| Result | Proceed to |
| Normal wave (light flash pattern and buzzer pattern) is output. | A |
| Unmatching recognition code is output | B |
| No diagnosis outputs |
|
| ||||
| A | ||
| ||
| ||
| 12.CHECK WAVE ENVIRONMENT |
Bring the transmitter near the door control receiver, and perform a wireless operation check.
|
| ||||
| OK | |
|
| 13.INSPECT DOOR CONTROL RECEIVER (POWER SOURCE, GROUND) |
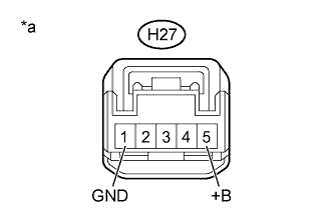 |
Disconnect the H27 door control receiver connector.
Measure the resistance and voltage according to the value(s) in the table below.
| Tester Connection | Condition | Specified Condition |
| H27-5 (+B) - Body ground | Always | 11 to 14 V |
| Tester Connection | Condition | Specified Condition |
| H27-1 (GND) - Body ground | Always | Below 1 Ω |
| *a | Front view of wire harness connector (to Door Control Receiver) |
|
| ||||
| OK | |
|
| 14.INSPECT DOOR CONTROL RECEIVER (OUTPUT) |
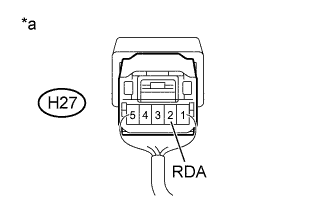 |
Reconnect the H27 door control receiver connector.
Measure the voltage according to the value(s) in the table below.
| Tester Connection | Switch Condition | Specified Condition |
| H27-2 (RDA) - Body ground | Ignition switch off, all doors closed and door control transmitter switch off | 11 to 14 V |
| Ignition switch off, all doors closed and door control transmitter switch on | pulse generation |
| *a | Component with harness connected (Door Control Receiver) |
| Result | Proceed to |
| OK (w/o Tire Pressure Warning System) | A |
| OK (w/ Tire Pressure Warning System) | B |
| NG | C |
|
| ||||
|
| ||||
| A | |
|
| 15.CHECK HARNESS AND CONNECTOR (MAIN BODY ECU (NETWORK GATEWAY ECU) - DOOR CONTROL RECEIVER) |
Disconnect the D6 main body ECU (network gateway ECU) connector.
Disconnect the H27 door control receiver connector.
Measure the resistance according to the value(s) in the table below.
| Tester Connection | Condition | Specified Condition |
| D6-7 (RDA) - H27-2 (RDA) | Always | Below 1 Ω |
| D6-6 (PRG) - H27-3 (PRG) | Always | Below 1 Ω |
| Tester Connection | Condition | Specified Condition |
| D6-7 (RDA) or H27-2 (RDA) - Body ground | Always | 10 kΩ or higher |
| D6-6 (PRG) or H27-3 (PRG) - Body ground | Always | 10 kΩ or higher |
|
| ||||
| OK | |
|
| 16.REPLACE DOOR CONTROL RECEIVER |
Replace the door control receiver with a new one (Click here).
| NEXT | |
|
| 17.REGISTER RECOGNITION CODE |
Perform the Registration procedures (Click here).
| NEXT | |
|
| 18.CHECK DOOR CONTROL RECEIVER (OPERATION) |
Check that the doors can be locked and unlocked by using the transmitter LOCK and UNLOCK switches.
|
| ||||
| OK | ||
| ||
| ||
| 19.CHECK HARNESS AND CONNECTOR (MAIN BODY ECU (NETWORK GATEWAY ECU) - TIRE PRESSURE WARNING ECU AND RECEIVER) |
Disconnect the D6 main body ECU (network gateway ECU) connector.
Disconnect the H28 tire pressure warning ECU and receiver connector.
Measure the resistance according to the value(s) in the table below.
| Tester Connection | Condition | Specified Condition |
| D6-7 (RDA) - H28-4 (BRDA) | Always | Below 1 Ω |
| D6-6 (PRG) - H28-5 (BPRG) | Always | Below 1 Ω |
| Tester Connection | Condition | Specified Condition |
| D6-7 (RDA) or H28-4 (BRDA) - Body ground | Always | 10 kΩ or higher |
| D6-6 (PRG) or H28-5 (BPRG) - Body ground | Always | 10 kΩ or higher |
|
| ||||
| OK | |
|
| 20.CHECK HARNESS AND CONNECTOR (TIRE PRESSURE WARNING ECU AND RECEIVER - DOOR CONTROL RECEIVER) |
Disconnect the H28 tire pressure warning ECU and receiver connector.
Disconnect the H27 door control receiver connector.
Measure the resistance according to the value(s) in the table below.
| Tester Connection | Condition | Specified Condition |
| H28-10 (RRDA) - H27-2 (RDA) | Always | Below 1 Ω |
| H28-9 (RPRG) - H27-3 (PRG) | Always | Below 1 Ω |
| Tester Connection | Condition | Specified Condition |
| H28-10 (RRDA) or H27-2 (RDA) - Body ground | Always | 10 kΩ or higher |
| H28-9 (RPRG) or H27-3 (PRG) - Body ground | Always | 10 kΩ or higher |
|
| ||||
| OK | |
|
| 21.INSPECT TIRE PRESSURE WARNING ECU AND RECEIVER (POWER SOURCE, GROUND) |
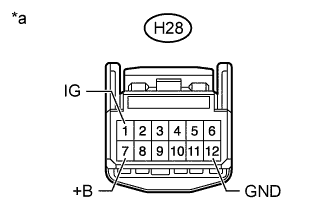 |
Disconnect the H28 tire pressure warning ECU and receiver connector.
Measure the resistance and voltage according to the value(s) in the table below.
| Tester Connection | Condition | Specified Condition |
| H28-1 (IG) - Body ground | Ignition switch ON | 11 to 14 V |
| H28-7 (+B) - Body ground | Always | 11 to 14 V |
| Tester Connection | Condition | Specified Condition |
| H28-12 (GND) - Body ground | Always | Below 1 Ω |
| *a | Front view of wire harness connector (to Tire Pressure Warning ECU and Receiver) |
|
| ||||
| OK | |
|
| 22.REPLACE DOOR CONTROL RECEIVER |
Replace the door control receiver with a new one (Click here).
| NEXT | |
|
| 23.REGISTER RECOGNITION CODE |
Perform the Registration procedures (Click here).
| NEXT | |
|
| 24.CHECK DOOR CONTROL RECEIVER (OPERATION) |
Check that the doors can be locked and unlocked by using the transmitter LOCK and UNLOCK switches.
|
| ||||
| OK | ||
| ||
| ||
| 25.REPLACE TIRE PRESSURE WARNING ECU AND RECEIVER |
Replace the tire pressure warning ECU and receiver with a new one (Click here).
| NEXT | |
|
| 26.CHECK DOOR CONTROL RECEIVER (OPERATION) |
Check that the doors can be locked and unlocked by using the transmitter LOCK and UNLOCK switches.
|
| ||||
| OK | ||
| ||
| ||

