Home › Engine / Hybrid System › FA20 ENGINE CONTROL › SFI SYSTEM

DTC    P2401    Evaporative Emission System Leak Detection Pump Control Circuit Low

DTC    P2402    Evaporative Emission Leak Detection Pump Stuck ON

DTC    P2419    Evaporative Emission System Switching Valve Control Circuit Low

DTC    P2420    Evaporative Emission Pressure Switching Valve Stuck OFF

for Preparation Click here


DTC SUMMARY


DTC No.
Monitoring Item
Malfunction Detection Condition
Trouble Area
Detection Timing
Detection Logic
P2401
Leak detection pump stuck OFF
P2401, P2402, P2419 and P2420 stored when one of following conditions met during EVAP monitor:
  1. Leak detection pump OFF malfunction
  2. Leak detection pump ON malfunction
  3. Vent valve ON (closed) malfunction
  4. Vent valve OFF (opened) malfunction
  1. Canister pump module
  2. Connector/wire harness (Canister pump module - ECM)
  3. ECM
Ignition switch ON or while EVAP monitor
1 trip
P2402
Leak detection pump stuck ON
P2419
Vent valve circuit low
P2420
Vent valve circuit high

DESCRIPTION

The description can be found in EVAP (Evaporative Emission) System (Click here).

MONITOR DESCRIPTION

While the ECM monitors the EVAP system, it also monitors the status of the leak detection pump and the vent valve within the canister pump module. If the ECM detects an abnormality in the leak detection pump or vent valve operational statuses, the ECM stores the DTC, and illuminates the MIL.

CONFIRMATION DRIVING PATTERN

NOTICE:
  1. The Evaporative System Check (Automatic Mode) consists of 5 steps performed automatically by the GTS. It takes a maximum of approximately 24 minutes.
  2. Do not perform the Evaporative System Check when the fuel tank is more than 90% full because the cut-off valve may be closed, making the fuel tank leak check unavailable.
  3. Do not run the engine during this operation.
  4. When the temperature of the fuel is 35°C (95°F) or more, a large amount of vapor forms and any check results become inaccurate. When performing the Evaporative System Check, keep the fuel temperature below 35°C (95°F) and the coolant temperature below 45°C (113°F).

  1. Connect the GTS to the DLC3.
  2. Turn the ignition switch to ON and turn the GTS on.
  3. Clear DTCs (even if no DTCs are stored, perform the clear DTC procedure) (Click here).
  4. Turn the ignition switch off and wait for at least 30 seconds.
  5. Turn the ignition switch to ON and turn the GTS on.
  6. Enter the following menus: Powertrain / Engine / Utility / Evaporative System Check / Automatic Mode.
  7. After the "Evaporative System Check" is completed, check for All Readiness by entering the following menus: Powertrain / Engine / Utility / All readiness.
  8. Input the DTC: P2401, P2402, P2419 or P2420.
  9. Check the DTC judgment result.

    GTS Display
    Description
    NORMAL
    1. DTC judgment completed
    2. System normal
    ABNORMAL
    1. DTC judgment completed
    2. System abnormal
    INCOMPLETE
    1. DTC judgment not completed
    2. Perform driving pattern after confirming DTC enabling conditions
    N/A
    1. Unable to perform DTC judgment
    2. Number of DTCs which do not fulfill DTC preconditions has reached ECU memory limit

    HINT:
    1. If the judgment result shows NORMAL, the system is normal.
    2. If the judgment result shows ABNORMAL, the system has a malfunction.

  10. If the judgment result is INCOMPLETE or N/A and no pending DTC is output, perform a universal trip and check for permanent DTCs (Click here).

    HINT:
    1. If a permanent DTC is output, the system is malfunctioning.
    2. If no permanent DTC is output, the system is normal.


WIRING DIAGRAM

Refer to DTC P0451 .

INSPECTION PROCEDURE

NOTICE:
  1. Do not disassemble the canister pump module.
  2. Inspect the fuses for circuits related to this system before performing the following inspection procedure.

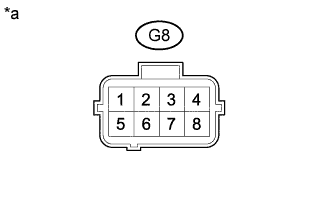
1.INSPECT CANISTER PUMP MODULE (POWER SOURCE)
A281930E01
  1. Turn the ignition switch off.

  1. Disconnect the canister pump module connector.

  1. Measure the resistance according to the value(s) in the table below.

Standard Voltage:
Tester Connection
Switch Condition
Specified Condition
G8-3 - Body ground
Ignition switch ON
11 to 14 V
G8-5 - Body ground
Ignition switch ON
11 to 14 V

Text in Illustration 
*a
Component without harness connected
(Canister Pump Module)


NG
Go to step 4
OK


2.CHECK HARNESS AND CONNECTOR (CANISTER PUMP MODULE - ECM)
  1. Turn the ignition switch off.

  1. Disconnect the canister pump module connector.

  1. Disconnect the ECM connector.

  1. Measure the resistance according to the value(s) in the table below.


Standard Resistance (Check for open):

Tester Connection
Condition
Specified Condition
A35-8 (MPMP) - G8-4
Always
Below 1 Ω
A35-1 (VPMP) - G8-1
Always
Below 1 Ω


Standard Resistance (Check for short):

Tester Connection
Condition
Specified Condition
A35-8 (MPMP) or G8-4 - Body ground
Always
10 kΩ or higher
A35-1 (VPMP) or G8-1 - Body ground
Always
10 kΩ or higher


NG
REPAIR OR REPLACE HARNESS OR CONNECTOR
OK


3.INSPECT CANISTER PUMP MODULE
  1. Inspect the canister pump module (Click here).


NG
REPLACE CANISTER PUMP MODULE (Click here)
OK

CHECK INTERMITTENT PROBLEMS (Click here)  

4.INSPECT RELAY (EFI MAIN1)
  1. Inspect the EFI MAIN1 relay .


NG
REPLACE RELAY (EFI MAIN1)
OK


5.CHECK HARNESS AND CONNECTOR (CANISTER PUMP MODULE - EFI MAIN1 RELAY)
  1. Turn the ignition switch off.

  1. Remove EFI MAIN1 relay from the engine room relay block assembly.

  1. Measure the resistance according to the value(s) in the table below.


Standard Resistance (Check for open):

Tester Connection
Condition
Specified Condition
G8-3 - EFI MAIN1 relay terminal 3
Always
Below 1 Ω
G8-5 - EFI MAIN1 relay terminal 3
Always
Below 1 Ω


Standard Resistance (Check for short):

Tester Connection
Condition
Specified Condition
G8-3 or EFI MAIN1 relay terminal 3 - Body ground
Always
10 kΩ or higher
G8-5 or EFI MAIN1 relay terminal 3 - Body ground
Always
10 kΩ or higher


NG
REPAIR OR REPLACE HARNESS OR CONNECTOR
OK

GO TO ECM POWER SOURCE CIRCUIT (Click here)