BRAKE SYSTEM (OTHER) BRAKE BOOSTER(for LHD) INSTALLATION
PROCEDURE

 1.INSTALL BRAKE MASTER CYLINDER PUSH ROD CLEVIS
Temporarily install the lock nut and brake master cylinder push rod clevis to the brake booster assembly.
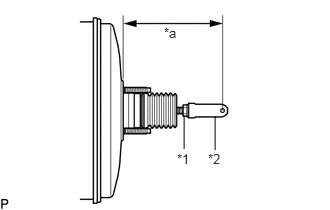
Set the push rod length as shown in the illustration.
| *1 | Lock Nut |
| *2 | Brake Master Cylinder Push Rod Clevis |
| *a | Push Rod Length |
- Push rod length:
155.2 mm (6.11 in.)
Tighten the lock nut.
- Torque:
- 19 N*m (194 kgf*cm, 14 ft.*lbf)
44610
2.INSTALL BRAKE BOOSTER ASSEMBLY
Install the 4 nuts to the brake booster assembly.
- Torque:
- 18 N*m (184 kgf*cm, 13 ft.*lbf)
47312
3.INSTALL FRONT NO. 2 BRAKE TUBE
Connect 2 clips and install the front No. 2 brake tube.
Using a union nut wrench 12 mm, connect the front No. 2 brake tube from the brake actuator.
- Torque:
- 19 N*m (194 kgf*cm, 14 ft.*lbf)
- NOTICE:
- ·
Do not bend or damage the brake lines.
·Do not allow brake lines to twist and interfere with other parts or vehicle body during tightening.
·Do not allow any foreign matter such as dirt or dust to enter the brake lines.
·Use the formula to calculate special torque values for situations where the union nut wrench is combined with a torque wrench (See page General>INTRODUCTION>REPAIR INSTRUCTION>PRECAUTION).
47311
4.INSTALL FRONT NO. 1 BRAKE TUBE
Connect 2 clips and install the front No. 1 brake tube.
Using a union nut wrench 12 mm, connect the front No. 1 brake tube from the brake actuator.
- NOTICE:
- ·
Do not bend or damage the brake lines.
·Do not allow brake lines to twist and interfere with other parts or vehicle body during tightening.
·Do not allow any foreign matter such as dirt or dust to enter the brake lines.
·Use the formula to calculate special torque values for situations where the union nut wrench is combined with a torque wrench (See page General>INTRODUCTION>REPAIR INSTRUCTION>PRECAUTION).
44771
5.CONNECT VACUUM TUBE CONNECTOR HOSE
47264A
6.INSTALL PUSH ROD PIN
47201
7.INSTALL BRAKE MASTER CYLINDER SUB-ASSEMBLY
8.CHECK AND ADJUST BRAKE PEDAL (for Automatic Transmission)
9.CHECK AND ADJUST BRAKE PEDAL (for Manual Transmission)
89071B
10.INSTALL TCM (for Automatic Transmission)
11.INSTALL LOWER NO. 1 INSTRUMENT FANEL AIRBAG ASSEMBLY (w/ Knee Airbag)
55606
12.INSTALL NO. 1 INSTRUMENT PANEL UNDER COVER SUB-ASSEMBLY (w/o Knee Airbag)
55318C
13.INSTALL INSTRUMENT SIDE PANEL LH (w/o Knee Airbag)
- HINT:
-
Use the same procedure for the LH side as for the RH side (See page Vehicle Interior>INTERIOR PANELS / TRIM>LOWER INSTRUMENT PANEL>INSTALLATION).