AUDIO / VIDEO AUDIO AND VISUAL SYSTEM Illumination Circuit
DESCRIPTION
Power is supplied to the radio receiver assembly and satellite switch assembly illumination when the light control switch is in the tail or head position.
*: for TFT Meter Type
WIRING DIAGRAM
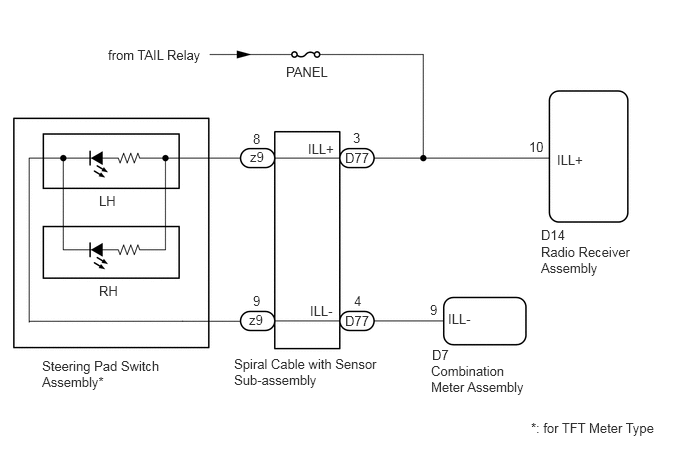
CAUTION / NOTICE / HINT
- NOTICE:
-
Inspect the fuses for circuits related to this system before performing the following procedure.
PROCEDURE
Check if the illumination for the radio receiver assembly, steering pad switch assembly or others (hazard switch, heater control switch, etc.) comes on when the light control switch is turned to the head or tail position.
*: for TFT Meter Type
- Result:
Result Proceed to Illumination comes on for all components except radio receiver assembly. A Illumination comes on for all components except steering pad switch assembly. B No illumination comes on (radio and display receiver assembly, hazard switch, heater control switch, etc.). C
A
B
C
Disconnect the D14 radio and display receiver assembly connector.
Measure the resistance according to the value(s) in the table below.
- Standard Voltage:
Tester Connection Condition Specified Condition D14-10 (ILL+) - Body ground Light control switch in tail or head position 11 to 14 V
OK
NG
Disconnect the D77 spiral cable with sensor sub-assembly connector.
Measure the voltage according to the value(s) in the table below.
- Standard Voltage:
Tester Connection Condition Specified Condition D77-3 (ILL+) - Body ground Light control switch in tail or head position 11 to 14 V
OK
NG
Remove the spiral cable with sensor sub-assembly. (See page Vehicle Interior>SUPPLEMENTAL RESTRAINT SYSTEMS>SPIRAL CABLE>REMOVAL )
Inspect the spiral cable with sensor sub-assembly. (See page Vehicle Interior>SUPPLEMENTAL RESTRAINT SYSTEMS>SPIRAL CABLE>INSPECTION)
OK
NG
Remove the steering pad switch assembly. (See page Steering>STEERING COLUMN>STEERING PAD SWITCH>REMOVAL)
Inspect the steering pad switch assembly. (See page Steering>STEERING COLUMN>STEERING PAD SWITCH>INSPECTION)
OK
NG
Disconnect the D78 spiral cable with sensor sub-assembly connector.
Disconnect the D7 combination meter assembly connector.
Measure the voltage according to the value(s) in the table below.
- Standard Resistance:
Tester Connection Condition Specified Condition D77-4 (ILL-) - D7-9 (ILL-) Always Bellow 1 Ω
OK
NG
(See pageVehicle Interior>METER / GAUGE / DISPLAY>METER / GAUGE SYSTEM>HOW TO PROCEED WITH TROUBLESHOOTING)