DOOR LOCK POWER DOOR LOCK CONTROL SYSTEM All Doors LOCK/UNLOCK Functions do not Operate Via Door Control Switch or Door Key Cylinder
DESCRIPTION
The main body ECU (network gateway ECU) receives switch signals from the door control switch, and driver side door key cylinder switch, activates the door lock motor on each door accordingly.
WIRING DIAGRAM
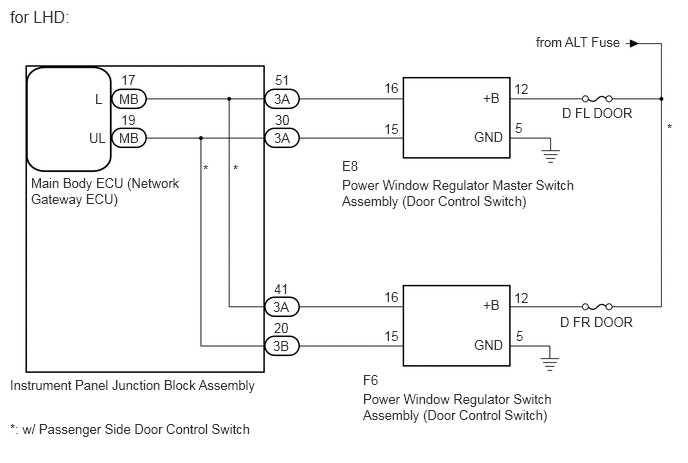
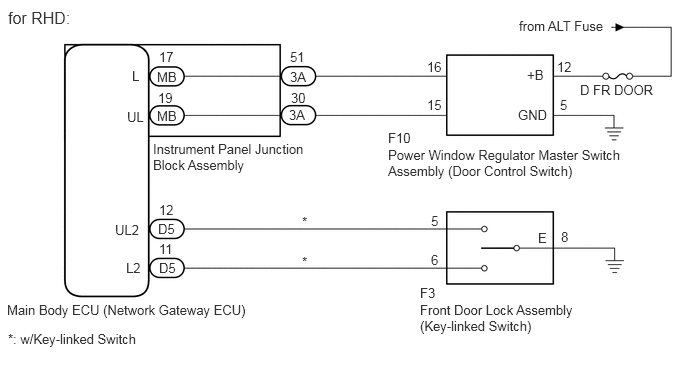
CAUTION / NOTICE / HINT
- NOTICE:
-
Inspect the fuses for circuits related to this system before performing the following inspection procedure.
PROCEDURE
Proceed to the next step according to the symptom listed in the table below.
| Result | Proceed to |
|---|---|
| Doors cannot be locked through power window regulator master switch assembly | A |
| Doors cannot be locked through power window regulator switch assembly*1 | B |
| Doors cannot be locked through driver side door key cylinder*2 | C |
*1: w/ Passenger Side Door Control Switch
*2: w/ Key-linked Switch
A
B
C
Connect the GTS to the DLC3.
Turn the ignition switch to ON.
Turn the GTS on.
Enter the following menus: Body Electrical / Main Body / Data List.
According to the display on the GTS, read the Data List.
| Tester Display | Measurement Item/Range | Normal Condition | Diagnostic Note |
|---|---|---|---|
| Door Lock SW-Lock | Door control switch (power window regulator master switch assembly) lock signal / OFF or ON | OFF: Lock side of door control switch (power window regulator master switch assembly) not pushed
ON: Lock side of door control switch (power window regulator master switch assembly) pushed |
- |
| Door Lock SW-Unlock | Door control switch (power window regulator master switch assembly) unlock signal / OFF or ON | OFF: Unlock side of door control switch (power window regulator master switch assembly) not pushed
ON: Unlock side of door control switch (power window regulator master switch assembly) pushed |
- |
- OK:
When the switch is operating, the GTS should display as shown in the table.
OK
NG
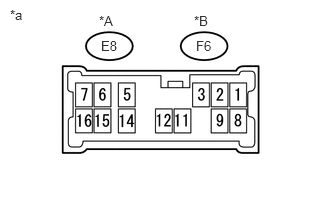
Remove the power window regulator master switch assembly (See page Vehicle Exterior>WINDOW / GLASS>POWER WINDOW MASTER SWITCH>REMOVAL).
Connect the E8*1 or F6*2 power window regulator master switch assembly connector.
*1: for LHD
*2: for RHD
Connect the cable to the negative(-) battery terminal.
Measure the voltage according to the value(s) in the table below.
- Standard Voltage (for LHD):
Tester Connection Switch Condition Specified Condition E8-16 - E8-5 (GND) Lock switch pushed 9.15 V or higher off Below 1 V E8-15 - E8-5 (GND) Unlock switch pushed 9.15 V or higher off Below 1 V
- Standard Voltage (for RHD):
Tester Connection Switch Condition Specified Condition F6-16 - E8-5 (GND) Lock switch pushed 9.15 V or higher off Below 1 V F6-15 - E8-5 (GND) Unlock switch pushed 9.15 V or higher off Below 1 V
| *A | for LHD |
| *B | for RHD |
| *a | Component with harness connected
(Power Window Regulator Master Switch Assembly (Door Control Switch)) |
OK
NG
for LHD:
Disconnect the 3A instrument panel junction block assembly connector.
Disconnect the E8 power window regulator master switch assembly (door control switch) connector.
Measure the resistance according to the value(s) in the table below.
- Standard Resistance:
Tester Connection Condition Specified Condition 3A-51 - E8-16 Always Below 1 Ω 3A-30 - E8-15 Always Below 1 Ω E8-5 (GND) - Body ground Always Below 1 Ω 3A-51 or E8-16 - Body ground Always 10 kΩ or higher 3A-30 or E8-15 - Body ground Always 10 kΩ or higher
for RHD:
Disconnect the 3A instrument panel junction block assembly connector.
Disconnect the F6 power window regulator master switch assembly (door control switch) connector.
Measure the resistance according to the value(s) in the table below.
- Standard Resistance:
Tester Connection Condition Specified Condition 3A-51 - F6-16 Always Below 1 Ω 3A-30 - F6-15 Always Below 1 Ω F6-5 (GND) - Body ground Always Below 1 Ω 3A-51 or F6-16 - Body ground Always 10 kΩ or higher 3A-30 or F6-15 - Body ground Always 10 kΩ or higher
OK
NG
Remove the instrument panel junction block assembly (See page Power Source / Network>POWER DISTRIBUTION>MAIN BODY ECU>REMOVAL).
Remove the main body ECU (network gateway ECU) from the instrument panel junction block assembly.
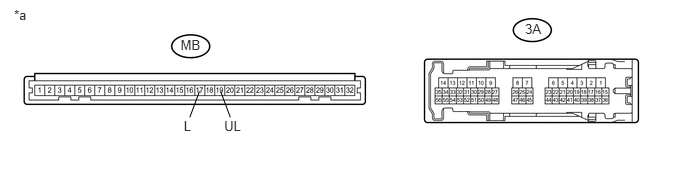
| *a | Component without harness connected
(Instrument Panel Junction Block Assembly) |
- | - |
Measure the resistance according to the value(s) in the table below.
- Standard Resistance:
Tester Connection Condition Specified Condition MB-17 (L) - 3A-51 Always Below 1 Ω MB-19 (UL) - 3A-30 Always Below 1 Ω
OK
NG
Connect the GTS to the DLC3.
Turn the ignition switch to ON.
Turn the GTS on.
Enter the following menus: Body Electrical / Main Body / Data List.
According to the display on the GTS, read the Data List.
| Tester Display | Measurement Item/Range | Normal Condition | Diagnostic Note |
|---|---|---|---|
| Door Lock SW-Lock | Door control switch (power window regulator switch assembly) lock signal / OFF or ON | OFF: Lock side of door control switch (power window regulator switch assembly) not pushed
ON: Lock side of door control switch (power window regulator switch assembly) pushed |
- |
| Door Lock SW-Unlock | Door control switch (power window regulator switch assembly) unlock signal / OFF or ON | OFF: Unlock side of door control switch (power window regulator switch assembly) not pushed
ON: Unlock side of door control switch (power window regulator switch assembly) pushed |
- |
- OK:
When the switch is operating, the GTS should display as shown in the table.
OK
NG
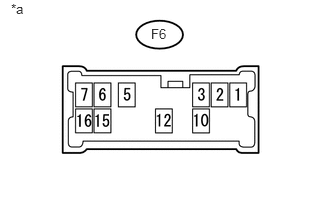
Remove the power window regulator switch assembly (See page Vehicle Exterior>WINDOW / GLASS>FRONT PASSENGER SIDE POWER WINDOW SWITCH>REMOVAL).
Connect the F6 power window regulator switch assembly connector.
Connect the cable to the negative(-) battery terminal.
Measure the voltage according to the value(s) in the table below.
- Standard Voltage:
Tester Connection Switch Condition Specified Condition F6-16 - F6-5 (GND) Lock switch pushed 9.15 V or higher off Below 1 V F6-15 - F6-5 (GND) Unlock switch pushed 9.15 V or higher off Below 1 V
| *a | Component with harness connected
(Power Window Regulator Switch Assembly (Door Control Switch)) |
OK
NG
Disconnect the 3A and 3B instrument panel junction block assembly connectors.
Disconnect the F6 power window regulator switch assembly (door control switch) connector.
Measure the resistance according to the value(s) in the table below.
- Standard Resistance:
Tester Connection Condition Specified Condition 3A-41 - F6-16 Always Below 1 Ω 3B-20 - F6-15 Always Below 1 Ω F6-5 (GND) - Body ground Always Below 1 Ω 3A-41 or F6-16 - Body ground Always 10 kΩ or higher 3B-20 or F6-15 - Body ground Always 10 kΩ or higher
OK
NG
Remove the instrument panel junction block assembly (See page Power Source / Network>POWER DISTRIBUTION>MAIN BODY ECU>REMOVAL).
Remove the main body ECU (network gateway ECU) from the instrument panel junction block assembly.
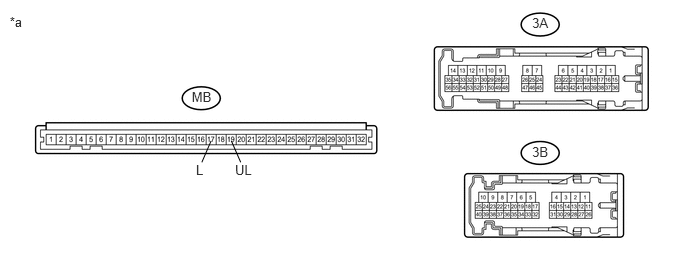
| *a | Component without harness connected
(Instrument Panel Junction Block Assembly) |
- | - |
Measure the resistance according to the value(s) in the table below.
- Standard Resistance:
Tester Connection Condition Specified Condition MB-17 (L) - 3A-41 Always Below 1 Ω MB-19 (UL) - 3B-20 Always Below 1 Ω
OK
NG
Connect the GTS to the DLC3.
Turn the ignition switch to ON.
Turn the GTS on.
Enter the following menus: Body Electrical / Main Body / Data List.
According to the display on the GTS, read the Data List.
| Tester Display | Measurement Item/Range | Normal Condition | Diagnostic Note |
|---|---|---|---|
| Door Key SW-Lock | Door key-linked lock switch signal/ ON or OFF | ON: Driver side door side key cylinder is turned to lock position
OFF: Driver side door key cylinder is turned to unlock position |
- |
| Door Key SW-ULock | Door key-linked unlock switch signal/ ON or OFF | ON: Driver side door key cylinder is turned to unlock position
OFF: Driver side door key cylinder is turned to lock position |
- |
- OK:
ON (driver side door key cylinder is turned to lock/unlock position) appears on the tester screen.
OK
NG
Remove the front door lock assembly RH (See page Vehicle Interior>DOOR LOCK>FRONT DOOR LOCK>REMOVAL).
Inspect the front door lock assembly RH (See page Vehicle Interior>DOOR LOCK>FRONT DOOR LOCK>INSPECTION).
OK
NG
Disconnect the D5 main body ECU (network gateway ECU) connector.
Disconnect the F3 front door lock assembly RH connector.
Measure the resistance according to the value(s) in the table below.
- Standard Resistance:
Tester Connection Condition Specified Condition D5-12 (UL2) - F3-5 Always Below 1 Ω D5-11 (L2) - F3-6 Always Below 1 Ω F3-8 (E) - Body ground Always Below 1 Ω D5-12 (UL2) or F3-5 - Body ground Always 10 kΩ or higher D5-11 (L2) or F3-6 - Body ground Always 10 kΩ or higher
OK
NG