2NR-VE ENGINE MECHANICAL ENGINE UNIT REASSEMBLY
PROCEDURE

 1.INSTALL RING PIN
- NOTICE:
-
It is not necessary to remove the ring pins unless they are being replaced.
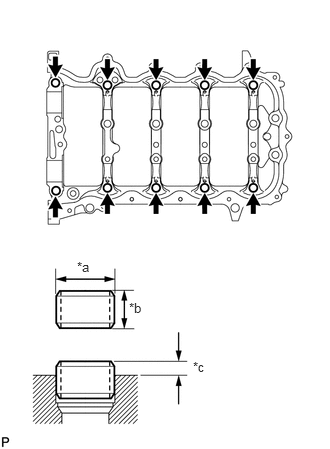
| *a | 12.48 to 12.50 mm (0.4913 to 0.4921 in.) |
| *b | 8.0 mm (0.315 in.) |
| *c | 2.7 to 3.3 mm (0.106 to 0.130 in.) |
Using a plastic-faced hammer, tap in 10 new ring pins to the specified protrusion height.
- Protrusion height:
2.7 to 3.3 mm (0.106 to 0.130 in.)
2.INSTALL STRAIGHT PIN
- NOTICE:
-
It is not necessary to remove the straight pins unless they are being replaced.
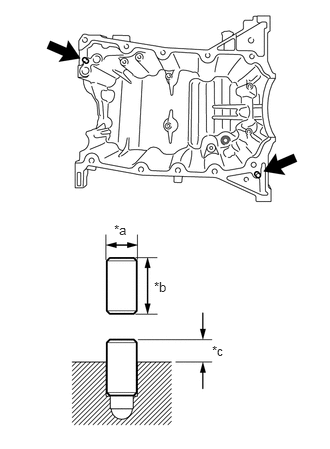
| *a | 8.0 mm (0.315 in.) |
| *b | 18.0 mm (0.709 in.) |
| *c | 5.0 to 7.0 mm (0.197 to 0.276 in.) |
Using a plastic-faced hammer, tap in 2 new straight pins to the specified protrusion height.
- Protrusion height:
5.0 to 7.0 mm (0.197 to 0.276 in.)
15104
3.INSTALL OIL STRAINER SUB-ASSEMBLY
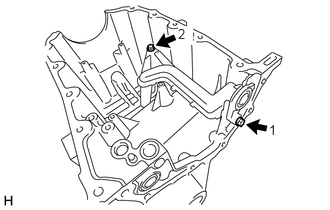
Install the oil strainer sub-assembly to the oil pan sub-assembly with the 2 bolts in the order shown in the illustration.
- Torque:
- 10 N*m (102 kgf*cm, 7 ft.*lbf)
12122
4.INSTALL NO. 2 OIL PAN BAFFLE PLATE
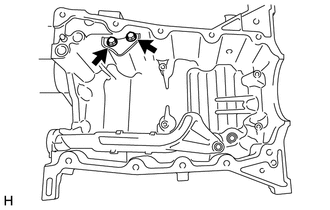
Install the No. 2 oil pan baffle plate to the oil pan sub-assembly with the 2 bolts.
- Torque:
- 10 N*m (102 kgf*cm, 7 ft.*lbf)
12121
5.INSTALL NO. 1 OIL PAN BAFFLE PLATE
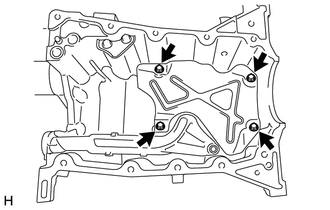
Install the No. 1 oil pan baffle plate to the oil pan sub-assembly with the 4 bolts.
- Torque:
- 10 N*m (102 kgf*cm, 7 ft.*lbf)
12101
6.INSTALL OIL PAN SUB-ASSEMBLY
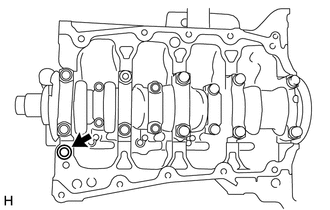
Install a new gasket to the cylinder block sub-assembly.
Apply seal packing to the places shown in the illustration.
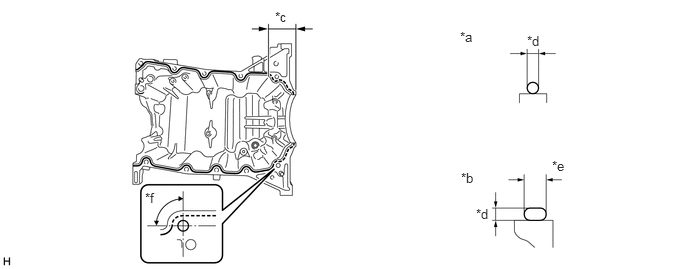
| *a | Continuous Line Area | *b | Dashed Line Area |
| *c | 39.3 to 39.7 mm (1.547 to 1.563 in.) | *d | 3.5 to 4.5 mm (0.138 to 0.177 in.) |
| *e | 6.0 to 10.0 mm (0.236 to 0.394 in.) | *f | 90° |
- Seal packing:
Toyota Genuine Seal Packing Black, Three Bond 1207B or equivalent
- NOTICE:
- ·
Remove any oil from the contact surfaces.
·Install the oil pan sub-assembly within 3 minutes and tighten the bolts within 10 minutes of applying seal packing.
·Do not start the engine for at least 2 hours after installation.
Apply adhesive to the threads of the bolt (C).
- Adhesive:
Toyota Genuine Adhesive 1324, Three Bond 1324 or equivalent
- NOTICE:
-
Install the bolt within 3 minutes of applying adhesive.
- HINT:
-
Apply adhesive to the bolt (C) more than 7.0 mm (0.276 in.) from the bolt end.
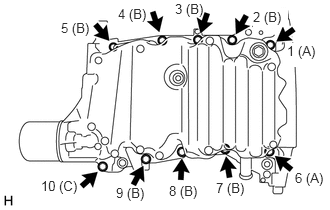
Install the oil pan sub-assembly with the 10 bolts in the sequence shown in the illustration.
- Torque:
- 21 N*m (214 kgf*cm, 15 ft.*lbf)
- Bolt Length:
Item Length Bolt A 70 mm (2.756 in.) Bolt B, C 30 mm (1.181 in.)
Wipe off any excess seal packing with a clean piece of cloth.
7.INSTALL OIL PAN DRAIN PLUG
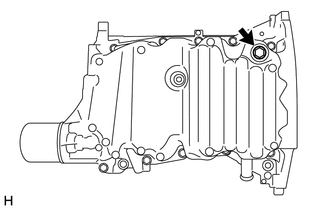
Install a new gasket and the oil pan drain plug to the oil pan sub-assembly.
- Torque:
- 30 N*m (306 kgf*cm, 22 ft.*lbf)
11445
8.INSTALL CYLINDER BLOCK WATER JACKET SPACER
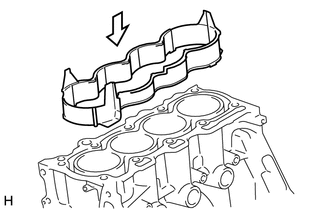
Install the cylinder block water jacket spacer to the cylinder block sub-assembly as shown in the illustration.
11115
9.INSTALL CYLINDER HEAD GASKET
11101
10.INSTALL CYLINDER HEAD SUB-ASSEMBLY
13750
11.INSTALL VALVE LASH ADJUSTER ASSEMBLY
- NOTICE:
- ·
Keep the valve lash adjuster assembly free of dirt and foreign matter.
·Only use clean engine oil.
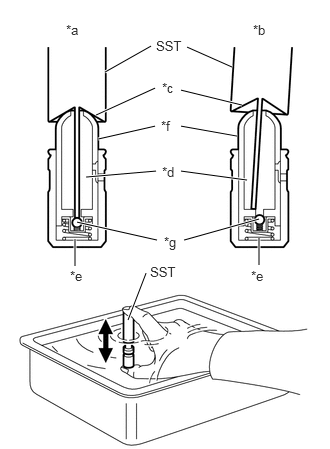
| *a | Correct |
| *b | Incorrect |
| *c | Taper Part |
| *d | Low Pressure Chamber |
| *e | High Pressure Chamber |
| *f | Plunger |
| *g | Check Ball |
Place the valve lash adjuster assembly into a container filled with engine oil.
Insert the tip of SST into the valve lash adjuster assembly plunger and use the tip to press down on the check ball inside the plunger.
- SST
- 09276-75010
Squeeze SST and the valve lash adjuster assembly together to move the plunger up and down 5 to 6 times.
Check the movement of the plunger and bleed it.
- OK:
Plunger moves up and down.
- NOTICE:
-
When bleeding the high-pressure chamber, make sure that the tip of SST is actually pressing the check ball as shown in the illustration. If the check ball is not pressed, the high-pressure chamber will not be bled.
After bleeding, remove SST. Then, try to press the plunger quickly and firmly by hand.
- OK:
Plunger is very difficult to move.
If the result is not as specified, replace the valve lash adjuster assembly.
Install the valve lash adjuster assemblies.
- NOTICE:
-
Install each valve lash adjuster assembly to the same place it was removed from.
13801
12.INSTALL NO. 1 VALVE ROCKER ARM SUB-ASSEMBLY
Apply engine oil to the valve lash adjuster assembly tip and valve stem cap end.
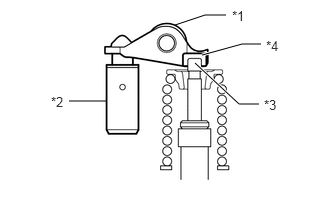
| *1 | No. 1 Valve Rocker Arm Sub-assembly |
| *2 | Valve Lash Adjuster Assembly |
| *3 | Valve Stem |
| *4 | Valve Stem Cap |
Make sure that the No. 1 valve rocker arm sub-assemblies are installed as shown in the illustration.
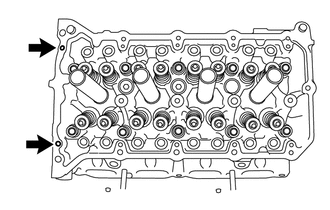
Fill the cylinder head sub-assembly with engine oil through the holes indicated in the illustration.
13511
13.INSTALL CAMSHAFT
13512
14.INSTALL NO. 2 CAMSHAFT
15678A
15.INSTALL OIL CONTROL VALVE FILTER
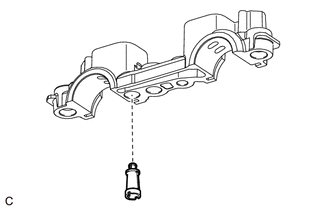
Install the oil control valve filter to the No. 1 camshaft bearing cap.
16.INSTALL CAMSHAFT BEARING CAP
11103
17.INSTALL CAMSHAFT HOUSING SUB-ASSEMBLY
13050
18.INSTALL CAMSHAFT TIMING GEAR ASSEMBLY
13070A
19.INSTALL CAMSHAFT TIMING EXHAUST GEAR ASSEMBLY
13521
20.INSTALL CRANKSHAFT TIMING GEAR OR SPROCKET
Install the crankshaft timing gear or sprocket to the crankshaft.
13566B
21.INSTALL TIMING CHAIN GUIDE
13506
22.INSTALL CHAIN SUB-ASSEMBLY
13591
23.INSTALL TIMING CHAIN TENSION ARM
13540
24.INSTALL NO. 1 CHAIN TENSIONER ASSEMBLY
11302
25.INSTALL TIMING CHAIN COVER SUB-ASSEMBLY
11302A
26.INSTALL TIMING CHAIN COVER OIL SEAL
13471
27.INSTALL CRANKSHAFT PULLEY
11301K
28.INSTALL CRANK POSITION SENSOR
15601
29.INSTALL OIL FILTER SUB-ASSEMBLY
16326
30.INSTALL NO. 2 WATER INLET HOUSING GASKET
16031
31.INSTALL WATER INLET SUB-ASSEMBLY WITH THERMOSTAT
89615
32.INSTALL KNOCK CONTROL SENSOR
83530
33.INSTALL ENGINE OIL PRESSURE SWITCH ASSEMBLY
11159H
34.INSTALL CAMSHAFT BEARING CAP OIL HOLE GASKET
11213
35.INSTALL CYLINDER HEAD COVER GASKET
11201
36.INSTALL CYLINDER HEAD COVER SUB-ASSEMBLY
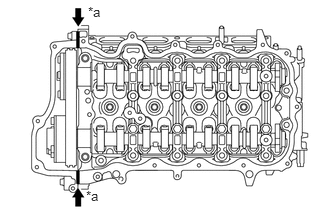
| *a | Seal Diameter 2.0 mm (0.0787 in.) |
Apply seal packing as shown the illustration.
- Seal packing:
Toyota Genuine Seal Packing Black, Three Bond 1207B or equivalent
- Seal diameter:
2.0 mm (0.0787 in.)
- NOTICE:
- ·
Remove any oil from the contact surfaces.
·Install the cylinder head cover sub-assembly within 3 minutes and tighten the bolts within 15 minutes of applying seal packing.
·Do not start the engine for at least 2 hours after the installation.
Temporarily install the cylinder head cover sub-assembly with 2 new seal washers, 2 plate washers and the 17 bolts.
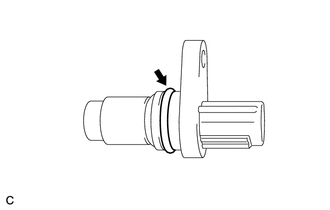
Apply a light coat of engine oil to the 2 O-rings of the 2 cam position sensors.
Temporarily install the 2 cam position sensors with the 2 bolts.
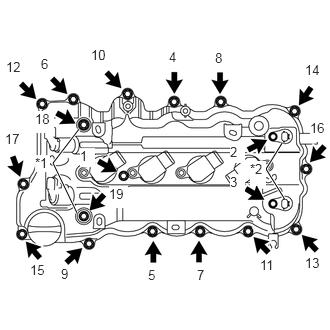
| *1 | Seal Washer and Plate Washer |
| *2 | Cam Position Sensor |
Install the 19 bolts in the order shown in the illustration.
- Torque:
- 12 N*m (122 kgf*cm, 9 ft.*lbf)
89422A
37.INSTALL ENGINE COOLANT TEMPERATURE SENSOR
11381A
38.INSTALL REAR ENGINE OIL SEAL
12204A
39.INSTALL VENTILATION SYSTEM GROMMET
12204
40.INSTALL VENTILATION VALVE SUB-ASSEMBLY
11101J
41.INSTALL CAMSHAFT TIMING OIL CONTROL VALVE ASSEMBLY
19100P
42.INSTALL SPARK PLUG
19500
43.INSTALL IGNITION COIL ASSEMBLY
12108A
44.INSTALL OIL FILLER CAP GASKET
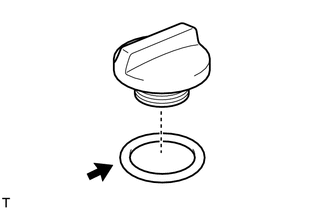
Install the oil filler cap gasket to the oil filler cap sub-assembly.
12108
45.INSTALL OIL FILLER CAP SUB-ASSEMBLY