2NR-VE ENGINE MECHANICAL CAMSHAFT INSTALLATION
CAUTION / NOTICE / HINT
PROCEDURE

 13750
1.INSTALL VALVE LASH ADJUSTER ASSEMBLY
13801
2.INSTALL NO. 1 VALVE ROCKER ARM SUB-ASSEMBLY
13511
3.INSTALL CAMSHAFT
Clean the camshaft journals.
Apply a light coat of engine oil to the camshaft journals and camshaft housing sub-assembly.
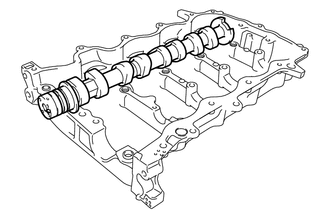
Install the camshaft to the camshaft housing sub-assembly.
13512
4.INSTALL NO. 2 CAMSHAFT
Clean the No. 2 camshaft journals.
Apply a light coat of engine oil to the No. 2 camshaft journals and camshaft housing sub-assembly.
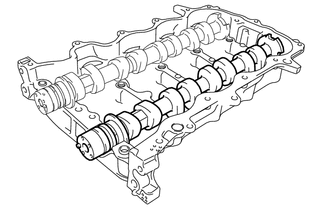
Install the No. 2 camshaft to the camshaft housing sub-assembly.
5.INSTALL CAMSHAFT BEARING CAP
Apply engine oil to the camshaft bearing caps.
Install the No. 1 camshaft bearing cap, No. 2 camshaft bearing cap, 2 No. 3 camshaft bearing caps and No. 4 camshaft bearing cap to the camshaft housing sub-assembly.
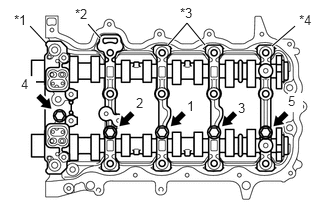
| *1 | No. 1 Camshaft Bearing Cap |
| *2 | No. 2 Camshaft Bearing Cap |
| *3 | No. 3 Camshaft Bearing Cap |
| *4 | No. 4 Camshaft Bearing Cap |
Tighten the 5 bolts in the order shown in the illustration.
- Torque:
- M7 Bolt : 16 N*m (163 kgf*cm, 12 ft.*lbf)
11103
6.INSTALL CAMSHAFT HOUSING SUB-ASSEMBLY
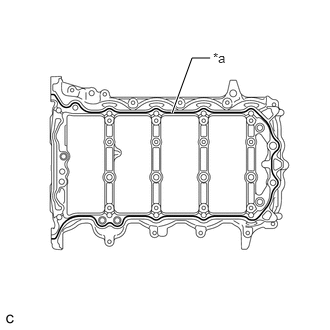
| *a | Seal Packing |
Apply seal packing in a continuous line as shown in the illustration.
- Seal Packing:
Toyota Genuine Seal Packing Black, Three Bond 1207B or equivalent
- Seal Diameter:
3.5 to 4.0 mm (0.138 to 0.157 in.)
- NOTICE:
- ·
Remove any oil from the contact surfaces.
·Install the camshaft housing sub-assembly within 3 minutes and tighten the bolts within 15 minutes of applying seal packing.
·Do not start the engine for at least 2 hours after installation.
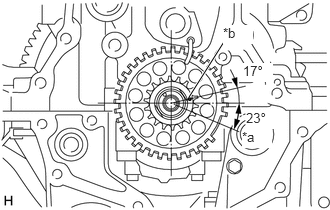
| *a | TDC |
| *b | Timing Mark |
Set the crankshaft in the position (40° BTDC) shown in the illustration.
- NOTICE:
- ·
Turn the crankshaft clockwise when positioning the No. 1 cylinder after the camshaft housing sub-assembly is installed.
·Never turn the crankshaft counterclockwise (when viewed from the front of the engine).
- HINT:
-
Make sure that the timing mark of the crankshaft is positioned as shown in the illustration.
Set the camshaft and No. 2 camshaft as shown in the illustration.
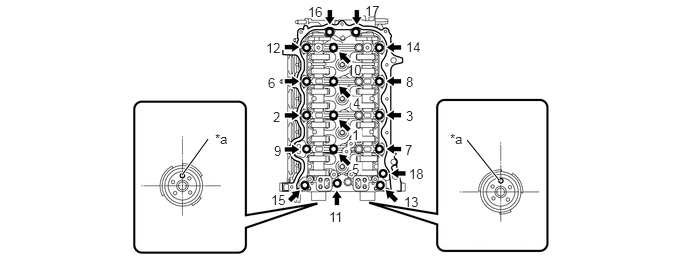
| *a | Straight Pin | - | - |
- HINT:
-
Make sure that the straight pins of the camshaft and No. 2 camshaft are positioned as shown in the illustration.
Install the camshaft housing sub-assembly and tighten the 18 bolts in the order shown in the illustration.
- Torque:
- M8 Bolt : 30 N*m (306 kgf*cm, 22 ft.*lbf)
- NOTICE:
- ·
After installing the camshaft housing sub-assembly, make sure that the straight pins are positioned as shown in the illustration.
·If any of the bolts are loosened during installation, remove the camshaft housing sub-assembly, clean the installation surfaces, and reapply seal packing.
·If the camshaft housing sub-assembly is removed because any of the bolts are loosened during installation, make sure that the previously applied seal packing does not enter any oil passages.
·After installing the camshaft housing sub-assembly, wipe off any seal packing that seeped out from between the camshaft housing sub-assembly and the cylinder head sub-assembly.
13050
7.INSTALL CAMSHAFT TIMING GEAR ASSEMBLY
Check that the straight pin is installed on the camshaft.
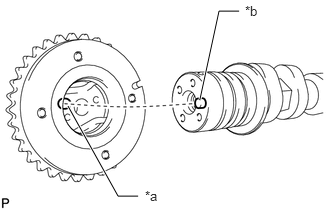
| *a | Key Groove |
| *b | Straight Pin |
Fit the camshaft timing gear assembly and camshaft together by aligning the key groove and straight pin.
- NOTICE:
- ·
Do not forcefully push in the camshaft timing gear assembly. This may cause the camshaft straight pin tip to damage the installation surface of the camshaft timing gear assembly.
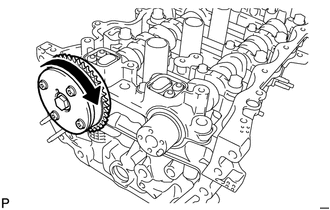
·Do not turn the camshaft timing gear assembly in the retard direction (clockwise).
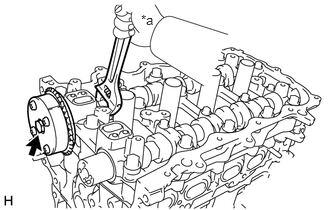
| *a | Hold |
Tighten the bolt with the camshaft timing gear assembly secured in place.
- Torque:
- 54 N*m (551 kgf*cm, 40 ft.*lbf)

|
Lock |
Check that the camshaft timing gear assembly moves in the retard direction (clockwise) and locks in the most retarded position.
13070A
8.INSTALL CAMSHAFT TIMING EXHAUST GEAR ASSEMBLY
Check that the straight pin is installed on the No. 2 camshaft.
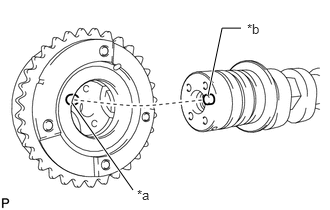
| *a | Key Groove |
| *b | Straight Pin |
Fit the camshaft timing exhaust gear assembly and No. 2 camshaft together by aligning the key groove and straight pin.
- NOTICE:
-
Do not forcefully push in the camshaft timing exhaust gear assembly. This may cause the No. 2 camshaft straight pin tip to damage the installation surface of the camshaft timing exhaust gear assembly.
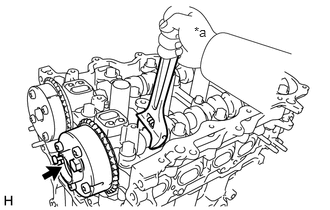
| *a | Hold |
Tighten the bolt with the camshaft timing exhaust gear assembly secured in place.
- Torque:
- 54 N*m (551 kgf*cm, 40 ft.*lbf)
Make sure that the camshaft timing exhaust gear assembly is locked.
13566B
9.INSTALL TIMING CHAIN GUIDE
Install the timing chain guide with the 2 bolts.
- Torque:
- 10 N*m (102 kgf*cm, 7 ft.*lbf)
13506
10.INSTALL CHAIN SUB-ASSEMBLY
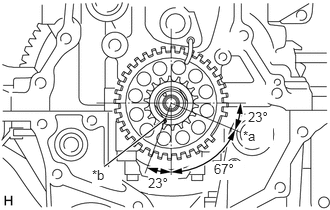
| *a | TDC |
| *b | Timing Mark |
Set the crankshaft in the position (90° ATDC) shown in the illustration.
- HINT:
-
Make sure that the timing mark of the crankshaft is positioned as shown in the illustration.
Set the camshaft timing gear assembly and camshaft timing exhaust gear assembly in the positions (20° ATDC) shown in the illustration.
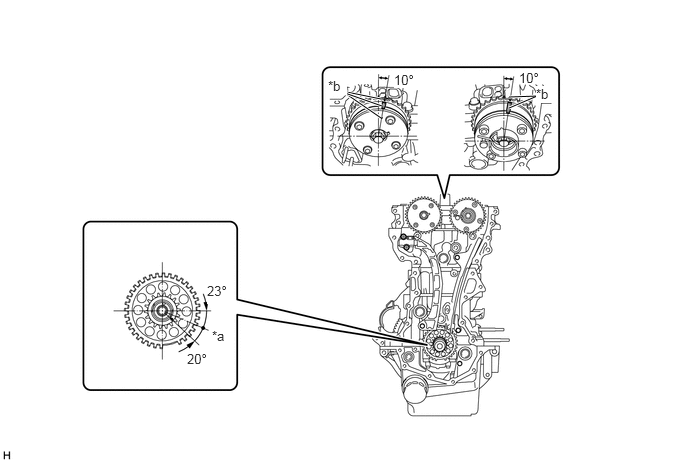
| *a | TDC | *b | Timing Mark |
- NOTICE:
-
Never turn the crankshaft counterclockwise (when viewed from the front of the engine).
Set the crankshaft in the position (20° ATDC) shown in the illustration.
Align the timing marks of the camshaft timing gear assembly, camshaft timing exhaust gear assembly and crankshaft with the mark plates of the chain sub-assembly and install the chain sub-assembly.
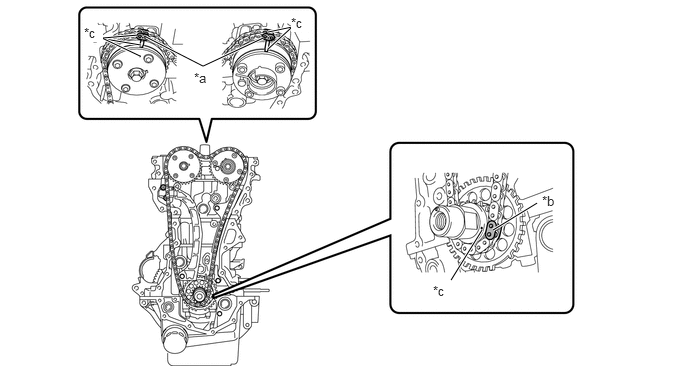
| *a | Mark Plate (Yellow) | *b | Mark Plate (Orange) |
| *c | Timing Mark | - | - |
13591
11.INSTALL TIMING CHAIN TENSION ARM
Install the timing chain tension arm.
13540
12.INSTALL NO. 1 CHAIN TENSIONER ASSEMBLY
Install the No. 1 chain tensioner assembly with the 2 new nuts.
- Torque:
- 10 N*m (102 kgf*cm, 7 ft.*lbf)
Install the No. 2 chain vibration damper with the 2 bolts.
- Torque:
- 10 N*m (102 kgf*cm, 7 ft.*lbf)
Remove the pin from the No. 1 chain tensioner assembly.
Turn the crankshaft approximately 20° counterclockwise to set it to TDC. Make sure that the timing marks and mark plates are correctly positioned and that the chain sub-assembly is securely fit into the timing chain tension arm, timing chain guide and No. 2 chain vibration damper.
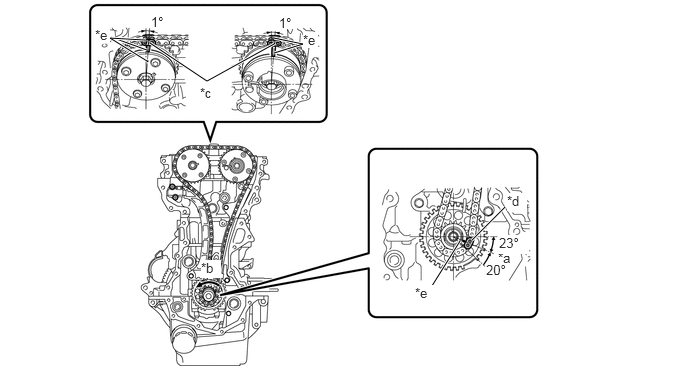
| *a | TDC | *b | Turn |
| *c | Mark Plate (Yellow) | *d | Mark Plate (Orange) |
| *e | Timing Mark | - | - |
11302
13.INSTALL TIMING CHAIN COVER SUB-ASSEMBLY
16507
14.INSTALL RADIATOR PIPE SUB-ASSEMBLY
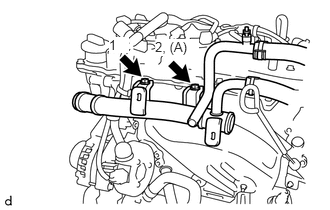
Temporarily install the radiator pipe sub-assembly with the bolt (A).
Install the bolt and tighten the 2 bolts in the order shown in the illustration.
- Torque:
- 10 N*m (102 kgf*cm, 7 ft.*lbf)
Engage the 2 harness clamps and connect the wire harness to the radiator pipe sub-assembly.
w/o Air Fuel Ratio Sensor:
Connect the oxygen sensor connector.
w/ Air Fuel Ratio Sensor:
Connect the air fuel ratio sensor connector.
16571C
15.INSTALL NO. 1 RADIATOR HOSE
16591A
16.CONNECT RADIATOR PIPE RADIATOR HOSE
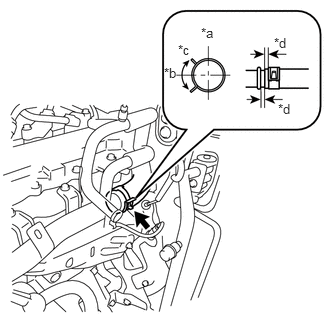
| *a | Upper Side |
| *b | LH Side |
| *c | 45° |
| *d | 0 to 5.0 mm (0 to 0.197 in.) |
Connect the radiator pipe radiator hose with the hose clamp as shown in the illustration.
- HINT:
-
Install the hose clamp so that it is positioned as shown in the illustration.
87246X
17.CONNECT NO. 2 HEATER WATER HOSE (w/ Heater)
87245X
18.CONNECT HEATER WATER HOSE (w/ Heater)
16281
19.CONNECT NO. 4 WATER BY-PASS HOSE
16267
20.CONNECT NO. 3 WATER BY-PASS HOSE
Connect the No. 3 water by-pass hose with the clamp.
23250
21.INSTALL FUEL INJECTOR ASSEMBLY
22.ADD ENGINE OIL
23.ADD ENGINE COOLANT
24.INSPECT FOR COOLANT LEAK
25.INSPECT FOR ENGINE OIL LEAK
51441
26.INSTALL NO. 1 ENGINE UNDER COVER