2ZR-FXE ENGINE MECHANICAL CAMSHAFT REMOVAL
CAUTION / NOTICE / HINT
The necessary procedures (adjustment, calibration, initialization, or registration) that must be performed after parts are removed and installed, or replaced during camshaft removal/installation are shown below.
| Replaced Part or Performed Procedure | Necessary Procedure | Effect/Inoperative Function when Necessary Procedure not Performed | Link |
|---|---|---|---|
| Disconnect cable from negative auxiliary battery terminal | Memorize steering angle neutral point | Lane departure alert system (w/ Steering Control) | ( ) |
| Toyota parking assist-sensor system*1 | |||
| Parking support brake system*1 | |||
| Simple intelligent parking assist system*1 | |||
| Pre-collision system | |||
| Memorize steering angle neutral point | Panoramic view monitor system | ()
|
|
| Initialize back door lock | Power door lock control system | ()
|
|
·
Replacement of throttle body assembly ·
Replacement of camshaft (for intake or exhaust camshaft) ·
Replacement of camshaft timing gear assembly ·
Replacement of ignition coil assembly |
Inspection After Repair | ·
Poor idle, etc. ·
Engine start function, etc. |
()
|
*1: When performing learning using the GTS.
PROCEDURE

 51441
1.REMOVE NO. 1 ENGINE UNDER COVER
2.DRAIN ENGINE COOLANT (for Engine)
3.REMOVE WINDSHIELD WIPER MOTOR AND LINK
55737B
4.REMOVE NO. 1 HEATER AIR DUCT SPLASH SHIELD SEAL
55735A
5.REMOVE WATER GUARD PLATE LH (for TMC Made RHD)
55736D
6.REMOVE COWL BODY MOUNTING REINFORCEMENT LH
55735C
7.REMOVE COWL BODY MOUNTING REINFORCEMENT RH
55701J
8.REMOVE OUTER COWL TOP PANEL SUB-ASSEMBLY (for LHD)
55701J
9.REMOVE OUTER COWL TOP PANEL SUB-ASSEMBLY (for RHD)
33820B
10.DISCONNECT TRANSMISSION CONTROL CABLE ASSEMBLY
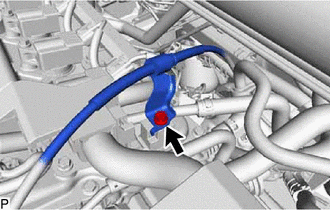
Remove the bolt to disconnect the transmission control cable assembly from the cylinder head cover sub-assembly.
12262
11.DISCONNECT NO. 2 VENTILATION HOSE
19500
12.REMOVE IGNITION COIL ASSEMBLY
11101E
13.REMOVE CAMSHAFT POSITION SENSOR
82121
14.DISCONNECT ENGINE WIRE
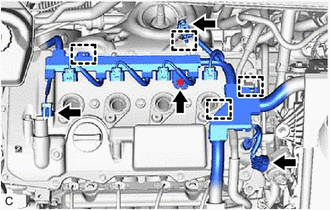
Disconnect the 3 connectors.
Disengage the 4 clamps.
Remove the bolt and disconnect the engine wire from the cylinder head cover sub-assembly.
23826
15.DISCONNECT NO. 1 FUEL VAPOR FEED HOSE
25610
16.REMOVE EGR PIPE ASSEMBLY
16296
17.DISCONNECT NO. 8 WATER BY-PASS HOSE
16297
18.DISCONNECT NO. 9 WATER BY-PASS HOSE
17650G
19.REMOVE PURGE VALVE (PURGE VSV)
23818
20.REMOVE FUEL VAPOR FEED PIPE
11201
21.REMOVE CYLINDER HEAD COVER SUB-ASSEMBLY
11213
22.REMOVE CYLINDER HEAD COVER GASKET
11193
23.REMOVE SPARK PLUG TUBE GASKET
24.SET NO. 1 CYLINDER TO TDC (COMPRESSION)
Set the No. 1 cylinder to TDC (Compression).
Click hereEngine / Hybrid System>2ZR-FXE (ENGINE MECHANICAL)>ENGINE UNIT>DISASSEMBLY
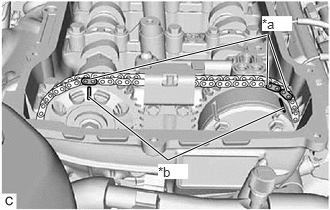
| *a | Paint Mark |
| *b | Timing Mark |
Place paint marks on the chain sub-assembly in alignment with the timing marks on the camshaft timing gear assembly and camshaft timing sprocket.
13562
25.REMOVE NO. 2 CHAIN VIBRATION DAMPER
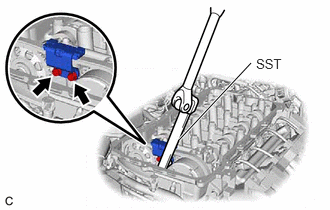
Using SST, remove the 2 bolts and No. 2 chain vibration damper from the No. 1 camshaft bearing cap.
- SST
- 09961-00950
13540
26.REMOVE NO. 1 CHAIN TENSIONER ASSEMBLY
13523G
27.REMOVE CAMSHAFT TIMING SPROCKET
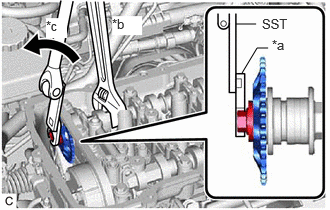
| *a | 14 mm union nut wrench |
| *b | Hold |
| *c | Turn |
While holding the hexagonal portion of the No. 2 camshaft with a wrench, remove the bolt with SST and 14 mm union nut wrench.
- SST
- 09961-00950
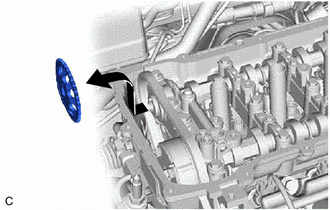
While removing the chain sub-assembly, pull out the camshaft timing sprocket horizontally and then upward.
13050
28.INSPECT CAMSHAFT TIMING GEAR ASSEMBLY
29.REMOVE CAMSHAFT BEARING CAP
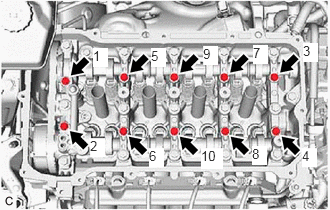
Uniformly loosen and remove the 10 bolts in the order shown in the illustration.
- NOTICE:
-
Do not loosen the other 10 bearing cap bolts in this step.
- HINT:
-
Arrange the removed parts in such a way that they can be reinstalled to their original locations.
Remove the bolts and camshaft bearing caps in the order shown in the illustration. Immediately after removing each camshaft bearing cap, install service bolts and spacers in the order shown in the illustration.
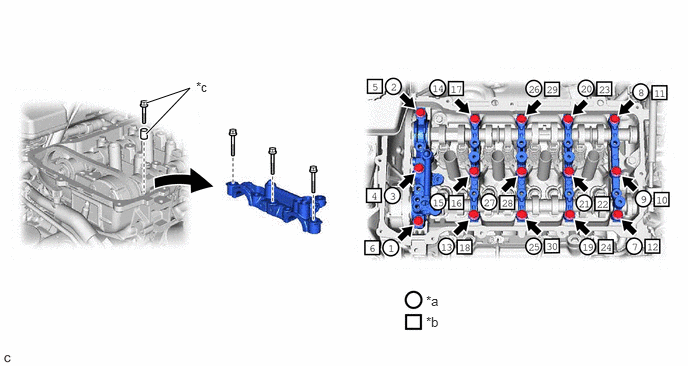
| *a | The removal order of the parts | *b | The installation order of the service bolts and spacers for temporarily tightening the camshaft housing sub-assembly |
| *c | Service bolt and spacer (Used to temporarily secure the camshaft housing sub-assembly) | - | - |
- Torque:
- 27 N*m (275 kgf*cm, 20 ft.*lbf)
- NOTICE:
- ·
If the bolts are loosened all at once, seal packing on the camshaft housing sub-assembly and cylinder head sub-assembly may separate, resulting in oil leaks. Therefore, be sure to install the service bolts and spacers to one camshaft bearing cap at a time.
·Do not install the camshaft bearing caps when installing the service bolts and spacers.
- HINT:
- ·
Arrange the removed parts in such a way that they can be reinstalled to their original locations.
·Part number for the service bolt used to temporarily secure the camshaft housing sub-assembly: 91551-G0875 (15 bolts)
·Part number for the spacer used to temporarily secure the camshaft housing sub-assembly: 90387-12048 (15 spacers)
13512
30.REMOVE NO. 2 CAMSHAFT
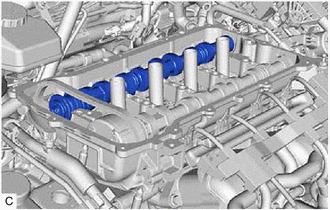
Remove the No. 2 camshaft from the camshaft housing sub-assembly.
13511
31.REMOVE CAMSHAFT
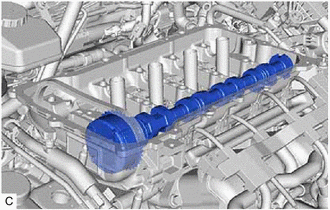
Hold up the chain sub-assembly and remove the camshaft from the camshaft housing sub-assembly.
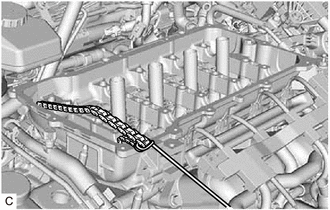
Suspend the chain sub-assembly with a string or equivalent.
13050
32.REMOVE CAMSHAFT TIMING GEAR ASSEMBLY
Secure the hexagonal portion of the camshaft in a soft jaw vise.
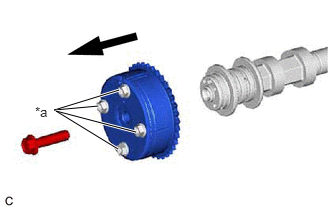
| *a | Do not remove |
Remove the bolt and camshaft timing gear assembly.
- NOTICE:
- ·
Before removing the camshaft timing gear assembly, make sure that the lock pin has been released.
·Do not remove the other 4 bolts.
·Keep the camshaft timing gear assembly horizontal while removing it from the camshaft.
·If the camshaft timing gear assembly is to be reused, be sure to install it with the lock pin released.
33.REMOVE NO. 1 CAMSHAFT BEARING
34.REMOVE NO. 2 CAMSHAFT BEARING