BRAKE CONTROL / DYNAMIC CONTROL SYSTEMS BRAKE ACTUATOR(for LHD) INSTALLATION
PROCEDURE

 44510
1.INSTALL BRAKE ACTUATOR ASSEMBLY
Install the brake actuator assembly to the brake actuator bracket assembly with 3 new bolts.
- Torque:
- 6.5 N*m (66 kgf*cm, 58 in.*lbf)
- NOTICE:
- ·
Do not remove the hole plugs of a new brake actuator assembly before connecting the brake lines because the brake actuator assembly is filled with brake fluid.
·Do not hold the brake actuator assembly by the connector.
·Do not apply excessive force to the brake lines or refrigerant lines.
·Be careful not to allow any brake fluid to enter the connector.
·Do not drop the brake actuator assembly when carrying it.
47070
2.INSTALL BRAKE BOOSTER PUMP ASSEMBLY
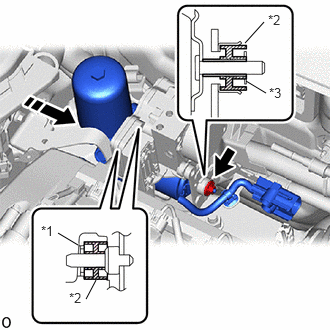
| *1 | Brake Booster Pump Collar |
| *2 | Brake Booster Pump Bushing |
| *3 | Brake Actuator Case Collar |

|
Install in this Direction |
Install the brake booster pump assembly to the brake actuator bracket assembly with the nut.
- Torque:
- 6.5 N*m (66 kgf*cm, 58 in.*lbf)
- NOTICE:
- ·
Be careful not to allow any brake fluid to enter the connector.
·When installing the brake booster pump assembly to the brake actuator bracket assembly, confirm that the brake booster pump bushing and brake actuator case collar are on the brake actuator bracket assembly, and 2 brake booster pump bushings and 2 brake booster pump collars are on the brake booster pump assembly.
·Do not drop the brake booster pump assembly when carrying it.
for 2ZR-FXE:
Engage the claw and clamp to install the brake booster pump assembly wire harness to the brake actuator bracket assembly.
for M20A-FXS:
Engage the clamp to install the brake booster pump assembly wire harness to the brake actuator bracket assembly.
473A1
3.INSTALL ACCUMULATOR TO BRAKE MASTER CYLINDER TUBE
Temporarily tighten the accumulator to brake master cylinder tube to the brake booster pump assembly.
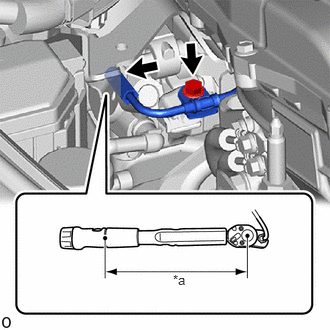
| *a | Torque Wrench Fulcrum Length |
Install the accumulator to brake master cylinder tube with the bolt.
- Torque:
- 7.0 N*m (71 kgf*cm, 62 in.*lbf)
Using a union nut wrench, tighten the accumulator to brake master cylinder tube.
- Torque:
- Specified tightening torque : 15.2 N*m (155 kgf*cm, 11 ft.*lbf)
- NOTICE:
- ·
Do not kink or damage the accumulator to brake master cylinder tube.
·Do not allow the accumulator to brake master cylinder tube to twist or interfere with other parts or the vehicle body during tightening.
·Do not allow any foreign matter such as dirt or dust to enter the accumulator to brake master cylinder tube from the connecting parts.
- HINT:
- ·
Calculate the torque wrench reading when changing the fulcrum length of the torque wrench.
Click hereGeneral>INTRODUCTION>REPAIR INSTRUCTION>PRECAUTION
·When using a union nut wrench (fulcrum length of 22 mm (0.866 in.)) + torque wrench (fulcrum length of 162 mm (6.38 in.)): 13.4 N*m (137 kgf*cm, 10 ft.*lbf)
4.CONNECT BRAKE LINE
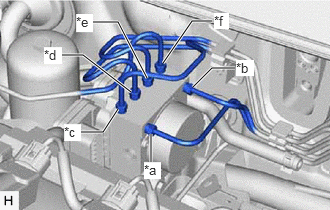
| *a | From 1st Chamber of Brake Booster with Master Cylinder Assembly |
| *b | From 2nd Chamber of Brake Booster with Master Cylinder Assembly |
| *c | To Front Wheel Cylinder Assembly LH |
| *d | To Rear Wheel Cylinder Assembly RH |
| *e | To Rear Wheel Cylinder Assembly LH |
| *f | To Front Wheel Cylinder Assembly RH |
Temporarily tighten the 6 brake lines to the correct positions on the brake actuator assembly as shown in the illustration.
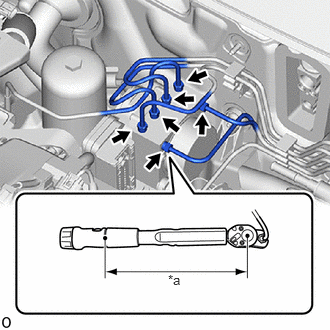
| *a | Torque Wrench Fulcrum Length |
Using a union nut wrench, fully tighten the 6 brake lines.
- Torque:
- Specified tightening torque : 15.2 N*m (155 kgf*cm, 11 ft.*lbf)
- NOTICE:
- ·
Do not kink or damage the brake lines.
·Do not allow the brake lines to twist or interfere with other parts or the vehicle body during tightening.
·Do not allow any foreign matter such as dirt or dust to enter the brake lines from the connecting parts.
- HINT:
- ·
Calculate the torque wrench reading when changing the fulcrum length of the torque wrench.
Click hereGeneral>INTRODUCTION>REPAIR INSTRUCTION>PRECAUTION
·When using a union nut wrench (fulcrum length of 22 mm (0.866 in.)) + torque wrench (fulcrum length of 162 mm (6.38 in.)): 13.4 N*m (137 kgf*cm, 10 ft.*lbf)
44571A
5.INSTALL NO. 1 BRAKE ACTUATOR HOSE
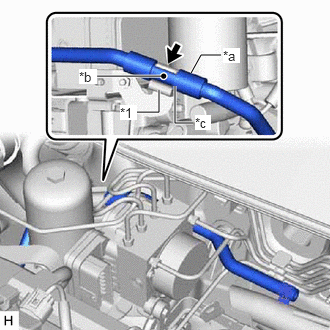
| *1 | Brake Actuator Hose Clamp |
| *a | Protector |
| *b | Identification Mark |
| *c | Contacts |
Install the No. 1 brake actuator hose to the brake actuator hose clamp.
- NOTICE:
- ·
Make sure to install the No. 1 brake actuator hose so that the protector on the brake booster pump assembly side contacts the brake actuator hose clamp.
·Make sure to install the No. 1 brake actuator hose so that its identification mark can be seen.
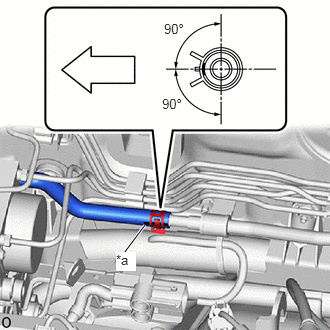
| *a | Identification Mark |

|
Front of the vehicle |
Connect the No. 1 brake actuator hose to the No. 1 brake actuator tube to install it, and slide the clip to secure it.
- NOTICE:
- ·
Make sure to connect the No. 1 brake actuator hose with its identification mark facing the front of the vehicle.
·Install the clip within the range shown in the illustration.
88716A
6.CONNECT AIR CONDITIONER TUBE AND ACCESSORY ASSEMBLY
Remove the vinyl tape from the air conditioner tube and accessory assembly.
Sufficiently apply compressor oil to a new O-ring and the fitting surface of the air conditioner tube and accessory assembly.
- Compressor Oil:
ND-OIL 11 or equivalent
Install the O-ring to the air conditioner tube and accessory assembly.
- NOTICE:
-
Keep the O-ring and O-ring fitting surface free of foreign matter.
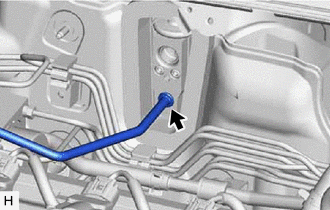
Insert the air conditioner tube and accessory assembly to the air conditioning unit assembly.
Engage the 2 clamps to install the air conditioner tube and accessory assembly.
88707
7.CONNECT SUCTION PIPE SUB-ASSEMBLY
Remove the vinyl tape from the suction pipe sub-assembly.
Sufficiently apply compressor oil to a new O-ring and the fitting surface of the suction pipe sub-assembly.
- Compressor Oil:
ND-OIL 11 or equivalent
Install the O-ring to the suction pipe sub-assembly.
- NOTICE:
-
Keep the O-ring and O-ring fitting surface free of foreign matter.
Insert the suction pipe sub-assembly to the air conditioning unit assembly.
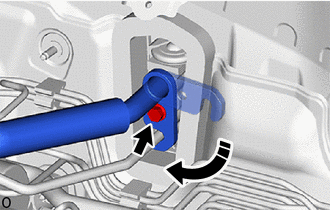
Rotate the hook connector as shown in the illustration.
Insert the hose joint into the fitting hole securely and install the bolt.
- Torque:
- 9.8 N*m (100 kgf*cm, 87 in.*lbf)
Engage the 2 clamps to install the suction pipe sub-assembly.
44551C
8.BLEED NO. 1 BRAKE ACTUATOR TUBE
9.FILL RESERVOIR WITH BRAKE FLUID
55225
10.INSTALL DASH PANEL HEAT INSULATOR (for M20A-FXS)
82111
11.CONNECT ENGINE ROOM MAIN WIRE
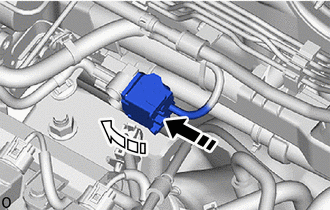
|
|
Connect the connector |

|
Lock the lock lever |
for 2ZR-FXE:
Connect the connector to the brake booster pump assembly and lock the lock lever as shown in the illustration.
- NOTICE:
- ·
Make sure that the connector is locked securely.
·Make sure that the connector can be connected smoothly. Do not allow water, oil or dirt to enter.
for M20A-FXS:
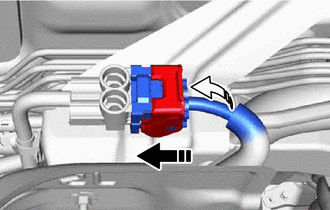
|
|
Connect the connector |
|
|
Lock the lock lever |
Connect the connector to the brake booster pump assembly and lock the lock lever as shown in the illustration.
- NOTICE:
- ·
Make sure that the connector is locked securely.
·Make sure that the connector can be connected smoothly. Do not allow water, oil or dirt to enter the connector.
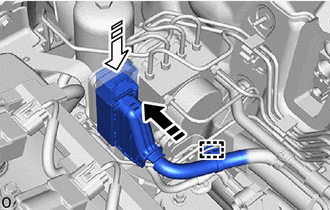
|
|
Connect the connector |
|
|
Lock the lock lever |
Connect the connector to the brake actuator assembly and lock the lock lever as shown in the illustration.
- NOTICE:
- ·
Make sure that the connector is locked securely.
·Make sure that the connector can be connected smoothly. Do not allow water, oil or dirt to enter.
Engage the clamp to install the engine room main wire.
12.CONNECT CABLE TO NEGATIVE AUXILIARY BATTERY TERMINAL (for 2ZR-FXE)
13.CONNECT CABLE TO NEGATIVE AUXILIARY BATTERY TERMINAL (for M20A-FXS)
14.BLEED BRAKE SYSTEM
15.CHARGE AIR CONDITIONING SYSTEM WITH REFRIGERANT
16.WARM UP COMPRESSOR
17.INSPECT FOR REFRIGERANT LEAK
for HFC-134a(R134a):
Click hereVehicle Interior>HEATING / AIR CONDITIONING>REFRIGERANT(for HFO-1234yf(R1234yf))>REPLACEMENT
for HFO-1234yf(R1234yf):
Click hereVehicle Interior>HEATING / AIR CONDITIONING>REFRIGERANT(for HFO-1234yf(R1234yf))>REPLACEMENT
51410
18.INSTALL NO. 1 ENGINE UNDER COVER ASSEMBLY (for M20A-FXS)
55701J
19.INSTALL OUTER COWL TOP PANEL SUB-ASSEMBLY
55735C
20.INSTALL COWL BODY MOUNTING REINFORCEMENT RH
55736D
21.INSTALL COWL BODY MOUNTING REINFORCEMENT LH
55737B
22.INSTALL NO. 1 HEATER AIR DUCT SPLASH SHIELD SEAL
23.INSTALL WINDSHIELD WIPER MOTOR AND LINK ASSEMBLY
24. INITIALIZATION AFTER RECONNECTING AUXILIARY BATTERY TERMINAL
Click hereGeneral>SETUP>WHEN DISCONNECTING OR RECONNECTING BATTERY TERMINAL>WORK PROCEDURE
- HINT:
-
When disconnecting and reconnecting the auxiliary battery, there is an automatic learning function that completes learning when the respective system is used.
-
Click hereGeneral>SETUP>WHEN DISCONNECTING OR RECONNECTING BATTERY TERMINAL>AUTOMATIC LEARNING CHART