8NR-FTS EMISSION CONTROL MONOLITHIC CONVERTER INSTALLATION
PROCEDURE

 17279
1.INSTALL OUTLET TURBINE ELBOW GASKET
Install a new outlet turbine elbow gasket to the turbocharger sub-assembly.
25051
2.INSTALL EXHAUST MANIFOLD CONVERTER SUB-ASSEMBLY (TWC: Front Catalyst)
Temporarily install the exhaust manifold converter sub-assembly (TWC: Front Catalyst) to the turbocharger sub-assembly with 4 new nuts.
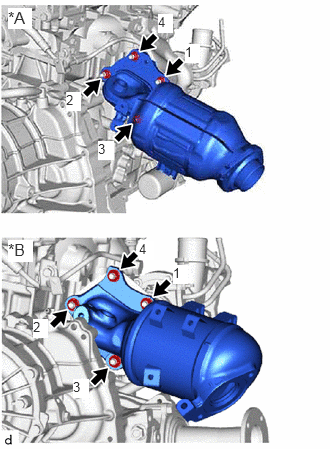
| *A | for 2WD |
| *B | for AWD |
Tighten the 4 nuts in the order shown in the illustration.
- Torque:
- 40 N*m (408 kgf*cm, 30 ft.*lbf)
25586
3.INSTALL NO. 1 MANIFOLD CONVERTER INSULATOR (for 2WD)
Temporarily install the No. 1 manifold converter insulator to the exhaust manifold converter sub-assembly (TWC: Front Catalyst) with the 3 bolts.
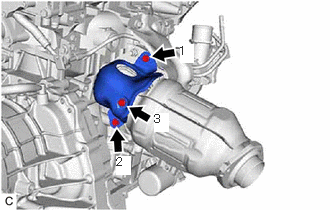
Tighten the 3 bolts in the order shown in the illustration.
- Torque:
- 10 N*m (102 kgf*cm, 7 ft.*lbf)
17272
4.INSTALL NO. 2 TURBO INSULATOR
Temporarily install the No. 2 turbo insulator to the cylinder head sub-assembly and heat insulator bracket with the 2 bolts.
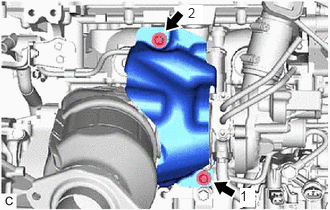
Tighten the 2 bolts in the order shown in the illustration.
- Torque:
- 10 N*m (102 kgf*cm, 7 ft.*lbf)
25587
5.INSTALL NO. 2 MANIFOLD CONVERTER INSULATOR (for AWD)
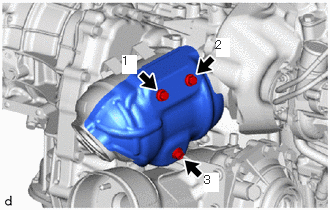
Temporarily install the No. 2 manifold converter insulator to the exhaust manifold converter sub-assembly (TWC: Front Catalyst) with the 3 bolts.
Tighten the 3 nuts in the order shown in the illustration.
- Torque:
- 12 N*m (122 kgf*cm, 9 ft.*lbf)
25586
6.INSTALL NO. 1 MANIFOLD CONVERTER INSULATOR (for AWD)
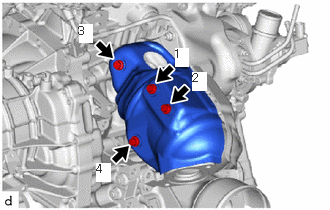
Temporarily install the No. 1 manifold converter insulator to the exhaust manifold converter sub-assembly (TWC: Front Catalyst) with 4 bolts.
Tighten the 4 bolts in the order shown in the illustration.
- Torque:
- 12 N*m (122 kgf*cm, 9 ft.*lbf)
37109A
7.INSTALL PROPELLER SHAFT HEAT INSULATOR BRACKET SUB-ASSEMBLY (for AWD)
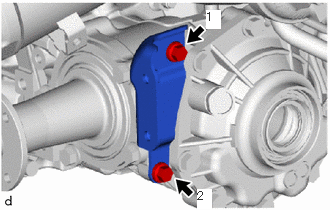
Temporarily install the propeller shaft heat insulator bracket sub-assembly to the transfer assembly with the 2 bolts.
Tighten the 2 bolts in the order shown in the illustration.
- Torque:
- 25 N*m (255 kgf*cm, 18 ft.*lbf)
37117B
8.INSTALL PROPELLER SHAFT HEAT INSULATOR (for AWD)
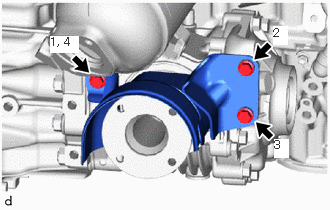
Temporarily install the propeller shaft heat insulator to the transfer assembly with the 3 bolts.
Tighten the 3 bolts in the order shown in the illustration.
- Torque:
- 25 N*m (255 kgf*cm, 18 ft.*lbf)
25591
9.INSTALL MANIFOLD SUPPORT BRACKET (for AWD)
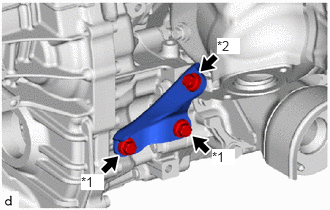
| *1 | Bolt (A) |
| *2 | Bolt (B) |
Temporarily install the manifold support bracket to the cylinder block sub-assembly and exhaust manifold converter sub-assembly (TWC: Front Catalyst) with the 3 bolts.
Temporarily tighten the 2 bolts (A).
Tighten the bolt (B).
- Torque:
- 40 N*m (408 kgf*cm, 30 ft.*lbf)
Tighten the 2 bolts (A).
- Torque:
- 40 N*m (408 kgf*cm, 30 ft.*lbf)
17163
10.INSTALL NO. 1 HEAT INSULATOR BRACKET (for 2WD)
- HINT:
-
Perform this procedure when it is necessary to replace the No. 1 heat insulator bracket.
Install the No. 1 heat insulator bracket to the cylinder block sub-assembly with the bolt.
- Torque:
- 43 N*m (438 kgf*cm, 32 ft.*lbf)
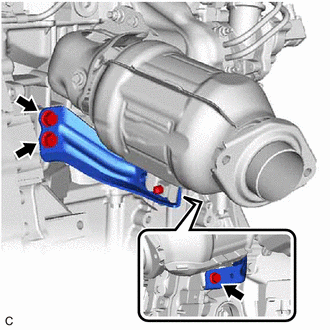
Temporarily install the manifold support bracket to the cylinder block sub-assembly and exhaust manifold converter sub-assembly with the 3 bolts.
- NOTICE:
-
Tighten the 3 bolts until they contact the surface of the manifold support bracket.
Tighten the 3 bolts.
- Torque:
- 40 N*m (408 kgf*cm, 30 ft.*lbf)
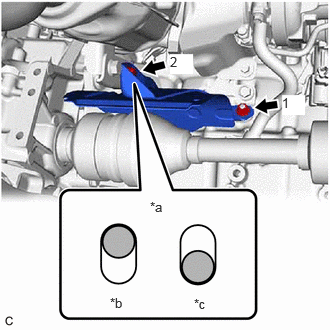
| *a | Bolt Position |
| *b | Correct |
| *c | Incorrect |
Temporarily install the driveshaft heat insulator sub-assembly to the No. 1 heat insulator bracket and manifold support bracket with the bolt and nut as shown in the illustration.
- NOTICE:
- ·
Tighten the nut and bolt until they contact the surface of the driveshaft heat insulator sub-assembly.
·Do not install the drive shaft heat insulator sub-assembly in the uppermost position. If the drive shaft heat insulator sub-assembly is installed in the uppermost position, damage may occur due to stress from distortion caused by high temperatures.
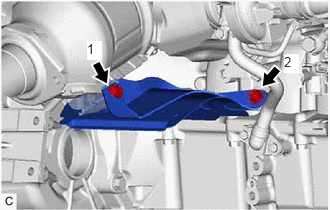
Tighten the bolt and nut in the order shown in the illustration.
- Torque:
- 17.6 N*m (179 kgf*cm, 13 ft.*lbf)
25591
11.INSTALL MANIFOLD SUPPORT BRACKET (for 2WD)
Temporarily install the manifold support bracket to the cylinder block sub-assembly and exhaust manifold converter sub-assembly with the 3 bolts.
- NOTICE:
-
Tighten the 3 bolts until they contact the surface of the manifold support bracket.
Tighten the 3 bolts.
- Torque:
- 40 N*m (408 kgf*cm, 30 ft.*lbf)
12321B
12.INSTALL DRIVE SHAFT HEAT INSULATOR SUB-ASSEMBLY (for 2WD)
| *a | Bolt Position |
| *b | Correct |
| *c | Incorrect |
Temporarily install the driveshaft heat insulator sub-assembly to the No. 1 heat insulator bracket and manifold support bracket with the bolt and nut as shown in the illustration.
- NOTICE:
- ·
Tighten the nut and bolt until they contact the surface of the driveshaft heat insulator sub-assembly.
·Do not install the drive shaft heat insulator sub-assembly in the uppermost position. If the drive shaft heat insulator sub-assembly is installed in the uppermost position, damage may occur due to stress from distortion caused by high temperatures.
Tighten the bolt and nut in the order shown in the illustration.
- Torque:
- 17.6 N*m (179 kgf*cm, 13 ft.*lbf)
58151
13.INSTALL FRONT NO. 1 FLOOR HEAT INSULATOR
Install the front No. 1 floor heat insulator to the vehicle body with 3 nuts.
- Torque:
- 5.0 N*m (51 kgf*cm, 44 in.*lbf)
17410
14.INSTALL FRONT EXHAUST PIPE ASSEMBLY (TWC: Rear Catalyst) (for 2WD)
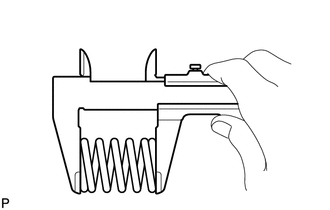
Using a vernier caliper, measure the free length of the compression springs.
| Standard Length | Front Side | 43 mm (1.69 in.) |
| Rear Side | 40 mm (1.57 in.) | |
| Minimum Free Length | Front Side | 41.5 mm (1.63 in.) |
| Rear Side | 38.5 mm (1.52 in.) |
If the free length is less than the minimum, replace the compression spring.
Temporarily install 2 new exhaust pipe gasket to the exhaust manifold converter sub-assembly (TWC: Front Catalyst) and front exhaust pipe assembly (TWC: Rear Catalyst).
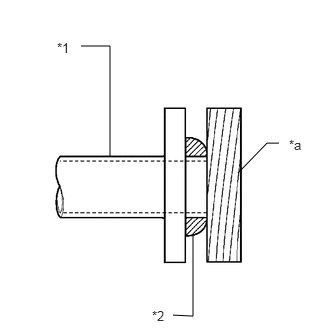
| *1 | Exhaust Manifold Converter Sub-assembly (TWC: Front Catalyst) or Front Exhaust Pipe Assembly (TWC: Rear Catalyst) |
| *2 | Exhaust Pipe Gasket |
| *a | Wooden Block |
Using a plastic hammer and wooden block, tap in the exhaust pipe gasket until its surface is flush with the exhaust manifold converter sub-assembly (TWC: Front Catalyst) and front exhaust pipe assembly (TWC: Rear Catalyst).
- NOTICE:
- ·
Be sure to install the exhaust pipe gasket in the correct direction.
·Do not reuse the exhaust pipe gasket.
·Do not damage the exhaust pipe gasket.
·Do not push in the exhaust pipe gasket by using the exhaust pipe when connecting it.
Install the front exhaust pipe assembly (TWC: Rear Catalyst) to the exhaust manifold converter sub-assembly (TWC: Front Catalyst) and tail exhaust pipe assembly with the 4 compression springs and 4 bolts.
- Torque:
- 43 N*m (438 kgf*cm, 32 ft.*lbf)
- HINT:
-
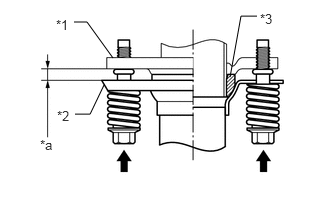 2.396,0.802 2.51,0.167 2.51,0.167 2.677,0.167 false 0.771,0.229 0.906,0.229 0.906,0.229 1.177,0.604 false 0.781,1.188 0.938,1.188 0.938,1.188 1.083,0.885 false 0.417,1.427 0.844,1.615 0.427,0.188 10 false *a 0.583,0.177 0.948,0.375 0.365,0.198 10 false *1 0.594,1.125 0.917,1.313 0.323,0.188 10 false *2 2.708,0.115 3.083,0.292 0.375,0.177 10 false *3
*1 Exhaust Manifold Converter Sub-assembly (TWC: Front Catalyst) or Front Exhaust Pipe Assembly (TWC: Rear Catalyst) *2 Front Exhaust Pipe Assembly (TWC: Rear Catalyst) or Tail Exhaust Pipe Assembly *3 Exhaust Pipe Gasket *a Space between Flanges:
- Front Side: 8.5 mm (0.335 in.)
- Rear Side: 6.5 mm (0.256 in.)
- ·
After installation, check that the space between the flanges of the exhaust manifold converter sub-assembly (TWC: Front Catalyst) and front exhaust pipe assembly (TWC: Rear Catalyst) is consistent front-to-rear and left-to-right.
·After installation, check that the space between the flanges of the front exhaust pipe assembly (TWC: Rear Catalyst) and tail exhaust pipe assembly is consistent front-to-rear and left-to-right.
Engage the wire harness clamp.
Connect the heated oxygen sensor connector.
17410
15.INSTALL FRONT EXHAUST PIPE ASSEMBLY (for AWD)
Temporarily install new exhaust pipe gasket to the exhaust manifold converter sub-assembly (TWC: Front Catalyst) and front exhaust pipe assembly.
Install the front exhaust pipe assembly to the exhaust manifold converter sub-assembly (TWC: Front Catalyst) with 2 new nuts.
- Torque:
- 43 N*m (438 kgf*cm, 32 ft.*lbf)
Engage the wire harness clamp.
Connect the heated oxygen sensor connector.
17420K
16.INSTALL NO. 2 CENTER EXHAUST PIPE ASSEMBLY (TWC: Rear Catalyst) (for AWD)
Temporarily install 2 new exhaust pipe gaskets to the front exhaust pipe assembly and tail exhaust pipe assembly.
Connect the No. 2 center exhaust pipe assembly (TWC: Rear Catalyst) to the 4 exhaust pipe supports.
Install the No. 2 center exhaust pipe assembly (TWC: Rear Catalyst) to the front exhaust pipe assembly and tail exhaust pipe assembly with the 4 bolts.
- Torque:
- 43 N*m (438 kgf*cm, 32 ft.*lbf)
57533B
17.INSTALL FRONT FLOOR CENTER BRACE
58166
18.INSTALL FRONT FLOOR COVER LH (w/ Cover)
58165B
19.INSTALL FRONT FLOOR COVER RH (w/ Cover)
- HINT:
-
Perform the same procedure as for the front floor cover LH.
12611
20.INSTALL NO. 1 ENGINE COVER
Install the No. 1 engine cover to the cylinder head cover sub-assembly and cylinder head sub-assembly.
89467B
21.INSTALL AIR FUEL RATIO SENSOR
17301C
22.INSTALL INLET NO. 1 AIR DUCT SUB-ASSEMBLY
Connect the inlet No. 1 air duct sub-assembly to the turbocharger sub-assembly.
Tighten the hose clamp.
- Torque:
- 4.0 N*m (41 kgf*cm, 35 in.*lbf)
Connect the No. 2 vacuum transmitting hose assembly to the turbocharger sub-assembly.
Connect the intake air control valve (air by-pass valve assembly) connector.
Connect the inlet No. 1 air duct sub-assembly to the fuel pump protector with the bolt.
- Torque:
- 10 N*m (102 kgf*cm, 7 ft.*lbf)
Connect the No. 1 vacuum transmitting hose assembly to the vacuum pump assembly.
Install the vacuum tank to the inlet No. 1 air duct sub-assembly with the 2 bolts.
- Torque:
- 9.0 N*m (92 kgf*cm, 80 in.*lbf)
Connect the No. 1 vacuum transmitting hose assembly to the vacuum tank.
25819
23.INSTALL VACUUM REGULATING VALVE ASSEMBLY
Connect the No. 2 vacuum transmitting hose and No. 3 vacuum transmitting hose to the vacuum regulating valve assembly.
Install the vacuum regulating valve assembly and No. 2 vacuum switching valve bracket to the cylinder head sub-assembly with the 3 bolts.
- Torque:
- 10 N*m (102 kgf*cm, 7 ft.*lbf)
17360A
24.INSTALL AIR TUBE ASSEMBLY
Connect the air tube assembly to the turbocharger sub-assembly.
Tighten the hose clamp.
- Torque:
- 6.3 N*m (64 kgf*cm, 56 in.*lbf)
Connect the No. 2 intercooler water hose and No. 3 intercooler water hose to the No. 1 water hose clamp bracket.
Connect the No. 2 intercooler water hose and No. 3 intercooler water hose to the turbocharger sub-assembly and slide the 2 clips to secure them.
12217
25.INSTALL VENTILATION EJECTOR
Apply a light coat of engine oil to the O-ring.
- NOTICE:
-
When reusing the ventilation ejector, inspect the O-ring.
Install the O-ring to the cylinder head cover sub-assembly.
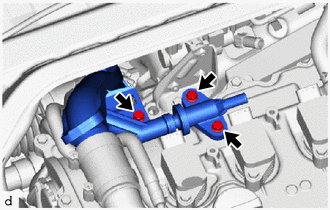
Install the ventilation ejector and air tube assembly to the cylinder head cover sub-assembly with the 3 bolts.
- Torque:
- 10 N*m (102 kgf*cm, 7 ft.*lbf)
12261
26.INSTALL VENTILATION HOSE
Install the ventilation hose to the cylinder head cover sub-assembly and inlet No. 1 air duct sub-assembly and slide the 2 clips to secure it.
Install the No. 4 ventilation hose to the ventilation ejector and inlet No. 1 air duct sub-assembly and slide the 2 clips to secure it.
82121
27.INSTALL ENGINE WIRE
Install the wire harness clamp bracket to the cylinder head sub-assembly with the 2 bolts.
- Torque:
- 10 N*m (102 kgf*cm, 7 ft.*lbf)
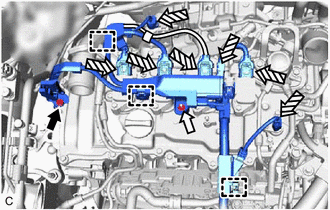

|
Bolt |

|
Nut |

|
Connector |
Engage the 3 wire harness clamps.
Install the bolt and nut.
- Torque:
- 10 N*m (102 kgf*cm, 7 ft.*lbf)
Connect the 7 connectors.
17705
28.INSTALL AIR CLEANER CAP WITH AIR CLEANER HOSE
17751
29.INSTALL NO. 1 AIR CLEANER INLET
53141F
30.INSTALL RADIATOR COVER
55225
31.INSTALL DASH PANEL HEAT INSULATOR
for LHD:
Click hereBrake>BRAKE SYSTEM (OTHER)>BRAKE BOOSTER (for LHD)>INSTALLATION
for RHD:
Click hereBrake>BRAKE SYSTEM (OTHER)>BRAKE BOOSTER (for RHD)>INSTALLATION
55701J
32.INSTALL OUTER COWL TOP PANEL SUB-ASSEMBLY (for LHD)
55701J
33.INSTALL OUTER COWL TOP PANEL SUB-ASSEMBLY (for RHD)
55735C
34.INSTALL COWL BODY MOUNTING REINFORCEMENT RH
55736D
35.INSTALL COWL BODY MOUNTING REINFORCEMENT LH
55735A
36.INSTALL WATER GUARD PLATE LH
55737B
37.INSTALL NO. 1 HEATER AIR DUCT SPLASH SHIELD SEAL
38.INSTALL WINDSHIELD WIPER MOTOR AND LINK ASSEMBLY
39.INSTALL INTERCOOLER ASSEMBLY
40.INSPECT FOR EXHAUST GAS LEAK
If gas is leaking, tighten the areas necessary to stop the leak. Replace damaged parts as necessary.
Perform Inspection After Repair after repairing an exhaust gas leak.
Click hereEngine / Hybrid System>8NR-FTS (ENGINE CONTROL)>SFI SYSTEM>INITIALIZATION