3ZR-FAE ENGINE MECHANICAL ENGINE UNIT INSTALLATION
PROCEDURE

 1.INSTALL WIRE HARNESS CLAMP BRACKET
Install the wire harness clamp bracket to the intake manifold with the bolt.
- Torque:
- 15 N*m (153 kgf*cm, 11 ft.*lbf)
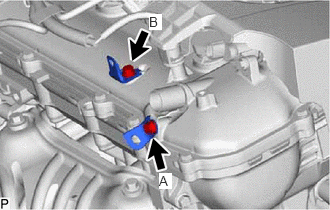
Install the 2 wire harness clamp brackets to the cylinder head cover sub-assembly with the 2 bolts.
- Torque:
- Bolt (A) : 10 N*m (102 kgf*cm, 7 ft.*lbf)
- Bolt (B) : 8.0 N*m (82 kgf*cm, 71 in.*lbf)
16620
2.INSTALL V-RIBBED BELT TENSIONER ASSEMBLY
When replacing the V-ribbed belt tensioner assembly with a new one.
Install the V-ribbed belt tensioner assembly to the engine assembly with the 2 bolts.
- NOTICE:
-
Make sure to install a new V-ribbed belt tensioner assembly with the pin and white cover installed to it.
- Torque:
- 21 N*m (214 kgf*cm, 15 ft.*lbf)
Remove the white cover.
Rotate the V-ribbed belt tensioner assembly slightly clockwise and remove the pin that is used to keep the spring compressed.
- NOTICE:
- ·
Do not forcibly rotate the V-ribbed belt tensioner assembly to the V-ribbed belt installation position with the pin installed.
·Do not apply or add any oil or grease to the V-ribbed belt tensioner assembly.
- HINT:
-
When installing the V-ribbed belt, rotate the V-ribbed belt tensioner assembly clockwise again with the pin removed, and secure the V-ribbed belt tensioner assembly using a 5 mm bi-hexagon wrench.
When reusing the V-ribbed belt tensioner assembly.
Check that the 3 mm bi-hexagon wrench is installed to the V-ribbed belt tensioner assembly.
Install the V-ribbed belt tensioner assembly to the engine assembly with the 2 bolts.
- Torque:
- 21 N*m (214 kgf*cm, 15 ft.*lbf)
Rotate the V-ribbed belt tensioner assembly slightly clockwise and remove the 3 mm bi-hexagon wrench that is used to keep the spring compressed.
- NOTICE:
-
Do not forcibly rotate the V-ribbed belt tensioner assembly to the V-ribbed belt installation position with the 3 mm bi-hexagon wrench installed.
- HINT:
-
When installing the V-ribbed belt, rotate the V-ribbed belt tensioner assembly clockwise again with the 3 mm bi-hexagon wrench removed, and secure the V-ribbed belt tensioner assembly using a 5 mm bi-hexagon wrench.
3.INSTALL ENGINE OIL TEMPERATURE SENSOR
12551A
4.INSTALL NO. 1 VACUUM PUMP BRACKET
Install a new gasket and the No. 1 vacuum pump bracket with the 2 bolts.
- Torque:
- 21 N*m (214 kgf*cm, 15 ft.*lbf)
29300
5.INSTALL VACUUM PUMP ASSEMBLY
16331A
6.INSTALL THERMOSTAT
16321
7.INSTALL WATER INLET
16262
8.INSTALL WATER INLET HOSE
Install the water inlet hose and slide the 2 clips to secure it.
16267
9.CONNECT NO. 3 WATER BY-PASS HOSE
Connect the No. 3 water by-pass hose to the water inlet housing and slide the clip to secure it.
12261
10.INSTALL PCV HOSE
Install the PCV hose to the PCV valve sub-assembly and slide the clip to secure it.
16261
11.INSTALL WATER BY-PASS HOSE
Install the water by-pass hose and slide the clip to secure it.
16268
12.CONNECT NO. 1 WATER BY-PASS PIPE
Install the No. 1 water by-pass pipe with the 2 bolts.
- Torque:
- 21 N*m (214 kgf*cm, 15 ft.*lbf)
16279
13.INSTALL NO. 3 WATER BY-PASS PIPE
Install a new gasket and the No. 3 water by-pass pipe with the 2 nuts.
- Torque:
- 10 N*m (102 kgf*cm, 7 ft.*lbf)
12512C
14.INSTALL NO. 2 GENERATOR BRACKET
Install the No. 2 generator bracket with the bolt.
- Torque:
- 25 N*m (255 kgf*cm, 18 ft.*lbf)
43457
15.INSTALL DRIVE SHAFT BEARING BRACKET
Install the drive shaft bearing bracket with the 3 bolts.
- Torque:
- 63.7 N*m (650 kgf*cm, 47 ft.*lbf)
17141
16.INSTALL EXHAUST MANIFOLD
17118
17.INSTALL MANIFOLD STAY
17167
18.INSTALL NO. 1 EXHAUST MANIFOLD HEAT INSULATOR
11452
19.INSTALL ENGINE OIL LEVEL DIPSTICK GUIDE
Apply a light coat of engine oil to a new O-ring.
Install the O-ring to the engine oil level dipstick guide.
Install the engine oil level dipstick guide with the bolt.
- Torque:
- 21 N*m (214 kgf*cm, 15 ft.*lbf)
Install the engine oil level dipstick.
19500
20.INSTALL IGNITION COIL ASSEMBLY
23250
21.INSTALL FUEL INJECTOR ASSEMBLY
23807V
22.INSTALL NO. 1 DELIVERY PIPE SPACER
23807
23.INSTALL FUEL DELIVERY PIPE SUB-ASSEMBLY
23901
24.CONNECT FUEL TUBE SUB-ASSEMBLY
17650
25.INSTALL PURGE VALVE (PURGE VSV)
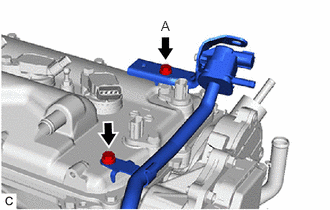
Install the purge valve (purge VSV) with the 2 bolts.
- Torque:
- 10 N*m (102 kgf*cm, 7 ft.*lbf)
- NOTICE:
-
Make sure that there is no oil on the thread of the bolt (A).
17111
26.INSTALL INTAKE MANIFOLD
22210
27.INSTALL THROTTLE BODY ASSEMBLY