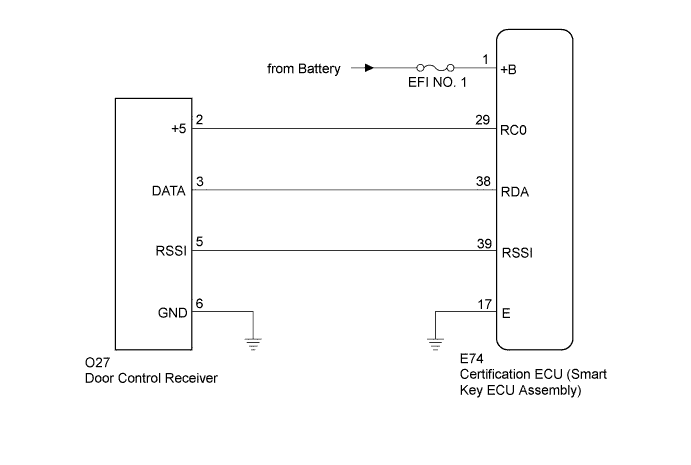
ENTRY AND START SYSTEM > All Door Entry Lock/Unlock Functions and Wireless Functions do not Operate |
| 1.CHECK POWER DOOR LOCK OPERATION |
When the door control switch on the master switch assembly is operated, check that the locked doors unlock (Click here).
|
| ||||
| OK | |
 |
| 2.CHECK ELECTRICAL KEY TRANSMITTER |
When another registered electrical key transmitter is used, check that the wireless and entry functions operate normally (Click here).
| Result | Proceed to |
| Entry functions operate and electrical key transmitter does not operate | A |
| Entry functions do not operate | B |
|
| ||||
| A | |
|
| 3.CHECK ELECTRICAL KEY TRANSMITTER (LED) |
Check that the transmitter LED illuminates 3 times when the switch is pressed 3 times.
| Result | Proceed to |
| Transmitter LED does not illuminate 3 times when switch is pressed 3 times | A |
| Transmitter LED illuminates 3 times when switch is pressed 3 times | B |
| Transmitter LED does not illuminate the second or third time | C |
|
| ||||
|
| ||||
| A | |
|
| 4.INSPECT TRANSMITTER BATTERY (VOLTAGE) |
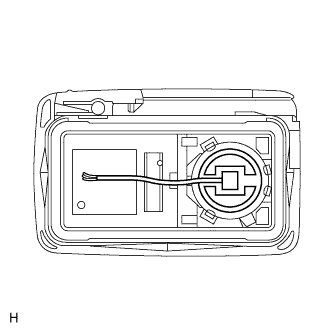 |
Remove the battery from the electrical key transmitter that does not operate. Attach a lead wire (0.6 mm (0.0236 in.) or less in diameter including wire sheath) with tape or equivalent to the negative terminal (Click here).
Carefully pull the lead wire out from the position shown in the illustration and install the previously removed transmitter battery.
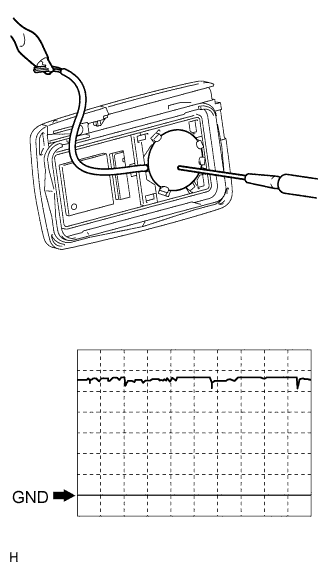 |
Using an oscilloscope, check the transmitter battery voltage waveform.
| Item | Content |
| Tester Connection | Battery positive (+) - Battery negative (-) |
| Tool Setting | 0.5 V/DIV., 100 ms/DIV. |
| Condition | Engine switch OFF, all doors closed and lock switch pushed |
| Specified Condition | 2.2 to 3.2 V (Refer to the waveform) |
|
| ||||
| OK | ||
 | ||
| ||
| 5.CHECK WAVE ENVIRONMENT |
Bring the electrical key transmitter near the door control receiver, and perform a wireless and entry operation check.
|
| ||||
| OK | ||
| ||
| ||
| 6.INSPECT FUSE (EFI NO. 1) |
Remove the EFI NO. 1 fuse from the No. 1 engine room relay block and fuse block.
Measure the resistance according to the value(s) in the table below.
| Tester Connection | Condition | Specified Condition |
| EFI NO. 1 fuse | Always | Below 1 Ω |
|
| ||||
| OK | |
|
| 7.CHECK HARNESS AND CONNECTOR (CERTIFICATION ECU - BATTERY AND GROUND) |
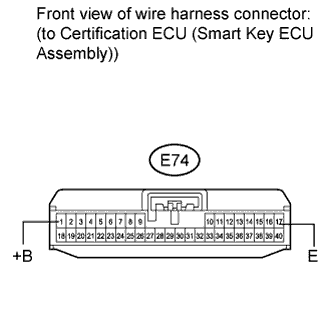 |
Disconnect the certification ECU (smart key ECU assembly) connector.
Measure the voltage according to the value(s) in the table below.
| Tester Connection | Condition | Specified Condition |
| E74-1 (+B) - Body ground | Always | 11 to 14 V |
Measure the resistance according to the value(s) in the table below.
| Tester Connection | Condition | Specified Condition |
| E74-17 (E) - Body ground | Always | Below 1 Ω |
|
| ||||
| OK | |
|
| 8.CHECK HARNESS AND CONNECTOR (DOOR CONTROL RECEIVER - CERTIFICATION ECU) |
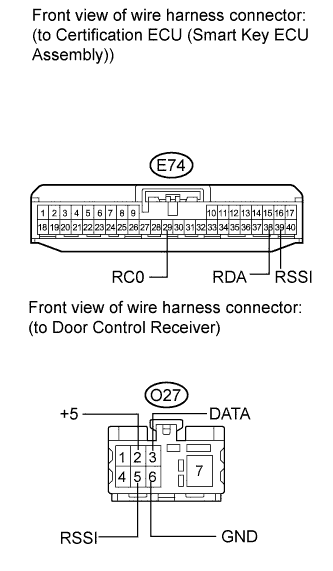 |
Disconnect the door control receiver connector.
Measure the resistance according to the value(s) in the table below.
| Tester Connection | Condition | Specified Condition |
| O27-6 (GND) - Body ground | Always | Below 1 Ω |
| E74-29 (RC0) - O27-2 (+5) | Always | Below 1 Ω |
| E74-38 (RDA) - O27-3 (DATA) | Always | Below 1 Ω |
| E74-39 (RSSI) - O27-5 (RSSI) | Always | Below 1 Ω |
| E74-29 (RC0) - Body ground | Always | 10 kΩ or higher |
| E74-38 (RDA) - Body ground | Always | 10 kΩ or higher |
| E74-39 (RSSI) - Body ground | Always | 10 kΩ or higher |
|
| ||||
| OK | |
|
| 9.REPLACE DOOR CONTROL RECEIVER |
Replace the door control receiver (Click here).
| NEXT | |
|
| 10.CHECK DOOR CONTROL RECEIVER (OPERATION) |
Check that the wireless and entry functions operate normally (Click here).
|
| ||||
| OK | ||
| ||
| ||

