PARKING BRAKE PARKING BRAKE PEDAL(for RHD) REMOVAL
PROCEDURE

 1. PRECAUTION
- CAUTION:
-
Be sure to read Precaution thoroughly before servicing.
-
Click hereVehicle Interior>SUPPLEMENTAL RESTRAINT SYSTEMS>AIRBAG SYSTEM>PRECAUTION
- NOTICE:
-
After turning the ignition switch off, waiting time may be required before disconnecting the cable from the negative (-) battery terminal. Therefore, make sure to read the disconnecting the cable from the negative (-) battery terminal notices before proceeding with work.
-
Click hereGeneral>INTRODUCTION>REPAIR INSTRUCTION>PRECAUTION
2.DISCONNECT CABLE FROM NEGATIVE BATTERY TERMINAL
- CAUTION:
-
Wait at least 90 seconds after disconnecting the cable from the negative (-) battery terminal to disable the SRS system.
- NOTICE:
-
When disconnecting the cable, some systems need to be initialized after the cable is reconnected.
-
Click hereGeneral>INTRODUCTION>REPAIR INSTRUCTION>INITIALIZATION
3. TURN FRONT WHEELS TO FACE STRAIGHT AHEAD
4.REMOVE FRONT WHEEL RH
33525
5.REMOVE SHIFT LEVER SUPPORT
- HINT:
-
Use the same procedure as for LHD.
-
Click hereDrivetrain>U660E AUTOMATIC TRANSMISSION / TRANSAXLE>SHIFT LEVER>REMOVAL
73900
6.REMOVE LOWER NO. 1 INSTRUMENT PANEL AIRBAG ASSEMBLY
899A0
7.REMOVE NO. 1 INDOOR ELECTRICAL KEY ANTENNA ASSEMBLY
58543B
8.REMOVE FLOOR CARPET BRACKET RH
89170
9.REMOVE AIRBAG SENSOR ASSEMBLY
55431B
10.REMOVE UPPER INSTRUMENT PANEL FINISH PANEL
55650
11.REMOVE NO. 1 INSTRUMENT PANEL REGISTER ASSEMBLY
- HINT:
-
Use the same procedure as for LHD.
-
Click hereVehicle Interior>INTERIOR PANELS / TRIM>INSTRUMENT PANEL SAFETY PAD>REMOVAL
55410C
12.REMOVE INSTRUMENT CLUSTER FINISH PANEL ASSEMBLY
83100
13.REMOVE COMBINATION METER ASSEMBLY
- HINT:
-
Use the same procedure as for LHD.
-
Click hereVehicle Interior>METER / GAUGE / DISPLAY>COMBINATION METER>REMOVAL
87201B
14.REMOVE NO. 2 AIR DUCT SUB-ASSEMBLY
45220
15.SEPARATE STEERING INTERMEDIATE SHAFT ASSEMBLY
- HINT:
-
Use the same procedure as for LHD.
-
Click hereSteering>STEERING COLUMN>STEERING COLUMN ASSEMBLY>REMOVAL
45220
16.REMOVE STEERING INTERMEDIATE SHAFT ASSEMBLY
- HINT:
-
Use the same procedure as for LHD.
-
Click hereSteering>STEERING COLUMN>STEERING COLUMN ASSEMBLY>REMOVAL
46441
17.LOOSEN ADJUSTING NUT
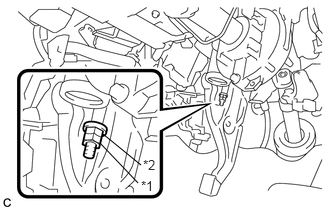
| *1 | Lock Nut |
| *2 | Adjusting Nut |
Remove the lock nut and loosen the adjusting nut.
46440
18.SEPARATE NO. 4 PARKING BRAKE CABLE ASSEMBLY
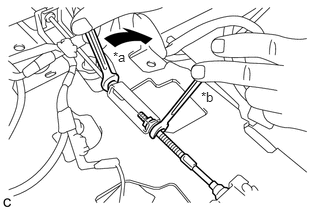
| *a | Turn |
| *b | Hold |
Separate the No. 4 parking brake cable assembly from the parking brake control pedal assembly as shown in the illustration.
46201
19.REMOVE PARKING BRAKE CONTROL PEDAL ASSEMBLY
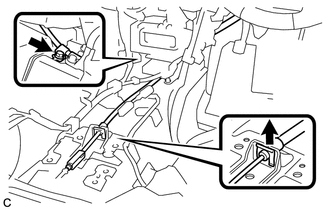
Remove the clip from the No. 1 parking brake cable assembly.
Remove the bolt and separate the No. 1 parking brake cable assembly.
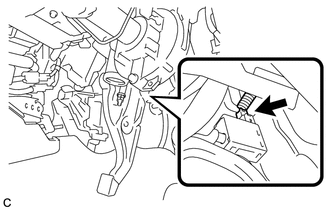
Disconnect the parking brake switch connector.
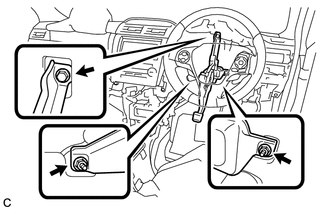
Remove the bolt, 2 nuts and parking brake control pedal assembly.