PARKING BRAKE PARKING BRAKE ASSEMBLY REASSEMBLY
PROCEDURE

 47456A
1.INSTALL PARKING BRAKE SHOE GUIDE PLATE
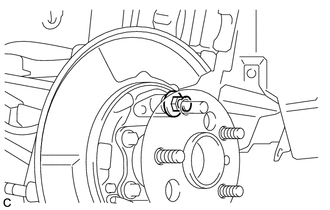
Install the parking brake shoe guide plate with the parking brake shoe guide plate set bolt.
- Torque:
- 18 N*m (184 kgf*cm, 13 ft.*lbf)
2.APPLY HIGH TEMPERATURE GREASE
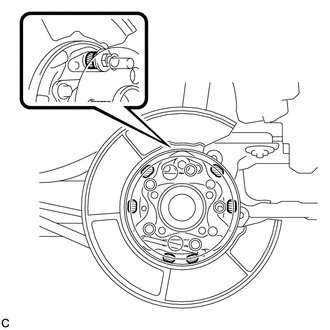

|
High Temperature Grease |
Apply high temperature grease to the areas of the parking brake plate which make contact with the shoes as shown in the illustration.
47447E
3.INSTALL PARKING BRAKE SHOE HOLD DOWN SPRING PIN
for Front Side:
Install the 2 parking brake shoe hold down spring cups, parking brake shoe hold down spring and parking brake shoe hold down spring pin.
for Rear Side:
Install the 2 parking brake shoe hold down spring cups, parking brake shoe hold down spring and parking brake shoe hold down spring pin.
47612
4.INSTALL PARKING BRAKE SHOE LEVER
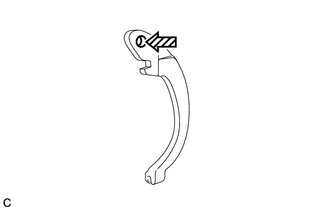

|
High Temperature Grease |
Apply high temperature grease to the areas of the parking brake shoe lever which make contact with the No. 2 parking brake shoe assembly.
Temporarily install the parking brake shoe lever to the No. 2 parking brake shoe assembly with a new parking brake shoe type C washer.
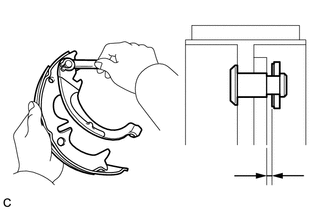
Using a feeler gauge, measure the clearance between the No. 2 parking brake shoe assembly and parking brake shoe lever.
- Standard clearance:
Less than 0.35 mm (0.0137 in.)
If the clearance is not as specified, replace the parking brake shoe shim with one of the correct size.
- Parking Brake Shoe Shim:
Part No. Shim Thickness 90564-09184 0.3 mm (0.0118 in.) 90564-09185 0.6 mm (0.0236 in.) 90564-09186 0.9 mm (0.0354 in.)
Select a parking brake shoe shim and install it and the parking brake shoe type C washer.
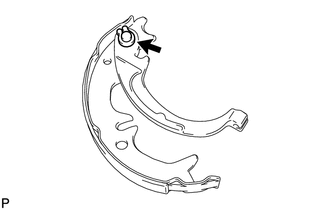
Using a pair of pliers, squeeze together the ends of the parking brake shoe type C washer.
Check that the parking brake shoe lever moves smoothly.
47612
5.CONNECT PARKING BRAKE SHOE LEVER
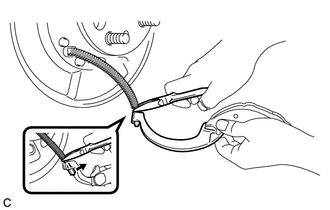
Using needle-nose pliers, connect the No. 3 parking brake cable assembly to the parking brake shoe lever.
46550E
6.INSTALL PARKING BRAKE SHOE RETURN TENSION SPRING (for Lower Side)
Install the parking brake shoe return tension spring to the No. 2 parking brake shoe assembly.
46580
7.INSTALL NO. 1 PARKING BRAKE SHOE ASSEMBLY
Install the No. 1 parking brake shoe assembly to the parking brake shoe return tension spring.
47406A
8.INSTALL PARKING BRAKE SHOE ADJUSTING SCREW SET
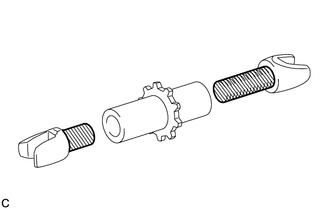
|
|
High Temperature Grease |
Apply high temperature grease to the parking brake shoe adjusting screw set as shown in the illustration.
Install the parking brake shoe adjusting screw set to the No. 1 parking brake shoe assembly and No. 2 parking brake shoe assembly.
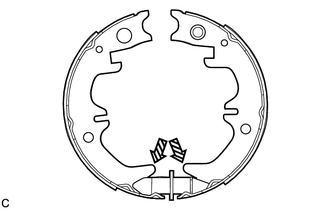
|
|
High Temperature Grease |
Apply high temperature grease to the No. 1 parking brake shoe assembly and No. 2 parking brake shoe assembly as shown in the illustration.
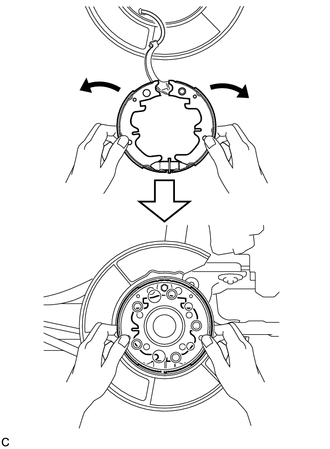
Expand the No. 1 and No. 2 parking brake shoe assemblies outward by hand and fit them to the parking brake plate.
- NOTICE:
-
Make sure that the parking brake shoe lever does not separate from the No. 2 parking brake shoe assembly.
46590
9.CONNECT NO. 2 PARKING BRAKE SHOE ASSEMBLY
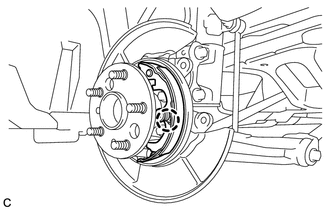
Engage the claw of the parking brake shoe hold down spring cup to the No. 2 parking brake shoe assembly.
46580
10.CONNECT NO. 1 PARKING BRAKE SHOE ASSEMBLY
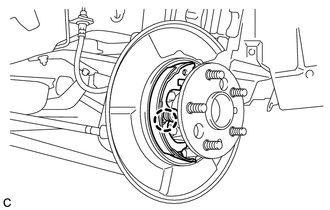
Engage the claw of the parking brake shoe hold down spring cup to the No. 1 parking brake shoe assembly.
47613D
11.INSTALL PARKING BRAKE SHOE STRUT COMPRESSION SPRING
Install the parking brake shoe strut compression spring.
47614
12.INSTALL PARKING BRAKE SHOE STRUT
Install the parking brake shoe strut.
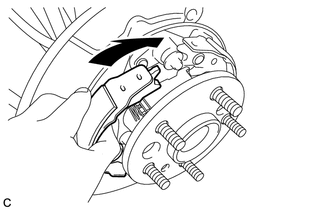
Install the No. 1 parking brake shoe assembly.
46550G
13.INSTALL PARKING BRAKE SHOE RETURN TENSION SPRING (for Upper Side)
for Front Side:
Install the parking brake shoe return tension spring.
for Rear Side:
Install the parking brake shoe return tension spring.
14. CHECK PARKING BRAKE INSTALLATION
Check that each part is installed properly.
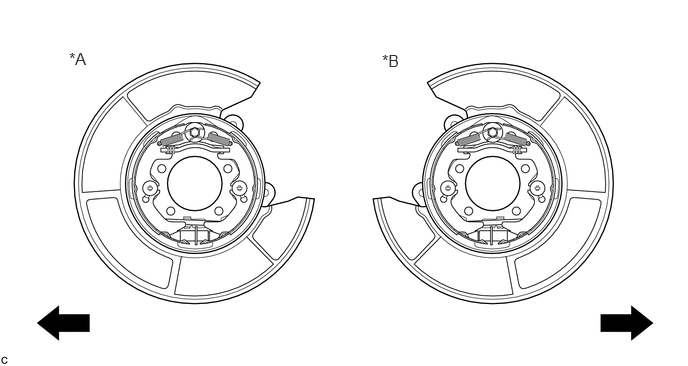
| *A | LH Side | *B | RH Side |

|
Front of the Vehicle | - | - |
- NOTICE:
-
There should be no oil or grease on the friction surfaces of the shoe linings or discs.
42431
15.INSTALL REAR DISC
42491
16.INSTALL PARKING BRAKE SHOE ADJUSTING HOLE PLUG
17.INSTALL REAR DISC BRAKE CALIPER ASSEMBLY
18.ADJUST PARKING BRAKE SHOE CLEARANCE AND PARKING BRAKE PEDAL TRAVEL
19.INSTALL REAR WHEEL
- Torque:
- 103 N*m (1049 kgf*cm, 76 ft.*lbf)
20.CONNECT CABLE TO NEGATIVE AUXILIARY BATTERY TERMINAL
Connect the cable to the negative (-) auxiliary battery terminal.
Click herePower Source / Network>2AR-FXE BATTERY / CHARGING>AUXILIARY BATTERY>INSTALLATION
Connect the reservoir level switch connector.
Clear the DTCs.
55702A
21.INSTALL FRONT OUTER COWL TOP PANEL SUB-ASSEMBLY
22.INSTALL WINDSHIELD WIPER MOTOR AND LINK ASSEMBLY