Home › Engine / Hybrid System · 6AR-FSE › ENGINE CONTROL › SFI SYSTEM

DTC    P020113    Cylinder 1 Injector "A" Circuit Open

DTC    P020213    Cylinder 2 Injector "A" Circuit Open

DTC    P020313    Cylinder 3 Injector "A" Circuit Open

DTC    P020413    Cylinder 4 Injector "A" Circuit Open

DTC    P062D13    Fuel Injector Driver Circuit Performance Bank 1 Circuit Open

for Preparation Click here


DESCRIPTION

The D-4S system has two fuel injection systems. One is an in-cylinder direct injection system that directly injects pressurized fuel into the combustion chamber. The other is an intake port injection system. The ECM determines which fuel injection system to use in accordance with the engine conditions. The direct injection system uses an injector driver (EDU) built into the ECM to rapidly operate the fuel injector assemblies (for direct injection). It converts injection request signals from the ECM to high-voltage and high-current injector-drive signals that drive the fuel injector assemblies (for direct injection).

DTC No.
DTC Detection Condition
Trouble Area
P020113
Either of following conditions is met (1 trip detection logic):
  1. Short to +B in No. 1 fuel injector assembly (for direct injection) circuit for 40 times or more.
  2. Open or short to ground in No. 1 fuel injector assembly (for direct injection) circuit for 20 times or more.
  1. Open or short in fuel injector assembly (for direct injection) circuit
  2. Fuel injector assembly (for direct injection)
  3. EDU relay
  4. No. 1 integration relay
  5. ECM
P020213
Either of following conditions is met (1 trip detection logic):
  1. Short to +B in No. 2 fuel injector assembly (for direct injection) circuit for 40 times or more.
  2. Open or short to ground in No. 2 fuel injector assembly (for direct injection) circuit for 20 times or more.
  1. Open or short in fuel injector assembly (for direct injection) circuit
  2. Fuel injector assembly (for direct injection)
  3. EDU relay
  4. No. 1 integration relay
  5. ECM
P020313
Either of following conditions is met (1 trip detection logic):
  1. Short to +B in No. 3 fuel injector assembly (for direct injection) circuit for 40 times or more.
  2. Open or short to ground in No. 3 fuel injector assembly (for direct injection) circuit for 20 times or more.
  1. Open or short in fuel injector assembly (for direct injection) circuit
  2. Fuel injector assembly (for direct injection)
  3. EDU relay
  4. No. 1 integration relay
  5. ECM
P020413
Either of following conditions is met (1 trip detection logic):
  1. Short to +B in No. 4 fuel injector assembly (for direct injection) circuit for 40 times or more.
  2. Open or short to ground in No. 4 fuel injector assembly (for direct injection) circuit for 20 times or more.
  1. Open or short in fuel injector assembly (for direct injection) circuit
  2. Fuel injector assembly (for direct injection)
  3. EDU relay
  4. No. 1 integration relay
  5. ECM
P062D13
Open or short in all fuel injector assembly (for direct injection) circuits for 60 times or more (1 trip detection logic).
  1. Open or short in fuel injector assembly (for direct injection) circuit
  2. Fuel injector assembly (for direct injection)
  3. EDU relay
  4. No. 1 integration relay
  5. ECM

MONITOR DESCRIPTION

The fuel injection sequence occurs in numerical order from No. 1 to No. 4.
The ECM monitors the EDU at all times. If a driver or fuel injector assembly (for direct injection) is malfunctioning, the EDU sends a fuel injector assembly (for direct injection) operation condition signal (fail signal) to the ECM. When the ECM receives this signal, it stops the fuel injection control of the appropriate cylinder, cuts voltage to the appropriate EDU relay, and illuminates the MIL.

MONITOR STRATEGY


Required Sensors/Components
Fuel injector assembly (for direct injection)
ECM (injector driver)
Frequency of Operation
Continuous

CONFIRMATION DRIVING PATTERN

  1. Connect the GTS to the DLC3.
  2. Turn the engine switch on (IG) and turn the GTS on.
  3. Clear the DTCs (even if no DTCs are stored, perform the clear DTC procedure).
  4. Turn the engine switch off and wait for at least 30 seconds.
  5. Turn the engine switch on (IG) and turn the GTS on.
  6. Start the engine and warm it up.
  7. Idle the engine for 15 seconds or more.
  8. Enter the following menus: Powertrain / Engine / Trouble Codes.
  9. Read the DTCs.

    HINT:
    1. If a pending DTC is output, the system is malfunctioning.
    2. If a pending DTC is not output, perform the following procedure.

  10. Enter the following menus: Powertrain / Engine / Utility / All Readiness.
  11. Input the DTC: P020113, P020213, P020313, P020413 or P062D13.
  12. Check the DTC judgment result.

GTS Display
Description
NORMAL
  1. DTC judgment completed
  2. System normal
ABNORMAL
  1. DTC judgment completed
  2. System abnormal
INCOMPLETE
  1. DTC judgment not completed
  2. Perform driving pattern after confirming DTC enabling conditions
N/A
  1. Unable to perform DTC judgment
  2. Number of DTCs which do not fulfill DTC preconditions has reached ECU memory limit

HINT:
  1. If the judgment result shows NORMAL, the system is normal.
  2. If the judgment result shows ABNORMAL, the system has a malfunction.
  3. If the judgment result shows INCOMPLETE or N/A, perform the Confirmation Driving Pattern and check the DTC judgment result again.


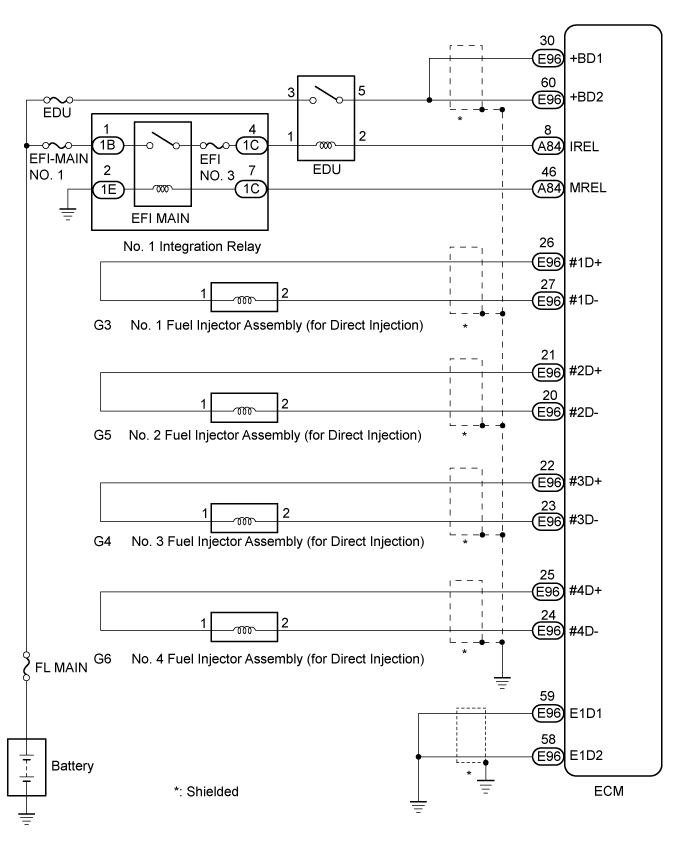
WIRING DIAGRAM


A337623E01


INSPECTION PROCEDURE

NOTICE:
Inspect the fuses for circuits related to this system before performing the following procedure.

HINT:
  1. If the current from the EDU relay is cut because DTC P062D13 is stored, DTC P123513 will be stored even if the fuel pump (for high pressure side) is normal.
  2. Read freeze frame data using the GTS. The ECM records vehicle and driving condition information as freeze frame data the moment a DTC is stored. When troubleshooting, freeze frame data can help determine if the vehicle was moving or stationary, if the engine was warmed up or not, if the air fuel ratio was lean or rich, and other data from the time the malfunction occurred.

1.READ DTC OUTPUT (DTC P020113, P020213, P020313 AND/OR P020413)
  1. Connect the GTS to the DLC3

  1. Turn the engine switch on (IG).

  1. Turn the GTS on.

  1. Enter the following menus: Powertrain / Engine / Trouble Codes.

  1. Read the DTCs.


Result:

Result
Proceed to
DTC P020113, P020213, P020313 or P020413 is output
A
3 or more of the following DTCs are output: P062D13, P020113, P020213, P020313 and P020413
B
P062D13 is output


B
Go to step 4
A


2.CHECK HARNESS AND CONNECTOR
  1. Disconnect the ECM connector.

  1. Measure the resistance according to the value(s) in the table below.


Standard Resistance:

Tester Connection
Condition
Specified Condition
E96-26 (#1D+) - E96-27 (#1D-)
20°C (68°F)
1.76 to 2.06 Ω
E96-21 (#2D+) - E96-20 (#2D-)
20°C (68°F)
1.76 to 2.06 Ω
E96-22 (#3D+) - E96-23 (#3D-)
20°C (68°F)
1.76 to 2.06 Ω
E96-25 (#4D+) - E96-24 (#4D-)
20°C (68°F)
1.76 to 2.06 Ω
E96-26 (#1D+) - Body ground and other terminals
Always
1 MΩ or higher
E96-21 (#2D+) - Body ground and other terminals
Always
1 MΩ or higher
E96-22 (#3D+) - Body ground and other terminals
Always
1 MΩ or higher
E96-25 (#4D+) - Body ground and other terminals
Always
1 MΩ or higher

HINT:
The standard values shown are fuel injector assembly (for direct injection) resistance values.


NG
Go to step 3
OK

REPLACE ECM (Click here)  

3.INSPECT FUEL INJECTOR ASSEMBLY (FOR DIRECT INJECTION (RESISTANCE))
  1. Check the resistance of the fuel injector assembly (for direct injection) (Click here).

    HINT:
    Perform "Inspection After Repair" after replacing the fuel injector assembly (for direct injection) (Click here).


NG
REPLACE FUEL INJECTOR ASSEMBLY (FOR DIRECT INJECTION) (Click here)
OK

REPAIR OR REPLACE HARNESS OR CONNECTOR (FUEL INJECTOR ASSEMBLY (FOR DIRECT INJECTION) - ECM) 

4.INSPECT EDU RELAY
  1. Inspect the EDU relay .


NG
REPLACE EDU RELAY
OK


5.CHECK HARNESS AND CONNECTOR (BATTERY - EDU RELAY)
  1. Remove the EDU relay from the engine room relay block and junction block assembly.

  1. Measure the voltage according to the value(s) in the table below.

    Standard Voltage:

    Tester Connection
    Condition
    Specified Condition
    3 (EDU relay) - Body ground
    Always
    11 to 14 V


NG
REPAIR OR REPLACE HARNESS OR CONNECTOR
OK


6.CHECK HARNESS AND CONNECTOR (EDU RELAY - ECM)
  1. Remove the EDU relay from the engine room relay block and junction block assembly.

  1. Disconnect the ECM connector.

  1. Measure the resistance according to the value(s) in the table below.

    Standard Resistance:

    Tester Connection
    Condition
    Specified Condition
    5 (EDU relay) - E96-30 (+BD1)
    Always
    Below 1 Ω
    5 (EDU relay) - E96-60 (+BD2)
    Always
    Below 1 Ω
    5 (EDU relay) or E96-30 (+BD1) - Body ground and other terminals
    Always
    10 kΩ or higher
    5 (EDU relay) or E96-60 (+BD2) - Body ground and other terminals
    Always
    10 kΩ or higher


NG
REPAIR OR REPLACE HARNESS OR CONNECTOR
OK


7.CHECK HARNESS AND CONNECTOR (EDU RELAY - ECM)
  1. Remove the EDU relay from the engine room relay block and junction block assembly.

  1. Disconnect the ECM connector.

  1. Measure the resistance according to the value(s) in the table below.

    Standard Resistance:

    Tester Connection
    Condition
    Specified Condition
    2 (EDU relay) - A84-8 (IREL)
    Always
    Below 1 Ω
    2 (EDU relay) or A84-8 (IREL) - Body ground and other terminals
    Always
    10 kΩ or higher


NG
REPAIR OR REPLACE HARNESS OR CONNECTOR
OK


8.CHECK HARNESS AND CONNECTOR (POWER SOURCE OF EDU RELAY)
  1. Remove the EDU relay from the engine room relay block and junction block assembly.

  1. Turn the engine switch on (IG).

  1. Measure the voltage according to the value(s) in the table below.

    Standard Voltage:

    Tester Connection
    Condition
    Specified Condition
    1 (EDU relay) - Body ground
    Engine switch on (IG)
    11 to 14 V


NG
Go to step 9
OK

REPLACE ECM (Click here)  

9.CHECK HARNESS AND CONNECTOR (NO. 1 INTEGRATION RELAY - EDU RELAY)
  1. Remove the EDU relay from the engine room relay block and junction block assembly.

  1. Disconnect the No. 1 integration relay connector.

  1. Measure the resistance according to the value(s) in the table below.

    Standard Resistance:

    Tester Connection
    Condition
    Specified Condition
    1C-4 - 1 (EDU relay)
    Always
    Below 1 Ω
    1C-4 or 1 (EDU relay) - Body ground and other terminals
    Always
    10 kΩ or higher


NG
REPAIR OR REPLACE HARNESS OR CONNECTOR
OK

REPLACE NO. 1 INTEGRATION RELAY (Click here)