6AR-FSE ENGINE CONTROL SFI SYSTEM P21951D A/F (O2) Sensor Signal Biased/Stuck Lean Bank 1 Sensor 1 Circuit Current Out of Range P219523 A/F (O2) Sensor Signal Biased/Stuck Lean Bank 1 Sensor 1 Signal Stuck Low P21961D A/F (O2) Sensor Signal Biased/Stuck Rich Bank 1 Sensor 1 Circuit Current Out of Range P219624 A/F (O2) Sensor Signal Biased/Stuck Rich Bank 1 Sensor 1 Signal Stuck High
DESCRIPTION
Refer to DTC P003012.
Click hereEngine / Hybrid System>6AR-FSE (ENGINE CONTROL)>SFI SYSTEM>P003012
- HINT:
-
Although the DTC titles say O2 sensor, these DTCs relate to the air fuel ratio sensor.
| DTC No. | Detection Item | DTC Detection Condition | Trouble Area | MIL | Memory | Note |
|---|---|---|---|---|---|---|
| P21951D | A/F (O2) Sensor Signal Biased/Stuck Lean Bank 1 Sensor 1 Circuit Current Out of Range | While the fuel-cut operation is performed (during vehicle deceleration), the air fuel ratio sensor current is 2.2 mA or higher for 3 seconds or more (2 trip detection logic). | ·
Open or short in air fuel ratio sensor (sensor 1) circuit ·
Air fuel ratio sensor (sensor 1) ·
Intake system ·
Gas leak from exhaust system ·
Fuel pressure (for low pressure side) ·
Fuel pressure (for high pressure side) ·
Port fuel injector assembly ·
Direct fuel injector assembly ·
Fuel system ·
EGR valve assembly ·
ECM |
Comes on | DTC stored | SAE Code:
P2195 |
| P219523 | A/F (O2) Sensor Signal Biased/Stuck Lean Bank 1 Sensor 1 Signal Stuck Low | Both of the following conditions are met for 5 seconds or more (2 trip detection logic):
1.
Air fuel ratio sensor voltage is higher than 3.8 V. 2.
Heated oxygen sensor voltage is 0.21 V or higher. |
·
Open or short in air fuel ratio sensor (sensor 1) circuit ·
Air fuel ratio sensor (sensor 1) ·
Intake system ·
Gas leak from exhaust system ·
Fuel pressure (for low pressure side) ·
Fuel pressure (for high pressure side) ·
Port fuel injector assembly ·
Direct fuel injector assembly ·
Fuel system ·
EGR valve assembly ·
ECM |
Comes on | DTC stored | SAE Code:
P2195 |
| P21961D | A/F (O2) Sensor Signal Biased/Stuck Rich Bank 1 Sensor 1 Circuit Current Out of Range | While the fuel-cut operation is performed (during vehicle deceleration), the air fuel ratio sensor current is less than 0.47 mA for 3 seconds or more (2 trip detection logic). | ·
Open or short in air fuel ratio sensor (sensor 1) circuit ·
Air fuel ratio sensor (sensor 1) ·
Intake system ·
Gas leak from exhaust system ·
Fuel pressure (for low pressure side) ·
Fuel pressure (for high pressure side) ·
Port fuel injector assembly ·
Direct fuel injector assembly ·
Fuel system ·
EGR valve assembly ·
ECM |
Comes on | DTC stored | SAE Code:
P2196 |
| P219624 | A/F (O2) Sensor Signal Biased/Stuck Rich Bank 1 Sensor 1 Signal Stuck High | Both of the following conditions are met for 5 seconds or more (2 trip detection logic):
1.
Air fuel ratio sensor voltage is less than 2.8 V. 2.
Heated oxygen sensor voltage is less than 0.69 V. |
·
Open or short in air fuel ratio sensor (sensor 1) circuit ·
Air fuel ratio sensor (sensor 1) ·
Intake system ·
Gas leak from exhaust system ·
Fuel pressure (for low pressure side) ·
Fuel pressure (for high pressure side) ·
Port fuel injector assembly ·
Direct fuel injector assembly ·
Fuel system ·
EGR valve assembly ·
ECM |
Comes on | DTC stored | SAE Code:
P2196 |
- HINT:
- ·
When any of these DTCs are stored, check the air fuel ratio sensor voltage output by entering the following menus on the GTS: Powertrain / Engine / Data List / A/F (O2) Sensor Voltage B1S1.
·Short-term fuel trim values can also be read using the GTS.
·The ECM regulates the voltages at the A1A+ and A1A- terminals of the ECM to a constant level. Therefore, the air fuel ratio sensor voltage output cannot be confirmed without using the GTS.
·If an air fuel ratio sensor malfunction is detected, the ECM will store a DTC.
MONITOR DESCRIPTION
- Sensor Voltage Detection Monitor
-
Under air fuel ratio feedback control, If the air fuel ratio sensor output voltage is less than 2.8 V (very rich condition) for 5 seconds despite the heated oxygen sensor output voltage being less than 0.69 V, the ECM stores DTC P219624. Alternatively, if the air fuel ratio sensor output voltage is higher than 3.8 V (very lean condition) for 5 seconds despite the heated oxygen sensor output voltage being 0.21 V or higher, DTC P219523 is stored.
- Sensor Current Detection Monitor
-
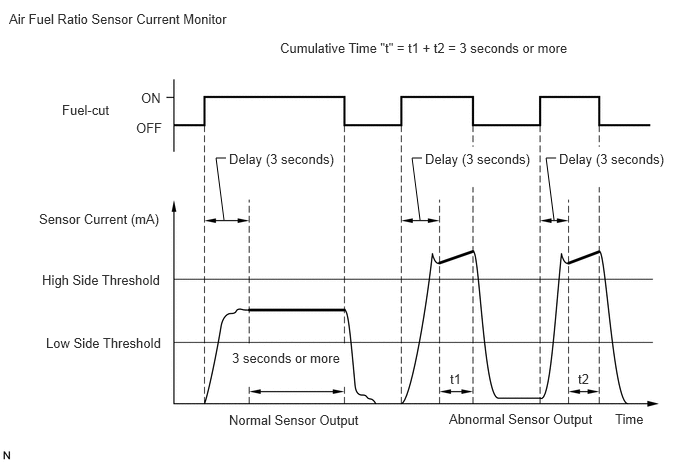
A rich air fuel mixture causes a low air fuel ratio sensor current, and a lean air fuel mixture causes a high air fuel ratio sensor current. Therefore, the sensor output becomes low during acceleration, and it becomes high during deceleration with the throttle valve fully closed. The ECM monitors the air fuel ratio sensor current during fuel-cut and detects any abnormal current values.
-
If the air fuel ratio sensor output is 2.2 mA or higher for 3 seconds or more of cumulative time, the ECM interprets this as a malfunction in the air fuel ratio sensor and stores DTC P21951D (stuck on high side). If the air fuel ratio sensor output is less than 0.47 mA for 3 seconds or more of cumulative time, the ECM stores DTC P21961D (stuck on low side).
MONITOR STRATEGY
| Required Sensors/Components (Main) | Air fuel ratio sensor |
| Required Sensors/Components (Related) | Heated oxygen sensor |
| Frequency of Operation | Continuous: Sensor voltage detection monitor
Once per driving cycle: Sensor current detection monitor |
| Duration | 3 seconds: Sensor current detection monitor
5 seconds: Sensor voltage detection monitor |
TYPICAL ENABLING CONDITIONS
| Time after engine start | 30 seconds or more |
| Battery voltage | 11 V or higher |
| Air fuel ratio sensor status | Activated |
| Fuel system status | Closed-loop |
| Battery voltage | 11 V or higher |
| Engine coolant temperature | 75°C (167°F) or higher |
| Atmospheric pressure | 76 kPa(abs) [11 psi(abs)] or higher |
| Air fuel ratio sensor status | Activated |
| Continuous time of fuel-cut | 3 seconds or more, and less than 10 seconds |
TYPICAL MALFUNCTION THRESHOLDS
| Heated oxygen sensor voltage | 0.21 V or higher |
| Air fuel ratio sensor voltage | Higher than 3.8 V |
| Heated oxygen sensor voltage | Less than 0.69 V |
| Air fuel ratio sensor voltage | Less than 2.8 V |
| Air fuel ratio sensor current | 2.2 mA or higher |
| Air fuel ratio sensor current | Less than 0.47 mA |
CONFIRMATION DRIVING PATTERN
Connect the GTS to the DLC3.
Turn the engine switch on (IG).
Turn the GTS on.
Clear the DTCs (even if no DTCs are stored, perform the clear DTC procedure).
Turn the engine switch off and wait for at least 30 seconds.
Turn the engine switch on (IG).
Turn the GTS on.
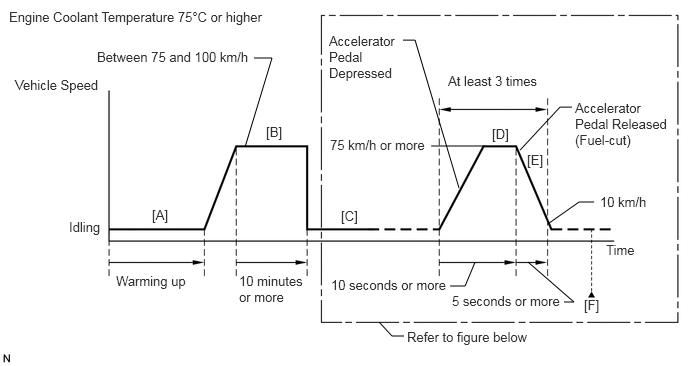
Start the engine and warm it up until the engine coolant temperature reaches 75°C (167°F) or higher [A].
Drive the vehicle at a speed between 75 and 100 km/h (47 and 62 mph) for at least 10 minutes [B].
- CAUTION:
-
When performing the confirmation driving pattern, obey all speed limits and traffic laws.
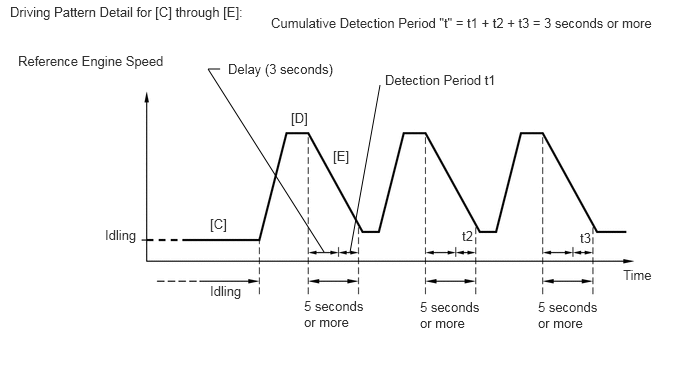
With shift state S selected [C], accelerate the vehicle to 75 km/h (47 mph) or more by depressing the accelerator pedal for at least 10 seconds [D].
- CAUTION:
-
When performing the confirmation driving pattern, obey all speed limits and traffic laws.
Soon after performing step [D] above, release the accelerator pedal for at least 5 seconds without depressing the brake pedal in order to execute fuel-cut control [E].
Allow the vehicle to decelerate until the vehicle speed decreases to less than 10 km/h (6 mph).
Repeat steps [C] through [E] above at least 3 times in one driving cycle.
Enter the following menus: Powertrain / Engine / Trouble Codes [F].
Read the pending DTCs.
- HINT:
- ·
If a pending DTC is output, the system is malfunctioning.
·If a pending DTC is not output, perform the following procedure.
Enter the following menus: Powertrain / Engine / Utility / All Readiness.
Input the DTC: P21951D, P219523, P21961D or P219624.
Check the DTC judgment result.
| GTS Display | Description |
|---|---|
| NORMAL | ·
DTC judgment completed ·
System normal |
| ABNORMAL | ·
DTC judgment completed ·
System abnormal |
| INCOMPLETE | ·
DTC judgment not completed ·
Perform driving pattern after confirming DTC enabling conditions |
- HINT:
- ·
If the judgment result shows NORMAL, the system is normal.
·If the judgment result shows ABNORMAL, the system has a malfunction.
·If the judgment result shows INCOMPLETE, perform steps [B] through [F] again.
WIRING DIAGRAM
Refer to DTC P003012.
Click hereEngine / Hybrid System>6AR-FSE (ENGINE CONTROL)>SFI SYSTEM>P003012
CAUTION / NOTICE / HINT
- NOTICE:
-
Inspect the fuses for circuits related to this system before performing the following procedure.
- HINT:
- ·
Sensor 1 refers to the sensor closest to the engine assembly.
·Sensor 2 refers to the sensor farthest away from the engine assembly.
·A low air fuel ratio sensor voltage could be caused by a rich air fuel mixture. Check for conditions that would cause the engine to run rich.
·A high air fuel ratio sensor voltage could be caused by a lean air fuel mixture. Check for conditions that would cause the engine to run lean.
·Read Freeze Frame Data using the GTS. The ECM records vehicle and driving condition information as Freeze Frame Data the moment a DTC is stored. When troubleshooting, Freeze Frame Data can help determine if the vehicle was moving or stationary, if the engine was warmed up or not, if the air fuel ratio was lean or rich, and other data from the time the malfunction occurred.
PROCEDURE
Connect the GTS to the DLC3.
Turn the engine switch on (IG).
Turn the GTS on.
Enter the following menus: Powertrain / Engine / Trouble Codes.
Read the DTCs.
- Powertrain > Engine > Trouble Codes
- 50001 372
- Result:
Result Proceed to DTC P21951D, P219523, P21961D or P219624 is output A DTC P21951D, P219523, P21961D or P219624 and P013613, P013617 or P01361C are output DTC P21951D, P219523, P21961D or P219624 and other DTCs are output B
- HINT:
-
If any DTCs relating to the air fuel ratio sensor (DTCs for the air fuel ratio sensor heater or air fuel ratio sensor admittance) are output, troubleshoot those DTCs first.
A
B
Has the vehicle run out of fuel in the past?
- Result:
Proceed to YES NO
YES
NO
Connect the GTS to the DLC3.
Turn the engine switch on (IG).
Turn the GTS on.
Clear the DTC.
- Powertrain > Engine > Clear DTCs
- 50002 372
Turn the engine switch off and wait for at least 30 seconds.
- Result:
Proceed to NEXT
NEXT
Drive the vehicle in accordance with the driving pattern described in Confirmation Driving Pattern.
Enter the following menus: Powertrain / Engine / Utility / All Readiness.
- Powertrain > Engine > Utility
-
Tester Display All Readiness - 50005 372 20
Input the DTC: P21951D, P219523, P21961D or P219624.
Check the DTC judgment.
- Result:
Result Proceed to NORMAL
(DTCs are not output)A ABNORMAL
(DTC P21951D, P219523, P21961D or P219624 is output)B
A
B
Connect the GTS to the DLC3.
Turn the engine switch on (IG).
Turn the GTS on.
Clear the DTC.
- Powertrain > Engine > Clear DTCs
- 50002 372
Turn the engine switch off and wait for at least 30 seconds.
- Result:
Proceed to NEXT
NEXT
Connect the GTS to the DLC3.
Start the engine.
Turn the GTS on.
Enter the following menus: Powertrain / Engine / Data List / A/F (O2) Sensor Current B1S1.
- Powertrain > Engine > Data List
-
Tester Display A/F (O2) Sensor Current B1S1 - 50003 372 230
Check the test value of the air fuel ratio sensor output current during fuel-cut, referring to the Driving Pattern Detail for [C] through [E] in Confirmation Driving Pattern.
- HINT:
- ·
To measure the air fuel ratio sensor current precisely, perform the fuel-cut operation as long as possible.
·If it is difficult to measure the air fuel ratio sensor current, use the snapshot function of the GTS.
- Result:
Test Value Proceed to Within normal range
(0.47 mA or higher, and less than 2.2 mA)A Outside normal range
(less than 0.47 mA, or 2.2 mA or higher)B
A
B
Connect the GTS to the DLC3.
Turn the engine switch on (IG).
Turn the GTS on.
Start the engine and warm it up until the engine coolant temperature reaches 75°C (167°F) or higher.
Warm up the sensors at an engine speed of 2500 rpm for 90 seconds.
Enter the following menus: Powertrain / Engine / Active Test / Control the Injection Volume for A/F Sensor / Data List / Coolant Temperature, A/F (O2) Sensor Voltage B1S1 and O2 Sensor Voltage B1S2.
- Powertrain > Engine > Active Test
-
Active Test Display Control the Injection Volume for A/F Sensor -
Data List Display Coolant Temperature A/F (O2) Sensor Voltage B1S1 O2 Sensor Voltage B1S2 - 50004 372 8 205,225,218
Perform the Control the Injection Volume for A/F Sensor operation with the engine idling.
Monitor the voltage outputs of the air fuel ratio sensor and the heated oxygen sensor (A/F (O2) Sensor Voltage B1S1 and O2 Sensor Voltage B1S2) displayed on the GTS.
- HINT:
- ·
The Active Test "Control the Injection Volume for A/F Sensor" can be used to lower the fuel injection volume by 12.5% or increase the injection volume by 12.5%.
·The air fuel ratio sensor has an output delay of a few seconds and the heated oxygen sensor has a maximum output delay of approximately 20 seconds.
·If the sensor output voltage does not change (almost no reaction) while performing the Active Test, the sensor may be malfunctioning.
| GTS Display (Sensor) | Injection Volume | Status | Voltage |
|---|---|---|---|
| A/F (O2) Sensor Voltage B1S1
(Air fuel ratio sensor) |
12.5% | Rich | Below 3.1 V |
| -12.5% | Lean | Higher than 3.4 V | |
| O2 Sensor Voltage B1S2
(Heated oxygen sensor) |
12.5% | Rich | Higher than 0.55 V |
| -12.5% | Lean | Below 0.4 V |
- Result:
Status of A/F (O2) Sensor Voltage B1S1 Status of O2 Sensor Voltage B1S2 Air Fuel Ratio Condition and Air Fuel Ratio Sensor Condition Proceed to Lean Lean Actual air fuel ratio lean A Rich Rich Actual air fuel ratio rich Lean Lean/Rich Air fuel ratio sensor malfunction B Rich Lean/Rich Air fuel ratio sensor malfunction Lean/Rich Lean/Rich Normal C
Lean: During Control the Injection Volume for A/F Sensor, the air fuel ratio sensor output voltage (A/F (O2) Sensor Voltage B1S1) is consistently higher than 3.4 V, and the heated oxygen sensor output voltage (O2 Sensor Voltage B1S2) is consistently below 0.4 V.
Rich: During Control the Injection Volume for A/F Sensor, the A/F (O2) Sensor Voltage B1S1 is consistently below 3.1 V, and the O2 Sensor Voltage B1S2 is consistently higher than 0.55 V.
Lean/Rich: During Control the Injection Volume for A/F Sensor of the Active Test, the output voltage of the air fuel ratio sensor or heated oxygen sensor alternates correctly.
- HINT:
-
Refer to "Data List / Active Test" [A/F (O2) Sensor Voltage B1S1 and O2 Sensor Voltage B1S2].
-
Click hereEngine / Hybrid System>6AR-FSE (ENGINE CONTROL)>SFI SYSTEM>DATA LIST / ACTIVE TEST
A
B
C
Check the intake system for vacuum leaks.
Click hereEngine / Hybrid System>6AR-FSE (INTAKE / EXHAUST)>INTAKE SYSTEM>ON-VEHICLE INSPECTION
- OK:
No leaks in the intake system.
- HINT:
-
Perform "Inspection After Repair" after repairing or replacing the intake system.
-
Click hereEngine / Hybrid System>6AR-FSE (ENGINE CONTROL)>SFI SYSTEM>INITIALIZATION
- Result:
Proceed to OK NG
OK
NG
Check for exhaust gas leaks.
- OK:
No gas leaks in exhaust system.
- HINT:
-
Perform "Inspection After Repair" after repairing or replacing the exhaust system.
-
Click hereEngine / Hybrid System>6AR-FSE (ENGINE CONTROL)>SFI SYSTEM>INITIALIZATION
- Result:
Proceed to OK NG
OK
NG
Connect the GTS to the DLC3.
Turn the engine switch on (IG).
Turn the GTS on.
Start the engine and warm it up until the engine coolant temperature reaches 75°C (167°F) or higher.
- HINT:
-
The A/C switch and all accessory switches should be off.
Enter the following menus: Powertrain / Engine / Active Test / Control the EGR Step Position / Data List / Engine Speed, Intake Manifold Absolute Pressure and Coolant Temperature.
- Powertrain > Engine > Active Test
-
Active Test Display Control the EGR Step Position -
Data List Display Engine Speed Intake Manifold Absolute Pressure Coolant Temperature - 50004 372 25 211,385,205
Check the engine idling condition and Intake Manifold Absolute Pressure values in the Data List while performing the Active Test.
- NOTICE:
- ·
Do not leave the EGR valve open for 10 seconds or more during the Active Test.
·Be sure to return the EGR valve to step 0 when the Active Test is completed.
·Do not open the EGR valve 30 steps or more during the Active Test.
- OK:
The value of Intake Manifold Absolute Pressure and Engine Speed change in response to EGR step position.
- Standard:
- Control the EGR Step Position (Active Test) 0 Steps 0 to 30 Steps Idling condition Steady idling Idling changes from steady to rough idling or engine stalls Intake Manifold Absolute Pressure
(Data List)Intake Manifold Absolute Pressure value is 20 to 40 kPa(abs)
(2.9 to 5.8 psi(abs))
(EGR valve is fully closed)Intake Manifold Absolute Pressure value is at least +10 kPa (1.45 psi) higher than when EGR valve is fully closed
- HINT:
-
During Active Test, if the idling condition does not change in response to EGR step position, then there is probably a malfunction in the EGR valve.
- Result:
Proceed to OK NG
OK
NG
Remove the EGR valve assembly.
Click hereEngine / Hybrid System>6AR-FSE (EMISSION CONTROL)>EGR VALVE>REMOVAL
Check if the EGR valve is stuck open.
- OK:
EGR valve is tightly closed.
- HINT:
-
Perform "Inspection After Repair" after replacing the EGR valve assembly.
-
Click hereEngine / Hybrid System>6AR-FSE (ENGINE CONTROL)>SFI SYSTEM>INITIALIZATION
- Result:
Proceed to OK NG
OK
NG
Check the fuel pressure (for low pressure side).
Click hereEngine / Hybrid System>6AR-FSE (FUEL)>FUEL SYSTEM>ON-VEHICLE INSPECTION
- Result:
Proceed to OK NG
OK
NG
Inspect the port fuel injector assembly (whether fuel volume is high or low, and whether injection pattern is poor).
Click hereEngine / Hybrid System>6AR-FSE (FUEL)>FUEL INJECTOR (for Port Injection)>INSPECTION
- HINT:
-
Perform "Inspection After Repair" after replacing the port fuel injector assembly.
-
Click hereEngine / Hybrid System>6AR-FSE (ENGINE CONTROL)>SFI SYSTEM>INITIALIZATION
- Result:
Proceed to OK NG
OK
NG
Connect the GTS to the DLC3.
Start the engine and warm it up until the engine coolant temperature is 75°C (167°F) or higher with all the accessories switched off.
Turn the GTS on.
Enter the following menus: Powertrain / Engine / Data List / Engine Speed, Coolant Temperature, Fuel Pressure (High) and Injection Mode.
- Powertrain > Engine > Data List
-
Tester Display Engine Speed Coolant Temperature Fuel Pressure (High) Injection Mode - 50003 372 211,205,265,294
According to the display on the GTS, read the Data List.
- Standard:
GTS Display Condition Specified Condition Fuel Pressure (High) ·Shift position: P
·A/C: Off
·Engine warmed up
·Engine Speed: 3000 rpm
·Injection Mode: Direct
2000 to 20000 kPa
- Result:
Proceed to OK NG
OK
NG
Inspect the direct fuel injector assembly.
Click hereEngine / Hybrid System>6AR-FSE (FUEL)>FUEL INJECTOR (for Direct Injection)>INSPECTION
- HINT:
-
Perform "Inspection After Repair" after replacing the direct fuel injector assembly.
-
Click hereEngine / Hybrid System>6AR-FSE (ENGINE CONTROL)>SFI SYSTEM>INITIALIZATION
- Result:
Proceed to OK NG
OK
NG
Replace the air fuel ratio sensor.
Click hereEngine / Hybrid System>6AR-FSE (ENGINE CONTROL)>AIR FUEL RATIO SENSOR>REMOVAL
- HINT:
-
Perform "Inspection After Repair" after replacing the air fuel ratio sensor.
-
Click hereEngine / Hybrid System>6AR-FSE (ENGINE CONTROL)>SFI SYSTEM>INITIALIZATION
- Result:
Proceed to NEXT
NEXT
Connect the GTS to the DLC3.
Turn the engine switch on (IG).
Turn the GTS on.
Clear the DTCs.
- Powertrain > Engine > Clear DTCs
- 50002 372
Turn the engine switch off and wait for at least 30 seconds.
- Result:
Proceed to NEXT
NEXT
Drive the vehicle in accordance with the driving pattern described in Confirmation Driving Pattern.
Enter the following menus: Powertrain / Engine / Utility / All Readiness.
- Powertrain > Engine > Utility
-
Tester Display All Readiness - 50005 372 20
Input the DTC: P21951D, P219523, P21961D or P219624.
Check the DTC judgment result.
- Result:
Result Proceed to NORMAL
(DTCs are not output)A ABNORMAL
(DTC P21951D, P219523, P21961D or P219624 is output)B
A
B
Connect the GTS to the DLC3.
Turn the engine switch on (IG).
Turn the GTS on.
Start the engine and warm it up until the engine coolant temperature reaches 75°C (167°F) or higher.
- HINT:
-
The A/C switch and all accessory switches should be off.
Enter the following menus: Powertrain / Engine / Active Test / Control the EGR Step Position / Data List / Engine Speed, Intake Manifold Absolute Pressure and Coolant Temperature.
- Powertrain > Engine > Active Test
-
Active Test Display Control the EGR Step Position -
Data List Display Engine Speed Intake Manifold Absolute Pressure Coolant Temperature - 50004 372 25 211,385,205
Check the engine idling condition and Intake Manifold Absolute Pressure values in the Data List while performing the Active Test.
- NOTICE:
- ·
Do not leave the EGR valve open for 10 seconds or more during the Active Test.
·Be sure to return the EGR valve to step 0 when the Active Test is completed.
·Do not open the EGR valve 30 steps or more during the Active Test.
- OK:
The value of Intake Manifold Absolute Pressure and Engine Speed change in response to EGR step position.
- Standard:
- Control the EGR Step Position (Active Test) 0 Steps 0 to 30 Steps Idling condition Steady idling Idling changes from steady to rough idling or engine stalls Intake Manifold Absolute Pressure
(Data List)Intake Manifold Absolute Pressure value is 20 to 40 kPa(abs)
(2.9 to 5.8 psi(abs))
(EGR valve is fully closed)Intake Manifold Absolute Pressure value is at least +10 kPa (1.45 psi) higher than when EGR valve is fully closed
- HINT:
-
During Active Test, if the idling condition does not change in response to EGR step position, then there is probably a malfunction in the EGR valve.
- Result:
Proceed to OK NG
OK
NG
Inspect the fuel pump (for low pressure side).
- HINT:
-
Perform "Inspection After Repair" after replacing the fuel pump (for low pressure side).
-
Click hereEngine / Hybrid System>6AR-FSE (ENGINE CONTROL)>SFI SYSTEM>INITIALIZATION
- Result:
Proceed to OK NG
OK
NG
Remove the EGR valve assembly.
Click hereEngine / Hybrid System>6AR-FSE (EMISSION CONTROL)>EGR VALVE>REMOVAL
Check if the EGR valve is stuck open.
- OK:
EGR valve is tightly closed.
- HINT:
-
Perform "Inspection After Repair" after replacing the EGR valve assembly.
-
Click hereEngine / Hybrid System>6AR-FSE (ENGINE CONTROL)>SFI SYSTEM>INITIALIZATION
- Result:
Proceed to OK NG
OK
NG
Replace the air fuel ratio sensor.
Click hereEngine / Hybrid System>6AR-FSE (ENGINE CONTROL)>AIR FUEL RATIO SENSOR>REMOVAL
- HINT:
-
Perform "Inspection After Repair" after replacing the air fuel ratio sensor.
-
Click hereEngine / Hybrid System>6AR-FSE (ENGINE CONTROL)>SFI SYSTEM>INITIALIZATION
- Result:
Proceed to NEXT
NEXT
Connect the GTS to the DLC3.
Turn the engine switch on (IG).
Turn the GTS on.
Clear the DTCs.
- Powertrain > Engine > Clear DTCs
- 50002 372
Turn the engine switch off and wait for at least 30 seconds.
- Result:
Proceed to NEXT
NEXT
Drive the vehicle in accordance with the driving pattern described in Confirmation Driving Pattern.
Enter the following menus: Powertrain / Engine / Utility / All Readiness.
- Powertrain > Engine > Utility
-
Tester Display All Readiness - 50005 372 20
Input the DTC: P21951D, P219523, P21961D or P219624.
Check the DTC judgment result.
- Result:
Result Proceed to NORMAL
(DTCs are not output)A ABNORMAL
(DTC P21951D, P219523, P21961D or P219624 is output)B
A
B