M20A-FKS ENGINE MECHANICAL CAMSHAFT REMOVAL
CAUTION / NOTICE / HINT
The necessary procedures (adjustment, calibration, initialization, or registration) that must be performed after parts are removed and installed, or replaced during camshaft removal/installation are shown below.
| Replaced Part or Performed Procedure | Necessary Procedure | Effect/Inoperative Function when Necessary Procedure not Performed | Link |
|---|---|---|---|
|
*1: w/ Smart Entry and Start System *2: w/o Smart Entry and Start System |
|||
| Battery terminal is disconnected/reconnected | Perform steering sensor zero point calibration | Lane Tracing Assist System | ( ) |
| Pre-collision system | |||
| Memorize steering angle neutral point | Parking assist monitor system | ()
|
|
| Panoramic View Monitor System | ()
|
||
| Replacement of ECM | Perform Vehicle Identification Number (VIN) or frame number registration | MIL comes on | ()
|
| Perform code registration (Immobiliser system) | Engine start function | See Service Bulletin for the registration method | |
·
Gas leak from exhaust system is repaired ·
Replacement of throttle body with motor assembly ·
Replacement of cam timing control motor with EDU assembly ·
Removal and installation of a cam timing control motor with EDU assembly ·
Replacement of camshaft timing gear assembly ·
Removal and installation of a camshaft timing gear assembly ·
Replacement of camshaft (for intake or exhaust camshaft) ·
Replacement of camshaft timing exhaust gear assembly ·
Replacement of fuel pump assembly (for high pressure side) ·
Replacement of ignition coil assembly ·
Replacement of EGR valve assembly ·
Replacement of air fuel ratio sensor (sensor 2) |
Inspection After Repair | ·
Poor idle, etc. ·
Engine start function, etc. |
()
|
| Replacement of continuously variable transaxle assembly | ·
Input transaxle compensation code into TCM ·
Perform reset memory ·
Deceleration sensor zero point calibration ·
CVT oil pressure calibration ·
Perform road test to allow TCM to learn |
·
Large shift shock ·
Deterioration of fuel efficiency |
()
for Initialization ( )
for Registration |
| Replacement of ECM | ·
Perform reset memory ·
Perform road test to allow TCM to learn |
||
| Replacement of ECM*1 | Perform code registration (Immobiliser function) | ·
Wireless door lock control system ·
Smart Entry and Start System (for Entry Function) ·
Smart Entry and Start System (for Start Function) ·
Steering lock function |
See Service Bulletin for the registration method |
| Replacement of ECM*2 | Perform code registration (Immobiliser system) | ·
Wireless Door Lock Control System ·
Engine start |
See Service Bulletin for the registration method |
| Replacement of CVT fluid | ATF thermal degradation estimate reset | The value of the Data List item "ATF Thermal Degradation Estimate" is not estimated correctly | ()
|
| Replacement of front bumper assembly | Front television camera view adjustment | Panoramic view monitor system | ()
for Initialization ( )
for Calibration |
| Suspension, tires, etc.
(The vehicle height changes because of suspension or tire replacement) |
·
Television camera controller initialization ·
Adjust steering angle ·
Rear television camera assembly optical axis (Back camera position setting) |
||
| Rear television camera assembly optical axis (Back camera position setting) | Parking assist monitor system | ()
for Initialization ( )
for Calibration |
|
| Perform headlight ECU sub-assembly LH initialization | Lighting system (EXT) (w/ Automatic Headlight Beam Level Control System) | ()
|
|
·
Measure ultrasonic sensor detection angle ·
Ultrasonic sensor detection angle registration |
Parking Support Brake System | ()
|
|
| Front wheel alignment adjustment | ·
Perform "Reset Memory" ·
Perform acceleration sensor zero point calibration and system information memorization |
·
VSC disabled or malfunctioning ·
DTCs are output ·
Slip indicator light illuminated ·
ABS warning light illuminated |
()
|
| Replacement of front bumper assembly | ·
Measure ultrasonic sensor detection angle ·
Ultrasonic sensor detection angle registration |
Parking Support Brake System | ()
|
- NOTICE:
-
This procedure includes the removal of small-head bolts. Refer to Small-Head Bolts of Basic Repair Hint to identify the small-head bolts.
-
Click hereGeneral>INTRODUCTION>REPAIR INSTRUCTION>PRECAUTION
PROCEDURE

 1.INSTALL ENGINE ASSEMBLY TO ENGINE STAND
2.REMOVE ENGINE HANGERS
23100X
3.REMOVE FUEL(ENGINE ROOM SIDE) PUMP ASSEMBLY (for High Pressure)
29300
4.REMOVE VACUUM PUMP ASSEMBLY
for M20 Series Engine, BOSCH Made:
Click hereBrake>BRAKE SYSTEM (OTHER)>VACUUM PUMP (for M20 Series Engine, BOSCH Made)>REMOVAL
for M20 Series Engine, except BOSCH Made:
Click hereBrake>BRAKE SYSTEM (OTHER)>VACUUM PUMP (for M20 Series Engine, except BOSCH Made)>REMOVAL
19500
5.REMOVE IGNITION COIL ASSEMBLY
11102A
6.REMOVE CAMSHAFT POSITION SENSOR (for Intake Side)
11102A
7.REMOVE CAMSHAFT POSITION SENSOR (for Exhaust Side)
15370
8.REMOVE CAM TIMING OIL CONTROL SOLENOID ASSEMBLY
135A0B
9.REMOVE CAMSHAFT TIMING VALVE ASSEMBLY
13090D
10.REMOVE CAM TIMING CONTROL MOTOR WITH EDU ASSEMBLY
13090E
11.REMOVE CAM TIMING CONTROL MOTOR O-RING
11201
12.REMOVE CYLINDER HEAD COVER SUB-ASSEMBLY
11193
13.REMOVE SPARK PLUG TUBE GASKET
23477
14.REMOVE FUEL PUMP LIFTER GUIDE
15.SET NO. 1 CYLINDER TO TDC (COMPRESSION)
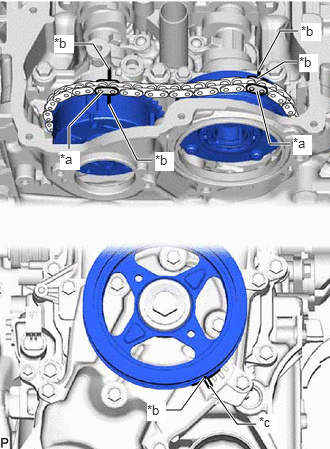
| *a | Paint Mark |
| *b | Timing Mark |
| *c | "0" Timing Mark |
Turn the crankshaft clockwise to align the timing mark (cutout) on the crankshaft pulley assembly with the "0" timing mark on the No. 2 timing chain cover assembly.
Check that the timing marks are positioned as shown in the illustration.
- HINT:
-
If the timing marks are not positioned as shown in the illustration, turn the crankshaft clockwise and then align them again.
Place paint marks on the chain sub-assembly at points aligned with the timing marks on the camshaft timing gear assembly and camshaft timing exhaust gear assembly.
16.REMOVE STRAIGHT SCREW PLUG
17.REMOVE CAMSHAFT
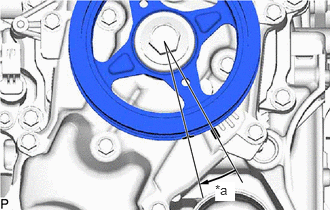
| *a | Approximately 15° |
Rotate the crankshaft approximately 15° clockwise.
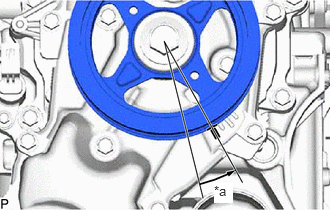
| *a | Approximately 15° |
Rotate the crankshaft approximately 15° counterclockwise.
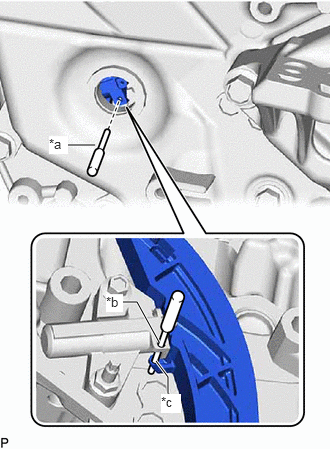
| *a | Pin |
| *b | Pin Hole (No. 1 Chain Tensioner Assembly Side) |
| *c | Pin Hole (Chain Tensioner Slipper Side) |
Align the pin hole of the No. 1 chain tensioner assembly with the pin hole of the chain tensioner slipper, and then insert the pin.
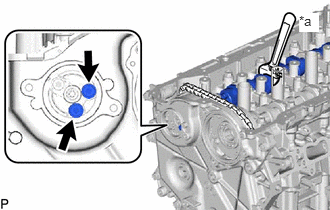
| *a | Hold |
Using the hexagonal portion of the exhaust camshaft sub-assembly, secure the exhaust camshaft sub-assembly.
- NOTICE:
-
Do not damage the camshaft housing sub-assembly, cylinder head sub-assembly and spark plug tube.
Using a 5 mm hexagon socket wrench, remove the 2 bolts from the camshaft timing exhaust gear assembly.
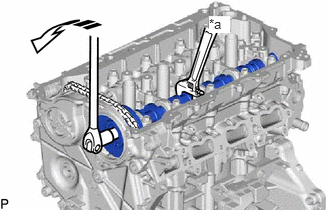
| *a | Hold |

|
Turn |
Using the hexagonal portion of the intake camshaft sub-assembly, secure the intake camshaft sub-assembly.
- NOTICE:
- ·
Do not damage the camshaft housing sub-assembly, cylinder head sub-assembly and spark plug tube.
·Do not disassemble the camshaft timing gear assembly.
Using a 10 mm bi-hexagon socket wrench, remove the bolt from the camshaft timing gear assembly.
Using the hexagonal portion of the exhaust camshaft sub-assembly, loosen and hold the chain sub-assembly while moving the exhaust camshaft sub-assembly in the direction shown in the illustration.
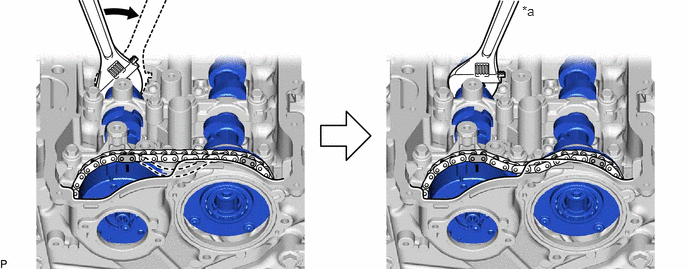
| *a | Hold | - | - |

|
Turn | - | - |
Move the camshaft timing gear assembly together with the camshaft timing exhaust gear assembly and chain sub-assembly toward the No. 2 timing chain cover assembly as shown in the illustration.
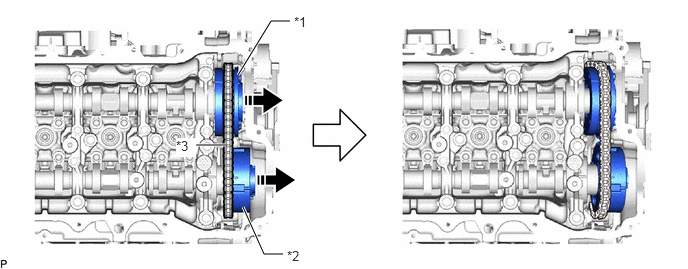
| *1 | Camshaft Timing Gear Assembly | *2 | Camshaft Timing Exhaust Gear Assembly |
| *3 | Chain Sub-assembly | - | - |
|
|
Remove in this Direction | - | - |
Remove the camshaft timing exhaust gear assembly from the chain sub-assembly.
Remove the camshaft timing gear assembly from the chain sub-assembly.
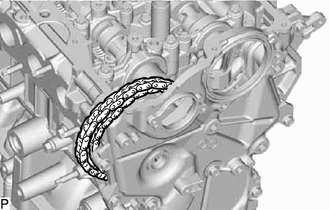
Secure the chain sub-assembly to the vehicle using rope, etc.
- NOTICE:
-
Do not drop the chain sub-assembly into the timing chain cover assembly.
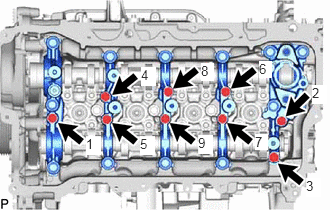
Uniformly loosen and remove the 9 bolts in the order shown in the illustration.
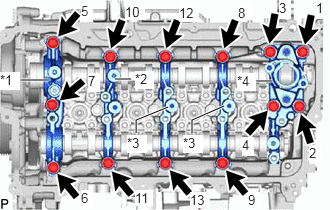
| *1 | No. 1 Camshaft Bearing Cap |
| *2 | No. 2 Camshaft Bearing Cap |
| *3 | No. 3 Camshaft Bearing Cap |
| *4 | No. 4 Camshaft Bearing Cap |
Uniformly loosen and remove the 13 bolts in the order shown in the illustration.
- NOTICE:
-
Uniformly loosen the bolts while holding the camshaft horizontally.
Remove the No. 1 camshaft bearing cap, No. 2 camshaft bearing cap, 2 No. 3 camshaft bearing caps and No. 4 camshaft bearing cap.
- HINT:
-
Arrange the removed parts so that they can be reinstalled in their original locations.
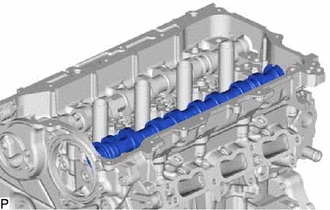
Remove the intake camshaft sub-assembly from the camshaft housing sub-assembly.
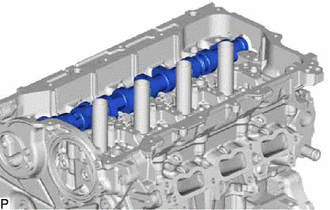
Remove the exhaust camshaft sub-assembly from the camshaft housing sub-assembly.