A25A-FKS INTAKE / EXHAUST EXHAUST MANIFOLD INSTALLATION
PROCEDURE

 17168
1.INSTALL NO. 2 EXHAUST MANIFOLD HEAT INSULATOR
Type A
Install the No. 2 exhaust manifold heat insulator to the exhaust manifold (TWC: Front Catalyst) with the 6 bolts.
- Torque:
- 11 N*m (112 kgf*cm, 8 ft.*lbf)
Type B
Install the No. 2 exhaust manifold heat insulator to the exhaust manifold (TWC: Front Catalyst) with the 3 bolts.
- Torque:
- 11 N*m (112 kgf*cm, 8 ft.*lbf)
17141
2.INSTALL EXHAUST MANIFOLD (TWC: Front Catalyst)
Install a new exhaust manifold to head gasket to the cylinder head sub-assembly.
Temporarily install the exhaust manifold (TWC: Front Catalyst), No. 1 upper front floor heat insulator and No. 1 exhaust manifold heat insulator.
- HINT:
-
At this time, do not install the parts with bolts or nuts.
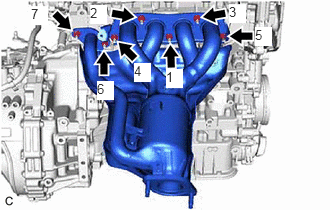
Using a 12 mm deep socket wrench, temporarily install the exhaust manifold (TWC: Front Catalyst) to the cylinder head sub-assembly with 7 new nuts.
Using the 12 mm deep socket wrench, tighten the 7 nuts in the order shown in the illustration.
- Torque:
- 26 N*m (265 kgf*cm, 19 ft.*lbf)
17118
3.INSTALL MANIFOLD STAY
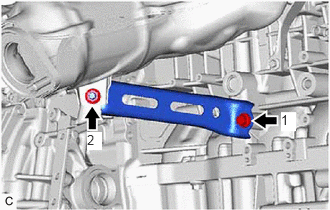
Temporarily install the manifold stay to the exhaust manifold (TWC: Front Catalyst) and cylinder block sub-assembly with the bolt and nut.
Tighten the bolt and nut in the order shown in the illustration.
- Torque:
- 43 N*m (438 kgf*cm, 32 ft.*lbf)
17167
4.INSTALL NO. 1 EXHAUST MANIFOLD HEAT INSULATOR
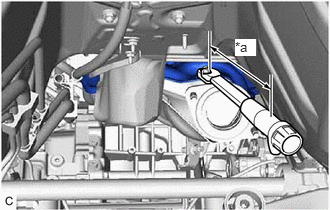
| *a | Torque Wrench Fulcrum Length |
Type A
Using a 10 mm union nut wrench, install the No. 1 exhaust manifold heat insulator to the exhaust manifold (TWC: Front Catalyst) with the 5 bolts.
- Torque:
- Specified tightening torque : 10 N*m (102 kgf*cm, 7 ft.*lbf)
- HINT:
- ·
Calculate the torque wrench reading when changing the fulcrum length of the torque wrench.
Click hereGeneral>INTRODUCTION>REPAIR INSTRUCTION>PRECAUTION
·When using a 10 mm union nut wrench (fulcrum length of 22 mm (0.866 in.)) + torque wrench (fulcrum length of 162 mm (6.38 in.)): 8.8 N*m (90 kgf*cm, 78 in.*lbf)
Type B
Install the No. 1 exhaust manifold heat insulator to the exhaust manifold (TWC: Front Catalyst) with the 3 bolts.
- Torque:
- 10 N*m (102 kgf*cm, 7 ft.*lbf)
58151
5.INSTALL NO. 1 UPPER FRONT FLOOR HEAT INSULATOR
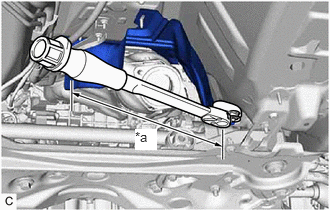
| *a | Torque Wrench Fulcrum Length |
Using a 10 mm union nut wrench, install the No. 1 upper front floor heat insulator to the vehicle body with the 2 nuts.
- Torque:
- Specified tightening torque : 4.9 N*m (50 kgf*cm, 43 in.*lbf)
- HINT:
- ·
Calculate the torque wrench reading when changing the fulcrum length of the torque wrench.
Click hereGeneral>INTRODUCTION>REPAIR INSTRUCTION>PRECAUTION
·When using a 10 mm union nut wrench (fulcrum length of 22 mm (0.866 in.)) + torque wrench (fulcrum length of 162 mm (6.38 in.)): 4.3 N*m (44 kgf*cm, 38 in.*lbf)
6.INSTALL WIRE HARNESS CLAMP BRACKET
Install the wire harness clamp bracket with the bolt.
- Torque:
- 13 N*m (133 kgf*cm, 10 ft.*lbf)
89467B
7.INSTALL AIR FUEL RATIO SENSOR (for Sensor 1)
53607A
8.INSTALL FRONT CENTER UPPER SUSPENSION BRACE SUB-ASSEMBLY (for LHD)
53607A
9.INSTALL FRONT CENTER UPPER SUSPENSION BRACE SUB-ASSEMBLY (for RHD)
55708
10.INSTALL COWL TOP VENTILATOR LOUVER SUB-ASSEMBLY
58152A
11.INSTALL FRONT LOWER NO. 1 FLOOR HEAT INSULATOR
17410
12.INSTALL FRONT EXHAUST PIPE ASSEMBLY (TWC: Rear Catalyst)
Install 2 new gaskets to the front exhaust pipe assembly (TWC: Rear Catalyst).
Connect the front exhaust pipe assembly (TWC: Rear Catalyst) to the 2 exhaust pipe supports.
Install the front exhaust pipe assembly (TWC: Rear Catalyst) to the exhaust manifold (TWC: Front Catalyst) and center exhaust pipe assembly with 2 new bolts and 2 new nuts.
- Torque:
- 43 N*m (438 kgf*cm, 32 ft.*lbf)
Connect the air fuel ratio sensor (for sensor 2) connector.
Engage the wire harness clamp.
57523A
13.INSTALL CENTER FLOOR CROSSMEMBER BRACE
57533B
14.INSTALL FRONT CENTER FLOOR BRACE
58166A
15.INSTALL FRONT FLOOR COVER LH
58165C
16.INSTALL FRONT FLOOR COVER RH
17.INSPECT FOR EXHAUST GAS LEAK
18.INSTALL NO. 2 ENGINE UNDER COVER ASSEMBLY (w/ Cover)
51441
19.INSTALL NO. 1 ENGINE UNDER COVER
53852K
20.INSTALL FRONT WHEEL OPENING EXTENSION PAD LH
53851M
21.INSTALL FRONT WHEEL OPENING EXTENSION PAD RH