N04C-UH ENGINE CONTROL ECD SYSTEM Rough Idling or Excessive Engine Vibrations
DESCRIPTION
| Malfunction Condition | Main Trouble Areas | Related Trouble Areas |
|---|---|---|
·
Rough idling or shuddering due to abnormal combustion ·
Shuddering when vehicle starting due to clutch system malfunctions |
1.
Injector malfunctions -
Injector assembly sliding malfunction -
Injector assembly stuck closed -
Injector assembly stuck open -
Deposit in injector assembly -
Injector assembly circuit malfunction 2.
Clutch system malfunctions -
Clutch system (shuddering when starting) |
·
Injector compensation code ·
Fuel leak ·
Engine mounting insulator ·
Intake air system leak ·
Intake air system blockage ·
EGR system ·
Throttle valve system ·
Injection or supply pump assembly ·
Pressure limiter (built into common rail assembly) ·
Fuel pressure sensor (built into common rail assembly) ·
Injector driver assembly (P0200 set simultaneously) ·
Low quality fuel ·
Vehicle modifications ·
Fuel filter air bleed problem ·
Accessory problem (A/C, generator, etc.) ·
ECM |
- HINT:
- ·
Rough idling and excessive engine vibrations are checked in this troubleshooting procedure.
·Specified values in the following troubleshooting flowchart are for reference only. Variations in the Data List result values may occur depending on the measuring conditions or the vehicle's age. Do not judge the vehicle to be normal even when the Data List values indicate a standard level. There are possibly some concealed factors of the malfunction.
·Check that the vehicle has not been modified in any way prior to the vehicle inspection.
CAUTION / NOTICE / HINT
- NOTICE:
- ·
After replacing the ECM, the new ECM needs registration (Click here Engine / Hybrid System>N04C-UH (ENGINE CONTROL)>ECD SYSTEM>REGISTRATION) and initialization (Click here Engine / Hybrid System>N04C-UH (ENGINE CONTROL)>ECD SYSTEM>INITIALIZATION).
·After replacing the injection or supply pump assembly, the ECM needs initialization (Click here Engine / Hybrid System>N04C-UH (ENGINE CONTROL)>ECD SYSTEM>INITIALIZATION).
·After replacing the injector assembly, the ECM needs registration (Click here Engine / Hybrid System>N04C-UH (ENGINE CONTROL)>ECD SYSTEM>REGISTRATION).
- HINT:
-
Before troubleshooting, conduct the following:
- 1.
Check the fuel quality.
2.Check the fuel for air.
3.Check the fuel system for blockages.
4.Check the air filter.
5.Check the engine oil.
6.Check the engine coolant.
7.Check the engine idling speed and the maximum engine speed.
8.Check the vacuum pump.
PROCEDURE
Check the harness and connector connections of the common rail system components.
- HINT:
-
Check the following components and systems:
- ·
Sensors
·Injection or supply pump assembly
·Common rail assembly
·Injector assemblies
·Injector driver assembly
·Turbocharger system
·Intake and exhaust system
- OK:
The wire harnesses and connectors are connected securely.
- Result:
Proceed to OK NG
OK
NG
- HINT:
-
Drive the vehicle according to the driving pattern below to allow the ECM to set DTCs relating to malfunctions of the fuel system, EGR system and throttle valve. If DTCs are set, problem areas can be identified.
Enter Check Mode (Click here Engine / Hybrid System>N04C-UH (ENGINE CONTROL)>ECD SYSTEM>CHECK MODE PROCEDURE).
Fully warm up the engine.
Allow the engine to idle for 5 minutes or more.
Drive the vehicle at more than 40 km/h (25 mph) for 1 minute or more (Procedure "A").
Decelerate and stop the vehicle (Procedure "B").
Repeat steps "A" (See procedure "A") and "B" (See procedure "B") 4 times or more.
Stop the engine and wait for at least 10 seconds (Procedure "C").
Repeat steps "A" (See procedure "A") and "C" (See procedure "C") described above (to set DTCs relating to the EGR system and throttle valve).
Drive the vehicle at more than 70 km/h (43 mph) for at least 1 minute (to set DTCs relating to the injection or supply pump assembly).
- Result:
Proceed to NEXT
NEXT
Enter the following menus: Powertrain / Engine and ECT / DTC.
Read the DTCs.
- Result:
Result Proceed to No DTCs A Engine related DTCs B
A
B
- HINT:
-
By performing this Active Test, the engine speed is maintained at 2000 rpm and the common rail internal fuel pressure is raised to the maximum operating pressure. As a result, a fuel leak check can be conducted while retaining the high common rail pressure.
Connect the intelligent tester to the DLC3.
Start the engine.
Turn the tester on.
Enter the following menus: Powertrain / Engine and ECT / Active Test / Test the Fuel Leak.
Visually check the injection or supply pump assembly, injector assembly, and fuel line located between the injection or supply pump assembly and common rail assembly for fuel leaks and fuel pressure leaks. Also, perform the same check on the fuel line between the common rail assembly and the injector assembly.
- HINT:
-
Visually check the injection or supply pump assembly, injector assembly, and fuel line located between the injection or supply pump assembly and common rail assembly for fuel leaks and fuel pressure leaks. Also, perform the same check on the fuel line between the common rail assembly and the injector assembly.
- OK:
No fuel leak.
- Result:
Proceed to OK NG
OK
NG
Connect the intelligent tester to the DLC3.
Start the engine and warm it up.
Turn the tester on.
Enter the following menus: Powertrain / Engine and ECT / Data List.
Enter the following menus in order and read the values.
MAP
MAF
Fuel Press
- Standard:
Item Engine Speed * Standard Range Description MAP Ignition switch ON (engine stopped) Same as atmospheric pressure Intake manifold internal pressure detected by manifold absolute pressure sensor Idling 90 to 100 kPa (675 to 750 mmHg, 26.58 to 29.53 in.Hg) 3000 rpm (no engine load) 110 to 140 kPa (825 to 1050 mmHg, 32.48 to 41.34 in.Hg) MAF Ignition switch ON (engine stopped) Less than 0.89 gm/s Intake air volume detected by mass air flow meter sub-assembly Idling 5 to 20 gm/s 3000 rpm (no engine load) 70 to 90 gm/s Fuel Press Idling 25000 to 35000 kPa Common rail assembly internal fuel pressure
- HINT:
-
*: The A/C switch and all accessory switches should be off, and the engine should be fully warmed up.
- Result:
Item Result Proceed to MAP, MAF and Fuel press Standard range A MAP and MAF Outside standard range B Only MAP Outside standard range C Only MAF Outside standard range D Only Fuel Press Outside standard range E
A
B
C
D
E
Enter the following menus in order and read the values.
Injection Feedback Val #1, #2, #3, and #4
Injection Volume
- Standard:
Item Engine Speed* Standard Range Description Injection Feedback Val #1 Idling -7.0 to 7.0 mm3/st Value of injector fuel injection volume compensates for differences in combustion condition of cylinders
·Positive values indicate control which corrects combustion degradation
·Negative values indicate control which corrects excessive combustion pressure
·If problems exist, "Injection Feedback Val" may deviate from the -7.0 and 7.0 mm3/st range
Injection Feedback Val #2 Idling -7.0 to 7.0 mm3/st Injection Feedback Val #3 Idling -7.0 to 7.0 mm3/st Injection Feedback Val #4 Idling -7.0 to 7.0 mm3/st Injection Volume Idling 5.0 to 16.0 mm3/st Fuel injection volume value controlled by ECU
·Controls NE signal, fuel temperature, engine coolant temperature, intake air temperature, manifold absolute pressure, atmospheric pressure, and EGR volume.
·If problems exist, "Injection Volume" may be outside the standard range
- Result:
Result Proceed to Standard range A Injection Feedback Val #1 to #4 and/or Injection Volume outside standard range B
- HINT:
-
*: The A/C switch and all accessory switches should be off, and the engine should be fully warmed up.
A
B
Read the injector compensation code (Click here Engine / Hybrid System>N04C-UH (ENGINE CONTROL)>ECD SYSTEM>PRECAUTION).
- HINT:
-
If the injector compensation code is not correctly registered, it may cause malfunctions (Click here Engine / Hybrid System>N04C-UH (ENGINE CONTROL)>ECD SYSTEM>REGISTRATION).
Check the injector compensation code.
- OK:
Compensation code of the installed injector assembly is same as the code registered in the ECM.
- Result:
Proceed to OK NG
OK
NG
Disconnect the cable from the negative (-) battery terminal for at least 2 minutes.
Reconnect the cable to the negative (-) battery terminal.
Check whether the malfunction has been successfully repaired by performing a driving test.
- OK:
Malfunction has been repaired successfully.
- Result:
Proceed to OK NG
OK
NG
Visually check that the engine mounting insulator is installed correctly and is not crooked or twisted.
- OK:
No abnormalities.
- Result:
Proceed to OK NG
OK
NG
Check for air leaks and blockage between the air cleaner and turbocharger sub-assembly.
Check for air leaks and blockage between the turbocharger sub-assembly and intake manifold.
- OK:
No air leaks or blockage.
- Result:
Proceed to OK NG
OK
NG
Inspect the exhaust retarder assembly.
- Result:
Proceed to OK NG
OK
NG
Check the EGR valve assembly (Click here Engine / Hybrid System>N04C-UH (EMISSION CONTROL)>EGR VALVE>REMOVAL).
- Result:
Proceed to OK NG
OK
NG
Inspect the diesel throttle body assembly (Click here Engine / Hybrid System>N04C-UH (ENGINE CONTROL)>DIESEL THROTTLE BODY>ON-VEHICLE INSPECTION).
- Result:
Proceed to OK NG
OK
NG
Follow the instructions in the table below according to the check result of the intelligent tester.
- HINT:
-
This operation is based on the premise that the common rail pressure is normal.
- Standard:
Item Engine Speed*1 Reference Value Injection Feedback Val #1 to #4 Idling -7.0 to 7.0 mm3/st Injection Volume Idling 5.0 to 16.0 mm3/st
- HINT:
-
*1: The A/C switch and all accessory switches should be off, and the engine should be fully warmed up.
| Injection Feedback Val #1 to #4 | Injection volume | ||
|---|---|---|---|
| Less than 5.0 mm3/st | Between 5.0 and 23.0 mm3/st (Normal) | More than 23.0 mm3/st | |
| 7.0 mm3/st or more, -7.0 mm3/st or less | A | B | B |
| Between -7.0 and 7.0 mm3/st | - | Normal | C*2 |
- Result:
Proceed to Inspection Areas Descriptions A Inspect and repair cylinder injector with revised injection volume of less than -7.0 mm3/st:
·Perform power balance inspection and identify malfunctioning cylinder
·Replace malfunctioning cylinder injector
Abnormal value cylinder injector injects excessively large quantity of fuel B Identify malfunctioning cylinders by conducting power balance inspection:
·Perform power balance inspection to identify malfunctioning cylinders
·Clean malfunctioning cylinder injector, then check and repair it
Abnormal value cylinder injector injects excessively large quantity of fuel
·Fuel injection volume too low due to injector nozzle being blocked by deposits
·Abnormal value cylinder injector compression decreases
·Abnormal value cylinder injector injects excessively large quantity of fuel
C Inspect and repair all cylinder injectors:
Clean all cylinder injectors, inspect, and repair themAll cylinder injectors inject excessively small quantity of fuel:
Fuel injection volume too low due to all cylinder injector nozzles being blocked by deposits
- HINT:
-
*2: When the Injection Volume displayed on the intelligent tester is large despite the Fuel Press and Injection Feedback Val #1 to #4 in the Data List being normal, the injector assembly may be clogged. In this case, there may be deposits inside or outside the tip of the injector assembly.
- ·
Despite the injector assembly functioning normally, the indicated Injection Feedback Val #1 to #4 value may be outside the normal operating range due to compensation for other problems (such as low compression).
·Injection Feedback Val #1 to #4 is the value used to correct the fuel injection volumes of each cylinder, in order to optimize (compensate for the unevenness between) all the cylinder combustion conditions. If any of the cylinders malfunction, the fuel injection volumes for the normal cylinders are corrected simultaneously. As a result, the Injection Feedback Val #1 to #4 may deviate from the standard range.
A
B
C
- HINT:
-
Use this Active Test to determine the malfunctioning cylinder.
Connect the intelligent tester to the DLC3.
Start the engine.
Turn the tester on.
Enter the following menus: Powertrain / Engine and ECT / Active Test / Control the Cylinder #1 to #4 Fuel Cut.
- HINT:
- ·
If the engine idle speed does not change when a fuel injector assembly is disabled, the cylinder being tested is malfunctioning.
·If the cylinder being tested is normal, there will be a significant change in idle speed when the fuel injection is stopped for that cylinder.
- Result:
Proceed to NEXT
NEXT
- HINT:
-
Use this Active Test to determine the malfunctioning cylinder.
Connect the intelligent tester to the DLC3.
Start the engine.
Turn the tester on.
Enter the following menus: Powertrain / Engine and ECT / Active Test / Control the Cylinder #1 to #4 Fuel Cut.
- HINT:
- ·
If the engine idle speed does not change when a fuel injector assembly is disabled, the cylinder being tested is malfunctioning.
·If the cylinder being tested is normal, there will be a significant change in idle speed when the fuel injection is stopped for that cylinder.
- Result:
Proceed to NEXT
NEXT
Check the cylinder compression pressure (Click here Engine / Hybrid System>N04C-UH (ENGINE MECHANICAL)>ENGINE>ON-VEHICLE INSPECTION)
- Result:
Proceed to OK NG
OK
NG
- HINT:
-
If an injector assembly is contaminated with deposits, the fuel injection volume deviates from the standard range. This may cause malfunctions.
Check the injector assembly for any deposits.
- Result:
Result Proceed to Deposits A No deposits B
A
B
Wipe away deposits from the tips of the injectors.
- HINT:
- ·
Solvent or carbon removal agents help remove deposits easily.
·Exercise extreme care not to damage the injector assemblies while wiping off the deposits.
- Result:
Proceed to NEXT
NEXT
Reinstall the injector assembly to the cylinder head.
Connect the intelligent tester to the DLC3.
Turn the ignition switch to ON.
Turn the tester on.
Start the engine and warm it up.
Enter the following menus: Powertrain / Engine and ECT / Data List.
Enter the following menus in order and read the values.
Injection Feedback Val #1, #2, #3, and #4
Injection Volume
- Standard:
Item Engine Speed* Reference Value Injection Feedback Val #1 to #4 Idling -7.0 to 7.0 mm3/st Injection Volume Idling 5.0 to 16.0 mm3/st
- HINT:
-
*: The A/C switch and all accessory switches should be off, and the engine should be fully warmed up. When the values are outside the standard range, deposits inside the injector assembly may be causing the problem.
- OK:
Values are within the standard range.
- Result:
Proceed to OK NG
OK
NG
- HINT:
-
If an injector assembly is contaminated with deposits, the fuel injection volume deviates from the standard range. This may cause malfunctions.
Check the injector assembly for any deposits.
- Result:
Result Proceed to Deposits A No deposits B
A
B
Wipe away deposits from the tips of the injector assembly.
- HINT:
- ·
Solvent or carbon removal agents help remove deposits easily.
·Exercise extreme care not to damage the injector assemblies while wiping off the deposits.
- Result:
Proceed to NEXT
NEXT
Reinstall the injector assembly to the cylinder head.
Connect the intelligent tester to the DLC3.
Turn the ignition switch to ON.
Turn the tester on.
Start the engine and warm it up.
Turn the tester on.
Enter the following menus: Powertrain / Engine and ECT / Data List.
Enter the following menus in order and read the values.
Injection Feedback Val #1, #2, #3, and #4
Injection Volume
- Standard:
Item Engine Speed* Reference Value Injection Feedback Val #1 to #4 Idling -7.0 to 7.0 mm3/st Injection Volume Idling 5.0 to 16.0 mm3/st
- HINT:
-
*: The A/C switch and all accessory switches should be off, and the engine should be fully warmed up. When the values are outside the standard range, deposits inside the injector assembly may be causing the problem.
- OK:
Values are within the standard range.
- Result:
Proceed to OK NG
OK
NG
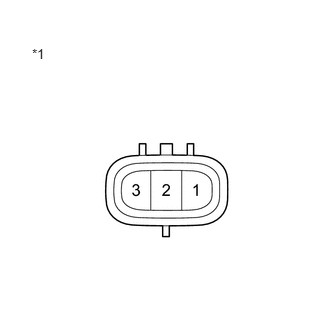
Disconnect the fuel pressure sensor connector.
Measure the resistance according to the value(s) in the table below.
- Standard Resistance:
Tester Connection Condition Specified Condition 3 - 2 20°C (68°F) 16.4 kΩ or less 2 - 1 20°C (68°F) 3 kΩ or less
| *1 | Component without harness connected
(Fuel Pressure Sensor) |
Reconnect the fuel pressure sensor connector.
- Result:
Proceed to OK NG
OK
NG
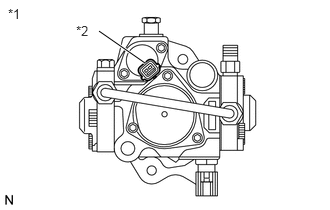
Disconnect the suction control valve connector.
Measure the resistance between the suction control valve terminals.
- Standard Resistance:
Tester Connection Condition Specified Condition 1 - 2 20°C (68°F) 1.9 to 2.3 Ω
| *1 | Component without harness connected
(Injection or Supply Pump Assembly) |
| *2 | Suction Control Valve |
Reconnect the suction control valve connector.
- Result:
Proceed to OK NG
OK
NG